Monthly Archives: July 2012

Minor progress on my F-22 RC flyer…

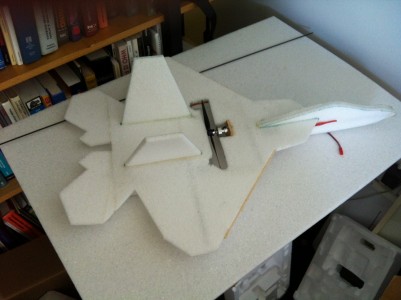
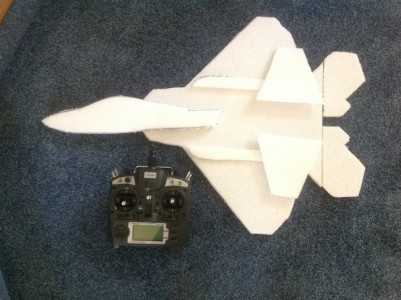
Okay, I haven’t made a lot of headway, but I did at least print out the pattern for my F-22 and cut the pieces for it. It’s literally the very first time I’ve done this, so the pieces aren’t perfect, but they aren’t bad. Witness:

The foam pieces for my F-22, with the radio transmitter to give some sense of scale.

I basically made the patterns by printing out the pieces, taping them together and then cutting out each individual piece. I then held them down and traced each piece with a wide point sharpy onto the foam, and then cut them pretty much freehand with an exacto knife, trying to cut pretty much all of the black off. It mostly worked okay, but the cellular nature of the foam made for some slight rough divets, and I found the first knife I used was actually a bit dull, which is a no-no. Switching it to a new blade helped, and the main body deck (which I cut last) was pretty good.

It’s some progress. I’ll think about it a bit more, and then figure out what else I need to do. I know I need to put in some carbon fiber rods across the body to stiffen it. I’ll have to review some of the online help to figure out what the best order to do things is. It also appears that Mark’s version has some kind of internal stiffening between the two identical body parts, not sure though, I’ll have to check it out.

Okay, off to vacuum up the styrofoam bits…

ArduinoSudoku – sudoku on arduino

Just a quickie Arduino project that I ran across this morning: Sudoku on the Arduino. It’s pretty cute, since it uses the Arduino tvout library to generate video, meaning that you can display and play on your TV set. Neat! The only real description of the project is inside the zip file which you can find on the following Google Project host, but it’s pretty good at describing both the theory and implementation. I haven’t downloaded and tried it myself yet, but maybe this weekend.

SudokuUsingTVout.zip – mysudoku – ArduinoSudoku – sudoku on arduino – Google Project Hosting

My first tentative steps into RC: a scratchbuilt F-22 Raptor in foam…

Do I really need another hobby? Sigh. Oh well, it appears that whether I need one or not, I’ve taken my first tentative steps into the world of radio controlled airplanes, and I have Mark H. of the Eastbay RC blog to blame. Mark is a fellow Pixarian, and has lately been sucked into the world of model aircraft, building both autonomous UAVs as well as more conventional aircraft. I first started talking to him about this stuff through our interest in the Arduino, but he’s got me interested in scratch building my first RC aircraft.

To entice me (and to serve as a model for copying) Mark left his version of the F-22 Raptor in my care:

Mark’s scratchbuilt F-22 Raptor, in EPP Foam

The design comes from this posting on rcgroups.com, and seems pretty straightforward. But I’m so inexperienced with this stuff, I was a little bit intimidated, so I spent most of the weekend staring at the plans, and digging up further resources. The page above listed this nice vimeo video:


which is also available in four parts on YouTube (glad to find, so I could watch it on my Apple TV on the big screen TV):


When I start working on mine, I’ll post more pictures and information. I did stop by Harbor Freight and picked up some X-acto knives and one of the Dremel-tool-knockoffs, and I picked up a Turnigy 9X transmitter-receiver pair. Stay tuned for more soon!

Ultimate QRSS kit arrives…

I have an on-again, off-again love affair with beacons. I spent many a day monitoring QRSS beacons on 30m, and have built a series of different beacon transmitters. Most of my work has been inspired by Hans Summers, G0UPL, so when I found he was selling something called the Ultimate QRSS kit for a mere $20 U.S., I decided I had to have one. I ordered it a bit back, and was beginning to wonder if I should shoot him an email, but yesterday some overseas mail was on my doorstep, and it had arrived!

The Ultimate QRSS kit is cool for a couple of reasons: first, it includes an LCD display and two button interface. It supports a wide variety of modes, including QRSS, Hellschrieber and WSPR. And, from my perspective the most cool feature: it can time and frequency lock with a GPS source to stay on frequency and will autosynchronize time and gridsquare. For this purpose, not all GPSes are considered equal: you’d like to have one with a 1PPS (one pulse per second) output. Luckily, I have an old Garmin 18 LVC lying around, which will fit the bill nicely.

The kit is very simple, it’s basically his tried and true “LED as varicap” design, driving a power amplifier which consists of a 2N7000, generating perhaps 180mw. It should take me just an hour or two to assemble. Stay tuned.

About “Where are the Positive Hams? And How to Tell?”…

Steve, K9ZW wrote an interesting post on his blog: Where are the Positive Hams? And How to Tell? – Part I « With Varying Frequency – Amateur Radio Ponderings. I understand what he’s saying, and while I don’t think it’s wrong per se, I think my own opinions are somewhat at right angles to the ideas he expresses.

It is important to realize that there is no single activity which characterizes “real” ham radio. It’s a whole bunch of diverse activities linked by the need to be licensed to use amateur frequencies. Ham radio is public safety and contesting. Homebrewing and antennas. Repeaters and EME. Digital modes and morse. Voice and SSTV. And so on. No one mode or activity is any more “real” than any others. It’s up to us as individuals to become licensed and explore the areas which interest us. We seek out others with similar interests and perhaps greater expertise to help us enhance our own enjoyment of our hobby.

We should remember: it is a hobby. It’s not an obligation, a calling or a job.

Steve writes:

Seems that some of us in the hobby have become forgetful of the debt we owe our Elmers (Mentors) and our fellow hams who helped us learn more about this hobby.

And here’s the thing: I don’t believe that any such debt exists. The mentoring that we do in ham radio isn’t a burden, it’s just another facet of the diverse hobby. If someone doesn’t wish to be a mentor, there is no reason for them to be one, and that’s okay. If someone is a mentor, it can only be because they gain pleasure from doing it, and therefore no “debt” from student to mentor is “owed”. As a mentor, I gain pleasure from helping others learn, and more often than not, find my own understanding increasing as I explain stuff that I already “know”. I think it makes as much sense to talk about the debt that mentors owe to students, for taking the time to perpetuate the activities that we have found interesting and engaging, and providing a rich, growing community for greater exploration and enjoyment.

I also find this idea of “debt” to be a bit self-serving: the ham radio “elite” tell us that Elmers are important, so important that anyone it seems that anyone who doesn’t apprentice themselves to an Elmer can’t experience the “real” ham radio that they should. It’s nice to think so, because it places the newly licensed in a position where they need Elmers (and by Elmers, we mean “people like us”) and that perpetuates our own sense of importance. But it’s an unnatural distinction: mentors are students, and students can be mentors. There is no magic transition that occurs where the student becomes the master. Once we begin to think of ourselves as masters, it can become easy to think that we’ve arrived, and to stop challenging ourselves to learn and to achieve. Rather than finding mentors, we need to find people who are doing and sharing.

So, I think the question isn’t really finding “positive” hams, it’s finding hams who are doing interesting things, and who are willing to share their experiences with you to inspire you. Whether you can find those in your local area is a bit of a hit and miss prospect: some clubs are engaged, fun, vibrant communities. Others are stodgy, old boy networks that talk a lot but do little. Luckily, even if your local clubs are more the latter, the Internet provides a great resource to find these people. Through YouTube, websites and mailing lists, we can find the people who are both doing, and taking the time to share those experiences with you, even if they don’t know you personally.

I don’t worry about finding “positive hams”. I just ignore the negative ones, life is too short. Do what you like. Look around for people doing the things you like. Share what you like. The rest will work itself out.

We also have to recognize that ham radio (or the parts of ham radio we happen to love) isn’t for everyone. Steve wrote:

Look at the number of amateurs who somehow can’t even interest their own family in the hobby – what sad things is that saying?

This isn’t sad at all. People get to pick the hobbies which make them happy. Get some perspective!

What do you all think?

Notes on no-knead bread…

I have previously mentioned Jim Lahey’s no-knead bread (posts here and here and here. I’ve continued to make this at least once a week since those early days of experimentation. I thought I might include a few notes about how I’m makind and refining the process that I use.

My early loaves kind of reminded me of the experience I had when first taking drawing classes. When I first started drawing classes, my improvement was immediate and dramatic. Childish squiggles gave way to portraits which were at least recognizable. But after that initial rush, you become more discerning, more critical of your own work. It’s that way for this bread as well. Initially, it’s amazingly good. But then, you begin to notice a few things which are perhaps not as good as you imagined. After a few weeks of that, I decided to try to be somewhat more methodical in trying to figure out what I was doing right or wrong, which approaches yielded better results, or worse results, and try to refine the basic recipe into something that is repeatable.

The recipe is so simple (flour, salt, yeast and water) that simple experimentation wasn’t difficult. The most obvious thing to vary was the ratio of water to flour. Jim Lahey’s book suggests a 2:1 ratio by volume (three cups of flour to one and a half of water) but when I tried to do that, I didn’t get repeatable results. Sometimes, the dough would appear to be fairly dry and it was difficult to get the flour to integrate, other times, the dough would be wet, and the second “rise” would look more like a “relax”: the dough would spread out rather than rise up. “Real” bakers will tell you that you need to weigh your ingredients to get an accurate measure, so I went ahead and bought a simple mechanical food scale that I could use.

Okay, but what amounts to use? Three cups of flour doesn’t really have a consistent weight, but it probably weighs a little over 4.5 ounces per cup. That would make for 13.5 ounces for three cups. Water is easier: a cup and a half is 12 ounces. So, I started experimenting. To make things easy, I decided to keep the weight of flour constant, and only vary the amount of water to
try to find the appropriate hydration ratio. My early experiments were all with dry yeast (1/4 tsp) and one teaspoon of salt.

I was a bit surprised. I’m using slightly more flour than the recipe would normally recommend, but it turns out that 12 ounces of water was ample to hydrate the flour. In fact, it appeared that the final dough was too wet: it spread out a lot during the second rise, and the final loaf was quite flat. A few more trials over the next couple of weeks (I can only eat so much bread) revealed that decreasing the water to eleven ounces gave a nicer result.

So, here’s my first rule of thumb: weigh your ingredients, sixteen ounces of flour, eleven ounces of water seems good for basic bread.

Secondly, I was concerned that my oven wasn’t coming up to temperature. I purchased an oven thermometer, and verified my oven was having a difficult time getting even to 450 degrees. Even with 30 minutes of pre-heating, it seems to reach a maximum temperature of 430 degrees or so. By 45 minutes, it seems to be more or less at 450 degrees. If I do a long preheat, I end up with nicer deeper color on the crusts, and the bread seems nicer overall.

Second rule of thumb: don’t rush your preheat, especially if your oven might have a hard time getting that hot.

Third, the depth and crispiness of the crust seems to be dependent on the humidity in the Dutch oven. Some have suggested spraying the bread with water as it goes into the oven, and I’ve found that to be helpful. When I take the time to spritz the loaf, the loaf seems to expand a bit better, and the resulting crust forms more nicely (more tender). But when you remove the lid during cooking, it also appears to be helpful to let the oven vent for thirty seconds or so: if you are too quick, the humidity in the oven can remain high, and when you pull the loaf out at the end, you may still feel some wet steam. That prevents the “singing” crackling crust that you want.

Third rule: spritz it with water when it goes in, when you remove the lid for the last fifteen minutes, vent the oven pretty well.

Fourth rule: let the bread cool before you eat it. My wife loves it when it’s hot, but frankly, some of the starches inside still seem fairly gelatinous to me when you cut into it, and they need some time for the steam to redistribute water inside the loafs. Just like resting a steak, the bread will be better when it’s rested for a while. After an hour or two, I put the whole loaves into paper bags and store them in our bread box until they are ready to eat. I don’t recommend plastic for whole loaves, especially if the loaves are not completely cool: the residual steam condenses inside the plastic, and wrecks the crust. Once you’ve cut into the loaf, plastic might be useful to store the bread to keep it from drying out.

I’ve just begun experimenting with similar ratios for using sourdough. My first tests have been with the same amounts of flour and salt. Previously I would use one and a half cups of water and 1/4 cup of starter, but again, I found that to be a fairly wet dough, creating a fairly flat loaf. My current experiments have centered around the ratio that I found for my yeast loaves: I take 1/4 cup of starter, and add enough water to make eleven ounces. I’ve made this twice, and the resulting loaves are nice and round, but perhaps a bit dense, with fairly even but small bubbles inside the loaf. I think I’ll try to add a very small amount of additional water (11.5 ounces total weight) to compensate for the small amount of additional flour that is in the starter. More experimentation is clearly called for.

I also have begun to wonder if I’m “overrising” some of my dough. Leaving this dough for 24 hours may be too long. I like to make the dough when I get home after work, and then bake it the next day, meaning a full day for it to rise. I suspect that (especially for the bread made with commercial yeast) it may be better to cut that down to 18 hours or so (make the dough just before going to bed, but bake it when I get home from work). I’ll be experimenting some more over the next few weeks.

Anybody else having fun with this recipe? Any tips you might want to give this budding baker?
brainwagon.{org/com/net} lives!

WordPress › Error

There has been a critical error on this website.

Learn more about troubleshooting WordPress.