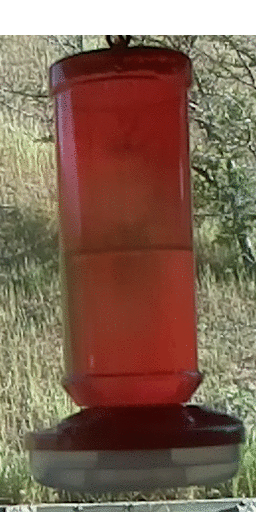
I imagine that some of you are getting bored with this, so I won’t post another 20 minutes of hummingbird video. But I will post a couple of things. For instance, I cut a frame from the videos at the beginning of the day and at the end of the day. You can clearly see the level of nectar in the feeder drop. They don’t seem to eat a lot.
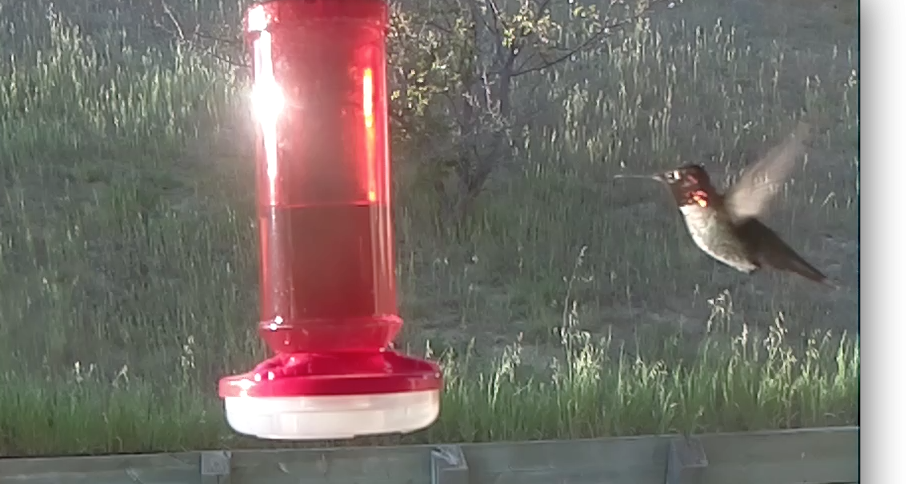
John wondered (quite rightly) whether I could get the camera positioned in a better position so I could get something other than the near silhouette images that I had yesterday. I’d have to move the camera outdoors, which means I’d have to make a better enclosure. But tonight the setting sun was fairly low and sidelit the birds in a couple of my late captures. Here is a late still frame…
Note: This post was adapted by an email that I sent out to our ham radio club.
If anyone is interested in a fun little ham radio related activitytonight, you can try to receive slow scan television from the International Space Station this weekend. I haven’t done this in a while,but I think I’ll give it a try and see what I can come up with.
The way I usually “work” these is to use one of my HTs. A better antenna than the stock one is usually good (a longer whip, or even a yagi) but you might just see what you can here with the stock antenna. The ISS transmits with 25 watts of power, which is usually pretty easy to hear. I have a set of earphones that I hook with a splitter. One half goes to my earbuds, the other to a small digital audio recorder I have. Turn the squelch on your radio off so you can here the signal when it is weak. You may find that moving your antenna round will help a bit, so monitor with your earphones. Don’t be shocked if you don’t hear the ISS right at the rise time: it has 3 minutes of dead time between transmissions, which take about 3 minutes to send. It sounds a bit like a ticking of a clock, with a whistle in between, if you click this link, you can hear what it sounds like:
I like to record the audio, then play it back into my Windows PC and use the MMSSTV program, but you can actually go completely low tech and try an inexpensive iphone app, held up to the speaker of your HT. I use
which works okay, not amazing. If you are out doors in a windy or noisy location, your image won’t be as good this way: the bg noise will cause interference.
To help out, I computed a set of rise/set/max elevation tables centered on San Francisco. If you live close, you can probably use these times. If you live in other parts of the country, you might try looking at the Heaven’s Above website. Select “Passes to include” to be all, and enter your location in the upper right. The table below was calculated by my own software.
--------------------------------------------------------------------------------
Rise time           Azi    Max Elev Time        Elev  Set time             Azi
--------------------------------------------------------------------------------
2015/04/11 16:24:33 178.90 2015/04/11 16:28:52   9.27 2015/04/11 16:33:10  74.10 (Local Time)
2015/04/11 23:24:34 178.90 2015/04/11 23:28:52   9.27 2015/04/11 23:33:11  74.10 (UTC)

2015/04/11 17:59:18 232.14 2015/04/11 18:04:47  76.70 2015/04/11 18:10:17  49.52 (Local Time) [1]
2015/04/12 00:59:18 232.14 2015/04/12 01:04:48  76.70 2015/04/12 01:10:17  49.52 (UTC)

2015/04/11 19:36:48 276.47 2015/04/11 19:41:38  13.93 2015/04/11 19:46:28  40.34 (Local Time)
2015/04/12 02:36:48 276.47 2015/04/12 02:41:38  13.93 2015/04/12 02:46:28  40.34 (UTC)

2015/04/11 21:15:06 309.66 2015/04/11 21:19:13   7.29 2015/04/11 21:23:21  47.92 (Local Time)
2015/04/12 04:15:06 309.66 2015/04/12 04:19:14   7.29 2015/04/12 04:23:21  47.92 (UTC)

2015/04/11 22:52:10 319.85 2015/04/11 22:56:52  12.34 2015/04/11 23:01:34  78.97 (Local Time) [2]
2015/04/12 05:52:10 319.85 2015/04/12 05:56:53  12.34 2015/04/12 06:01:35  78.97 (UTC)

2015/04/12 00:28:22 312.09 2015/04/12 00:33:48  58.58 2015/04/12 00:39:14 122.75 (Local Time) [3]
2015/04/12 07:28:22 312.09 2015/04/12 07:33:49  58.58 2015/04/12 07:39:15 122.75 (UTC)

2015/04/12 02:05:15 289.69 2015/04/12 02:09:49  11.95 2015/04/12 02:14:23 174.60 (Local Time)
2015/04/12 09:05:16 289.69 2015/04/12 09:09:50  11.95 2015/04/12 09:14:24 174.60 (UTC)

[1] Probably the easiest pass, the ISS passes almost straight overhead,
should be loud and easy.

[2] A low night time pass, but the ISS should be visible to the naked eye.

[3] Another night time pass, but too late for the ISS to catch any
sun. 58 degrees is a good pass, the second one.
If I get any good images, I’ll send them out next week.
Last week I was playing around with using “motion-mmal” to capture pictures of hummingbirds feeding at my feeder. That was fun, but if I wanted to get high resolution pictures, I could not get very high frame rates (maybe 2-5 fps at best). I thought that perhaps by writing my own capture application in C, perhaps I could do better. After all, the graphics processor in the Pi is capable of recording HD video and directly encode it as H264 video. There should be some way to use that hardware effectively, right?
As it turns out, there is.
As a tease, here is some of the video I captured yesterday:
It’s recorded at 1280×720 and 25fps (more on that later). It takes about 20% of the cpu available on one of my older Model B Raspberry Pi. The motion detection is done on the camera entirely in Python, and is a bit crufty, but works well enough to get some good video.
Warning: this code is presented as-is. If you aren’t a python programmer, you may not have the skills necessary to understand or use this code, but it is a good basic outline that spells out most of the parts you need. Feel free to adapt the code to your needs. If you redistribute it, it would be nice if you could give a nod to this code and my blog in some fashion, but I’m not going to be insulted if you don’t. And if you have any improvements, I’d love to hear about them.
def write_video(stream, fname):
# Write the entire content of the circular buffer to disk. No need to
# lock the stream here as we’re definitely not writing to it
# simultaneously
with io.open(fname, ‘wb’) as output:
for frame in stream.frames:
if frame.frame_type == picamera.PiVideoFrameType.sps_header:
stream.seek(frame.position)
break
while True:
buf = stream.read1()
if not buf:
break
output.write(buf)
# Wipe the circular stream once we’re done
stream.seek(0)
stream.truncate()
with picamera.PiCamera(framerate=fractions.Fraction(’30/1′)) as camera:
dir = "/var/tmp/capture"
camera.resolution = (1280, 720)
camera.framerate = fractions.Fraction(’30/1′)
camera.vflip = True
camera.hflip = True
camera.start_preview()
seconds = 5
stream = picamera.PiCameraCircularIO(camera,seconds=seconds, bitrate=8000000)
print "[ Buffer %s seconds/%d bytes ]" % (seconds, stream.size)
camera.start_recording(stream, format=’h264′, bitrate=8000000)
try:
while True:
camera.wait_recording(1)
if detect_motion(camera):
print "Dumping."
# generate a filename…
base = ‘cam_’+dt.datetime.now().strftime("%H%M%S")
part1 = os.path.join(dir, base+"-A.h264")
part2 = os.path.join(dir, base+"-B.h264")
camera.split_recording(part2)
write_video(stream, part1)
camera.wait_recording(15)
while detect_motion(camera):
camera.wait_recording(1)
camera.split_recording(stream)
with open("files.txt", "a") as f:
f.write("file %s\n" % part1)
f.write("file %s\n" % part2)
print "Dumped %s %s" % (part1, part2)
# Copy files to remote server
dst = ‘markv@conceptron.local:capture’
print "Copying %s to %s…" % (part1, dst)
rc = subprocess.check_call([‘scp’, ‘-p’, ‘-q’, part1, dst])
if rc != 0:
print "PROBLEM: (rc = %d)" % rc
else:
os.unlink(part1)
print "Copying %s to %s…" % (part2, dst)
rc = subprocess.check_call([‘scp’, ‘-p’, ‘-q’, part2, dst])
if rc != 0:
print "PROBLEM: (rc = %d)" % rc
else:
os.unlink(part2)
# ready to record some more…
camera.wait_recording(seconds)
finally:
camera.stop_recording()
[/sourcecode]
This would not be possible without the awesome picamera Python module and lots of careful engineering by the Raspberry Pi + Camera designers. They clearly foresaw this kind of possible application, and did everything that they needed to make it run efficiently and reasonably.
A few more short notes:
The motion detection code is terrible. It works after a fashion, but clearly could be tuned better.
To save space on my Pi, after capture it uploads each video file to one of my local servers, and then delete the file. I hardcoded it to use scp via subprocess. If you want to do something else, you can figure out what that might be and do it there. It won’t record new video while the scp is occurring: you could spawn a thread or some such to handle the copy and then dump back to the loop if you like.
You might want to write to a tmpfs file space, so it doesn’t eventually wear out your flash card with repeated writes and deletes, particularly if you can transmit these video files off as they are generated.
The picamera documentation is quite helpful. Indeed, it was my reading of that documentation which formed the basis of this initial script, which likely could not have been done (or not as easily) without them.
I will probably produce a tidier, better annotated version of this code and put it on github soon.
Hope this is of interest to some of you.
Addendum: If you want to see what the hardware looks like, you can see it here. Really just a cardboard box holding a pi, a powered hub, and the pi camera taped to the top, hung in the window.