I imagine that some of you are getting bored with this, so I won’t post another 20 minutes of hummingbird video. But I will post a couple of things. For instance, I cut a frame from the videos at the beginning of the day and at the end of the day. You can clearly see the level of nectar in the feeder drop. They don’t seem to eat a lot.
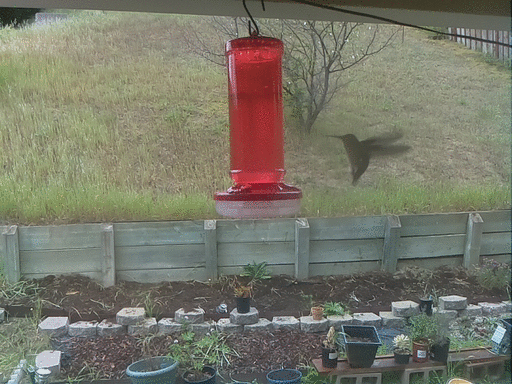
John wondered (quite rightly) whether I could get the camera positioned in a better position so I could get something other than the near silhouette images that I had yesterday. I’d have to move the camera outdoors, which means I’d have to make a better enclosure. But tonight the setting sun was fairly low and sidelit the birds in a couple of my late captures. Here is a late still frame…
Note: This post was adapted by an email that I sent out to our ham radio club.
If anyone is interested in a fun little ham radio related activitytonight, you can try to receive slow scan television from the International Space Station this weekend. I haven’t done this in a while,but I think I’ll give it a try and see what I can come up with.
The way I usually “work” these is to use one of my HTs. A better antenna than the stock one is usually good (a longer whip, or even a yagi) but you might just see what you can here with the stock antenna. The ISS transmits with 25 watts of power, which is usually pretty easy to hear. I have a set of earphones that I hook with a splitter. One half goes to my earbuds, the other to a small digital audio recorder I have. Turn the squelch on your radio off so you can here the signal when it is weak. You may find that moving your antenna round will help a bit, so monitor with your earphones. Don’t be shocked if you don’t hear the ISS right at the rise time: it has 3 minutes of dead time between transmissions, which take about 3 minutes to send. It sounds a bit like a ticking of a clock, with a whistle in between, if you click this link, you can hear what it sounds like:
I like to record the audio, then play it back into my Windows PC and use the MMSSTV program, but you can actually go completely low tech and try an inexpensive iphone app, held up to the speaker of your HT. I use
which works okay, not amazing. If you are out doors in a windy or noisy location, your image won’t be as good this way: the bg noise will cause interference.
To help out, I computed a set of rise/set/max elevation tables centered on San Francisco. If you live close, you can probably use these times. If you live in other parts of the country, you might try looking at the Heaven’s Above website. Select “Passes to include” to be all, and enter your location in the upper right. The table below was calculated by my own software.
--------------------------------------------------------------------------------
Rise time           Azi    Max Elev Time        Elev  Set time             Azi
--------------------------------------------------------------------------------
2015/04/11 16:24:33 178.90 2015/04/11 16:28:52   9.27 2015/04/11 16:33:10  74.10 (Local Time)
2015/04/11 23:24:34 178.90 2015/04/11 23:28:52   9.27 2015/04/11 23:33:11  74.10 (UTC)

2015/04/11 17:59:18 232.14 2015/04/11 18:04:47  76.70 2015/04/11 18:10:17  49.52 (Local Time) [1]
2015/04/12 00:59:18 232.14 2015/04/12 01:04:48  76.70 2015/04/12 01:10:17  49.52 (UTC)

2015/04/11 19:36:48 276.47 2015/04/11 19:41:38  13.93 2015/04/11 19:46:28  40.34 (Local Time)
2015/04/12 02:36:48 276.47 2015/04/12 02:41:38  13.93 2015/04/12 02:46:28  40.34 (UTC)

2015/04/11 21:15:06 309.66 2015/04/11 21:19:13   7.29 2015/04/11 21:23:21  47.92 (Local Time)
2015/04/12 04:15:06 309.66 2015/04/12 04:19:14   7.29 2015/04/12 04:23:21  47.92 (UTC)

2015/04/11 22:52:10 319.85 2015/04/11 22:56:52  12.34 2015/04/11 23:01:34  78.97 (Local Time) [2]
2015/04/12 05:52:10 319.85 2015/04/12 05:56:53  12.34 2015/04/12 06:01:35  78.97 (UTC)

2015/04/12 00:28:22 312.09 2015/04/12 00:33:48  58.58 2015/04/12 00:39:14 122.75 (Local Time) [3]
2015/04/12 07:28:22 312.09 2015/04/12 07:33:49  58.58 2015/04/12 07:39:15 122.75 (UTC)

2015/04/12 02:05:15 289.69 2015/04/12 02:09:49  11.95 2015/04/12 02:14:23 174.60 (Local Time)
2015/04/12 09:05:16 289.69 2015/04/12 09:09:50  11.95 2015/04/12 09:14:24 174.60 (UTC)

[1] Probably the easiest pass, the ISS passes almost straight overhead,
should be loud and easy.

[2] A low night time pass, but the ISS should be visible to the naked eye.

[3] Another night time pass, but too late for the ISS to catch any
sun. 58 degrees is a good pass, the second one.
If I get any good images, I’ll send them out next week.
Last week I was playing around with using “motion-mmal” to capture pictures of hummingbirds feeding at my feeder. That was fun, but if I wanted to get high resolution pictures, I could not get very high frame rates (maybe 2-5 fps at best). I thought that perhaps by writing my own capture application in C, perhaps I could do better. After all, the graphics processor in the Pi is capable of recording HD video and directly encode it as H264 video. There should be some way to use that hardware effectively, right?
As it turns out, there is.
As a tease, here is some of the video I captured yesterday:
It’s recorded at 1280×720 and 25fps (more on that later). It takes about 20% of the cpu available on one of my older Model B Raspberry Pi. The motion detection is done on the camera entirely in Python, and is a bit crufty, but works well enough to get some good video.
Warning: this code is presented as-is. If you aren’t a python programmer, you may not have the skills necessary to understand or use this code, but it is a good basic outline that spells out most of the parts you need. Feel free to adapt the code to your needs. If you redistribute it, it would be nice if you could give a nod to this code and my blog in some fashion, but I’m not going to be insulted if you don’t. And if you have any improvements, I’d love to hear about them.
def write_video(stream, fname):
# Write the entire content of the circular buffer to disk. No need to
# lock the stream here as we’re definitely not writing to it
# simultaneously
with io.open(fname, ‘wb’) as output:
for frame in stream.frames:
if frame.frame_type == picamera.PiVideoFrameType.sps_header:
stream.seek(frame.position)
break
while True:
buf = stream.read1()
if not buf:
break
output.write(buf)
# Wipe the circular stream once we’re done
stream.seek(0)
stream.truncate()
with picamera.PiCamera(framerate=fractions.Fraction(’30/1′)) as camera:
dir = "/var/tmp/capture"
camera.resolution = (1280, 720)
camera.framerate = fractions.Fraction(’30/1′)
camera.vflip = True
camera.hflip = True
camera.start_preview()
seconds = 5
stream = picamera.PiCameraCircularIO(camera,seconds=seconds, bitrate=8000000)
print "[ Buffer %s seconds/%d bytes ]" % (seconds, stream.size)
camera.start_recording(stream, format=’h264′, bitrate=8000000)
try:
while True:
camera.wait_recording(1)
if detect_motion(camera):
print "Dumping."
# generate a filename…
base = ‘cam_’+dt.datetime.now().strftime("%H%M%S")
part1 = os.path.join(dir, base+"-A.h264")
part2 = os.path.join(dir, base+"-B.h264")
camera.split_recording(part2)
write_video(stream, part1)
camera.wait_recording(15)
while detect_motion(camera):
camera.wait_recording(1)
camera.split_recording(stream)
with open("files.txt", "a") as f:
f.write("file %s\n" % part1)
f.write("file %s\n" % part2)
print "Dumped %s %s" % (part1, part2)
# Copy files to remote server
dst = ‘markv@conceptron.local:capture’
print "Copying %s to %s…" % (part1, dst)
rc = subprocess.check_call([‘scp’, ‘-p’, ‘-q’, part1, dst])
if rc != 0:
print "PROBLEM: (rc = %d)" % rc
else:
os.unlink(part1)
print "Copying %s to %s…" % (part2, dst)
rc = subprocess.check_call([‘scp’, ‘-p’, ‘-q’, part2, dst])
if rc != 0:
print "PROBLEM: (rc = %d)" % rc
else:
os.unlink(part2)
# ready to record some more…
camera.wait_recording(seconds)
finally:
camera.stop_recording()
[/sourcecode]
This would not be possible without the awesome picamera Python module and lots of careful engineering by the Raspberry Pi + Camera designers. They clearly foresaw this kind of possible application, and did everything that they needed to make it run efficiently and reasonably.
A few more short notes:
The motion detection code is terrible. It works after a fashion, but clearly could be tuned better.
To save space on my Pi, after capture it uploads each video file to one of my local servers, and then delete the file. I hardcoded it to use scp via subprocess. If you want to do something else, you can figure out what that might be and do it there. It won’t record new video while the scp is occurring: you could spawn a thread or some such to handle the copy and then dump back to the loop if you like.
You might want to write to a tmpfs file space, so it doesn’t eventually wear out your flash card with repeated writes and deletes, particularly if you can transmit these video files off as they are generated.
The picamera documentation is quite helpful. Indeed, it was my reading of that documentation which formed the basis of this initial script, which likely could not have been done (or not as easily) without them.
I will probably produce a tidier, better annotated version of this code and put it on github soon.
Hope this is of interest to some of you.
Addendum: If you want to see what the hardware looks like, you can see it here. Really just a cardboard box holding a pi, a powered hub, and the pi camera taped to the top, hung in the window.
My weekend experiments lead me eventually toward flashing nodemcu, a Lua based firmware that runs on the ESP8266. Having a simple programming language (albeit one I’m not super fluent in) is very cool, and enables a whole bunch of nifty experiments.
While reading up, I encountered the acronym MQTT again. From Wikipedia:
MQTT (formerly Message Queue Telemetry Transport) is a publish-subscribe based “light weight” messaging protocol for use on top of the TCP/IP protocol. It is designed for connections with remote locations where a “small code footprint” is required and/or network bandwidth is limited. The Publish-Subscribe messaging pattern requires a message broker. The broker is responsible for distributing messages to interested clients based on the topic of a message. Andy Stanford-Clark and Arlen Nipper of Cirrus Link Solutions authored the first version of the protocol in 1999.
So, I thought I’d experiment a bit. I installed an MQTT broker called Mosquitto on a spare Raspberry Pi along with some simple command line clients and the python library with this command:
The mosquitto broker is started automatically. In its simplest form, you can run a client that “subscribes” to a given “topic” in a shell window.
mosquitto_sub -d -t hello/world
The -d specifies a slightly noisy “debug” mode. You’ll keep keepalive ping messages from the broker. The -t specifies the topic as something that looks like a path expression. You can specify more than one pattern, and there are expressions to wild card match subexpressions within the pattern. By default, these will connect to a broker on your localhost, but if you specify a -h flag, you can contact brokers running remotely (indeed, this will be the common case for IoT applications.)
From another window, you can “publish” to all clients which are subscribed to this topic:
mosquitto_pub -d -t hello/world -m "Hello world."
This sends the message to anybody subscribed to hello/world. You can send pretty much anything: it’s up to the application to know what to expect and what to do with it. You can even send the contents of complete files.
mosquitto_pub -d -t hello/world -f sendme.txt
So far, it doesn’t look all that exciting, but looks can be deceiving. First of all, the client code is relatively small and simple. This means that it’s easy to put into the small, low memory, low power nodes that you will typically use as sensors. There are already libraries for the Arduino and as I mentioned at the start, it’s already builtin to the nodemcu firmware for the ESP8266. Because it’s lightweight, even very modest brokers can handle huge numbers of messages. To give you some idea of scaleability, Facebook Messenger uses MQTT to route messages between users with very low latency, and without chewing the battery power on your mobile device. And it enables two way communications to sensor nodes, clients can both publish and subscribe at the same time.
As an experiment, I’m thinking of creating a notification service for my hummingbird camera that will update me when new captures occur. It seems pointless (and is) but it’s all a learning experiment. Eventually, I’m sure I’ll get back to the ESP8266.
Oh, and incidently, I’ve ordered some MCP23017 I2C I/O extenders, and hope to experiment with those on the ESP8266. They are nifty little chips which provide 16 additional digital I/O lines all under I2C control. Combined with the ESP8266, you’ll be able to sense lots of buttons and light lots of LEDs. Perhaps with the addition of an I2C A/D converter (or any other I2C sensor), you can do some serious tinkering.
Shelby noticed that hummingbirds had made a little nest, so she got a webcam and now you can view it via live streaming. At the moment, I looked, there didn’t seem to be much action, but I’ll be checking in frequently. Awesome.
I’ve tinkered a bit with metal working over the years, but never really developed any skill. I’ve always been fascinated by precision machining, particularly those that make clocks and watches. Yesterday, I discovered the Clickspring Youtube channel, which is really, really good. I’ve linked to his video where he makes washers and screws for a skeleton clock project, but there are lots of other videos with different kinds of machining in them. Enjoy!
I know, I know, it’s probably getting a little repetitive and boring. But I’m still getting a kick out of my motion capturing hummingbird camera. Improvements are coming.
This morning I’m still drinking coffee and waking up, but I was pointed at “the ESP8266 wiki”, which appears to be this Wiki page. Bookmarked mostly so I can quickly find it again. But it has some good information. If I haven’t teased you enough with this experimentation, consider these features of the ESP8266:
It’s a wireless SoC
It has GPIO, I2C, ADC, SPI, PWM and some more
It’s running at 80MHz
64KBytes of instruction RAM
96KBytes of data RAM
64KBytes boot ROM
It has a Winbond W25Q40BVNIG SPI flash
It’s a RISC architecture
The core is a 106micro Diamond Standard core (LX3) made by Tensilica
The ESP8266 chip is made by Espressif
Modules bearing this chip are made by various manufacturers
And most importantly, you can get modules starting for as low as $3. You can get modules with the same chipset, more pins and USB for just $8.70 (plus shipping) (thanks MicroHex for suggesting it). And now, with the ability to program them from the Arduino environment? I’m definitely going to be experimenting with them.
Got a chance to play around a bit more with the ESP8266 tonight. I dug out a nice little dual output power supply board that I had got from tautic.com with the hope that it would eliminate some of the erratic behavior that I had observed before. Sadly, that didn’t seem to solve my problem. Luckily, after a bit of googling, I think I see what’s going on.
First of all, the ESP-01 module I have is really limited in its number of pins. There are only a total of 8 pins brought on onto the header. They are:
UXTD — connects to the UART 0 transmit pin
CH_PD — must be tied high (to 3.3v) to boot
RST — pull low to reset
VCC — connect to 3.3V power supply
GND
GPIO2 — general purpose IO pin (but see below)
GPIO0 — general purpose IO pin (but see below)
URXD — connects to UART 0 receive pin
I had read that in order to flash, you needed to set GPIO0 low (tie it to ground) but for normal operation, you could either pull it high, or simply let it float. That seemed to work fine. Then, I tried to use GPIO2 to power a small led. It would work fine if I hooked it up after booting, but if I was wired up both the red and blue leds would come on, and it would not boot properly. It turns out that GPIO2 must be left high or floating for normal operation to occur.
This article explains some of the issues. It appears that a 2.2k pull up resistor will probably do the trick. It’s too late tonight for me to scramble around, but I’ll try it tomorrow.
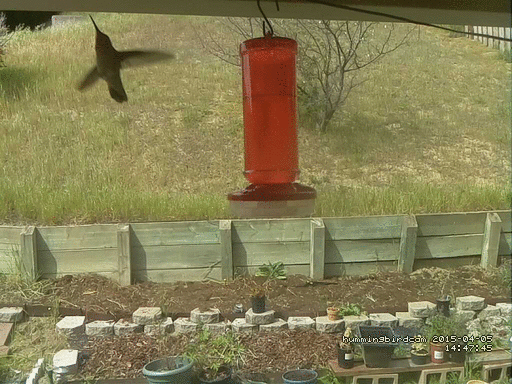
A couple more quick snaps from my hummingbird camera. I’m going to try to work on some improvements over the weekend, but shockingly we are gonna get some rain, so I may concentrate on getting it waterproofed and ready for life outdoors.
Okay, after I did my quick video record yesterday re: the ESP8266, I continued to play with it a bit more. And, it must be said, I had a little bit of difficulty which I thought I would write up so that other people who are experiencing the same issues might be able to comment, and hopefully benefit as we get the problem resolved.
First of all, I observed a couple of different issues in just repeatedly playing with the board. Occasionally, the board would seemingly hang when a new URL request was received. It would print out an informational message that said that a new client had connected, but it wouldn’t actually print the message that it received. I had to recycle the power to reset it.
Secondly, when I had the LED connected, it would sometimes just fail to boot my program entirely. It would spew random crud into the serial monitor. Not good.
I suspect that both of these things might have to do with inadequate power supply. I am powering it entirely from a little 3.3v FTDI cable I had lying around (I believe it is this one, now retired.) If I read the datasheet properly, it appears that it can only power about 50ma of external circuitry. That’s simply not enough: I’m kind of shocked that it can boot at all. Peak current draw is probably somewhere around 300ma. Most every page on ESP8266 development says that I should use a high quality 3.3v power supply able to supply at least 500ma.
Next experiments will try to feature a better power supply. MOAR POWER.
Addendum: The module that I am using is the ESP-01. As you can see, it’s very simple, has only 8 pins, and is not breadboard friendly. Luckily for experimenters, there are other varieties of boards available based upon the same chipset. For instance, the ESP-04 has seven GPIO pins broken out, and can needs an external antenna. The ESP-201 is much more breadboard friendly, and includes both an on-board antenna, and UFL connector for an external antenna. There are lots of other types too, all very reasonably priced. If you haven’t bought the ESP-01 already, some of these other boards might be better to experiment with. But there are also people making various adapters for the ESP-01, such as the ESP8266 buddy, which sells for a paltry $2.50 and can adapt the ESP-01 to your breadboard. I think I’ll be getting a few of these.
In the telescope making world, we call the first time that a telescope is used to look at the sky “first light”. I’ve decided to call the first time I load some code onto a new development board “first electrons”.
A few weeks ago, when I did a video that illustrated some of the bucket of development boards that I had lying around, I decided that I should at least make a sincere effort to try to do something, anything, with each of them. Since then, I’ve discovered platformio which has enabled me to at least get some code running on the more obscure ARM based boards that I had lying around. Buoyed by that positive experience, I sought to see how I could get code running on some of the other boards. Tonight’s board was the ESP8266, a little cheap board (I paid $6 or so for mine, I’ve seen them on eBay for as little as $3) which are often used as serial-Wifi links, but which actually include a nifty little 32 bit SOC.
Luckily, the gods have smiled in the form of a three part article (Part 1Part 2Part 3) by Alasdair Allen for Make magazine. Previously, getting code to compile onto the ESP8266 required finding the right version of gcc and the download esptool, configuring it… Who has the time? What’s awesome is that now you can download a version of the Arduino environment that already has the necessary compiler and tools installed, and use the friendly, comfortable Arduino environment to compile and run code.
So, tonight, that’s what I did!
Conveniently, I had an 3.3V FTDI serial cable that I had purchased back when I was experimenting with 3.3V boards. That’s convenient, because otherwise I’d have to wire up a 3.3V voltage regulator, which isn’t hard, but at least takes one more step. Using the diagram in Part 2 of the article listed above, I setup some jumper wires to connect it all up. I then downloaded the necessary version of the Arduino environment (for my Linux laptop), installed it, loaded the WifiServer example application, modified it with my own network’s SSID and password, and tried compilation. It compiled fine, but when I tried to download the new code to the ESP8266, I got a communication error. I double checked all the connections against the diagram, no dice. Hmmph. There was one small bit of confusion that I always have when hooking up serial devices: the RX (receive) pin of one side needs to be connected to the TX (transmit) on the other, and vice versa. But when you try to document this, it can be confusing: if an end of your cable is labelled RX, does it mean that you should attach it to the RX? Or that the other end of the cable is RX, so you should connect it to TX?
I swapped RX and TX. And voila. The download works just fine.
To reboot and run the code, you need to remove one of the ground connections from the boad and cycle the power. I then fired up the serial monitor, changed the baud rate to 115200, and then watched it boot. It printed out that it was attempting to connect to my network, printed a series of periods, and eventually reported it’s IP address.
Nifty! I need to go dig up some current limiting resistors (maybe 220 ohms or so) so I can test it, but I verified that if I accessed http://192.168.1.116/gpio/0, it turns the gpio pin low, and http://192.168.1.116/gpio sends it high. Voila!
Well, with a few caveats. It seemed a little unreliable, and seemed to hang a couple of times. I’m not sure what the deal is. I’m suspicious about how much power my FTDI cable can actually supply, maybe that’s part of it. Or it could be software related. I’ll have to play with it more to be sure. But it’s pretty nifty. I’m sure I’ll be playing with it more. Good stuff.
Addendum: I dug up an LED and a 330 ohm current limiting resistor, and then recorded this trivial little demonstration.
It is true that this represents only one side of the story, but it does seem that at a minimum, Arduino SRL (represented at http://arduino.org) has copied much of the Arduino LLC website without credit to the other creators. Whether that rises to the level of illegality, IMO it is, pardon my language, a dick move. The story spun on the arduino.org website here does not strike me as answering any of the criticisms, and has the general feel of dodging important questions.
Have any of the major Arduino distributors like SparkFun or Adafruit made any mention of how this internal spat is affecting their deals and supply chains?