Category Archives: Arduino

Time from the ESP8266…

Yesterday, I mentioned the idea of using the cheap ESP8266 as a clock source for a WSPR beacon transmitter. My initial idea was to basically write code for the Arduino that connected to a remote NTP server, formulate UDP packages… sounds like a pain. But then I found that there was alternative software I could upload to the ESP8266 that would implement the NTP client on the ESP8266 module, and then simply fetch it with an “AT” style command.

So, I downloaded the firmware, and gave it a shot.

esptool.py write_flash 0x0000 eagle.app.v6.flash.bin 0x40000 eagle.app.v6.irom0text.bin

I rebooted, and then told it to connect to my local wifi network, and then told it to start the NTP client with the following commands…

AT+CWJAP="ssid","password"
OK

AT+CIPNTP=0

And it works! I can get this connected to the Arduino and write up a simple sketch, and it should be able to update the time really easily. This is cheaper and probably easier than using a GPS as a time source. Very cool.

Screen Shot 2015-05-14 at 9.23.10 PM

An Arduino by any other name…

I was trying to make some headway on my robotic platform project, so I went digging through boxes in my office to find the large, 12v SLA battery that I know I have somewhere. While searching I found a bunch of stuff: hundreds of red LEDs in a pack, two Arduinos, a Sparkfun breakoutboard for an electret microphone, a bunch of level converters, and a Teensy 3.0. But of course, no battery.

So, I played a bit with the Teensy.teensy

The Teensy 3.0 is an older version of the more modern Teensy 3.1 and the Teensy LC (which I have on order right now from Sparkfun). It’s a, well, teensy board: only 1.4″ x 0.7″ It has a 32 bit arm processor which has 128K of flash and 16kb of RAM, and a bunch of peripherals. You have to solder on your own header pins, but it would be easy to do so and put it on a breadboard. And, what’s sort of cool, you can program it pretty much exactly like an Arduino. Same setup()/loop() structure. You use pinMode(), digitalRead() and digitalWrite(). The Serial objects work the same. Pretty cool.

As a first (but not particularly challenging) test, I downloaded my Morse beacon code. It worked fine, with no changes: the Teensy even uses pin 13 to flash its tiny onboard orange led. Pretty nifty.

I’ve been pondering using Arduino Mini/Nanos for future projects, but I’m kind of viewing the ATMega328 chip that underlies those Arduinos as a bit of a dinosaur. These chips are a lot faster, and at around $13 for the Teensy LC (which has same clock rate, but only 64K flash and 8K memory) I think I may have found a better embeddable CPU for projects.

Addendum: the Teensy family is well supported with platformio as well.

Using a SainSmart LCD panel with the Arduino 1.6.3 IDE…

IMG_0015Yesterday I experienced some frustration with the SainSmart I2C LCD Module that I bought to help Pete and Bill uncover the problems that they’ve been having. If you go and read, you’ll find that I had a lot of difficulty finding the right combination of code that can be used with this module. Eventually, I figured out how to use it, so I thought I’d document it here, to avoid the pain that someone else may feel.

The basics are essentially this:

  1. The LiquidCrystal library that ships with I2C is probably fine for connecting to LCDs with a parallel interface, but it does not support I2C bus displays.
  2. There is a so-called “New” or “FM” version of the LiquidCrystal library that you can find documented here. You can download the code by clicking here. I tested LiquidCrystal_V1.2.1.zip while typing this up.
  3. The new library is viewed as a replacement for the existing library. That means that you have to delete the existing library from the 1.6.3 libraries directory, and add the LiquidCrystal library in its place. This is kind of a pain, and is the worst part of this procedure. The instructions are here, but not very explicit. The commands you type also vary a bit with what operating system you use. Basically, the idea is to find the directory where the Arduino system libraries are installed, and delete (maybe after backing up) the LiquidCrystal directory, and replace its contents with the new LiquidCrystal directory. You’ll have to shutdown and restart the Arduino IDE after making the change.

And, you are almost home. You’ll have to make a couple of small changes to your sketches to make them use the I2C LCD display. Instead of including “LiquidCrystal.h”, you’ll need to include “LiquidCrystal_I2C.h”. And, you’ll need to make a small change to the “constructor” that builds the LCD object.

#include "LiquidCrystal_I2C.h"
#define BACKLIGHT_PIN (3)
#define LED_ADDR (0x27)  // might need to be 0x3F, if 0x27 doesn't work
LiquidCrystal_I2C lcd(LED_ADDR, 2, 1, 0, 4, 5, 6, 7, BACKLIGHT_PIN, POSITIVE) ;

And then you should be able to use the “lcd” object just like any other. If you look at this page, you can see all the operations that the lcd object supports. If you ever want to use (say) a parallel interfaced LCD, you’ll probably be able to do so by just changing the include and the constructor.

Bonus explanation: You are probably asking “what’s with all that the numbers in that constructor?” and “why those numbers?” and “what do they mean?” Here’s the basics (the details are not that important). The “piggyback” board that we use is mostly a chip that we call an “I2C I/O expander”. If you look carefully, you can read the part number off the chip.IMG_0014 In this case, it says that it’s a PCF8574. A little Googling will reveal that it’s a chip made by Texas Instrument, and it basically has a set of data pins that can be individually configured as inputs and outputs, and read and written by commands sent over the I2C bus. The little backpack connects each one of those outputs to a particular pin on the LCD board. The library (you can think of it as a driver) is basically the code that knows how to send commands over the I2C lines, that causes each of the eight or so pins on the PCF8574 to go high or low, and thereby activating functions on the LCD.

There are a couple of complications that can arise. First of all, while the PCF8574 is a common chip, there are similar backpacks you can buy that might use different (but similar chips). If your backpack doesn’t have a PCF8574 on it, you may find that my code above doesn’t work, and you’ll have to figure out what’s happening on your own.

But even if it does, there appear to be incompatibilities between some backpacks as well. As I mentioned before, some appear to have the address 0x27 (like mine) but some might have the address 0x3F. I’m not sure why that may happen (perhaps they are using a “work-a-like” chip whose real only difference is the I2C Address it response to?)

But the major problem is that even if they use the same chip, they need to wire the circuit to the LCD in the same way. I’ll try to explain. Let’s say the I/O expander has 8 output pins, which we will label P0 through P7. They all have similar capabilities. To drive the LCD parallel inputs, we need to wire them up. One of the LCD pins controls the backlight. Which of the I/O expander outputs should we wire to it? It’s actually arbitrary, we could pick whatever we like. But to turn on the backlight, we need to know which choice was made (which of the P0-P7 we need to turn on), and the same goes for all the other pins that we need write. Thus, the software needs to know how the wiring of this little backpack is setup.

And sadly, it appears that there might be different boards, with different wiring. Luckily, in this new LiquidCrystal library, they foresaw this eventuality, and allowed you to specify how those things are wired up. If you look in the file LiquidCrystal_I2C.h, you’ll see a definition for the constructor that we are using:

  // Constructor with backlight control
   LiquidCrystal_I2C(uint8_t lcd_Addr, uint8_t En, uint8_t Rw, uint8_t Rs,
                     uint8_t d4, uint8_t d5, uint8_t d6, uint8_t d7,
                     uint8_t backlighPin, t_backlighPol pol);

This looks a bit daunting, but what it means is that you can specify an LCD panel by specifying a bunch of values. The uint8_t is just an ugly shorthand for a small integer (an unsigned value, ranging from 0-255). The first argument is the I2C address (0x27 in the case of my board). The next arguments are which I/O pin on the I/O expander goes to the named pin on the LCD board. For example, in our case, the next argument after the address was a 2. That means that P2 of the I/O expander is wired to En (the enable pin) on the LCD board. Similarly P1 goes to the Read/Write Pin, and so on. The final two arguments say that the backlight was wired to P3, and that it’s polarity is POSITIVE (some displays have the LED turn on when the pin goes to ground).

So, how did I figure out which pin goes to which? If you had a schematic for the board, you could work it out using datasheets. I actually got lucky, and realized that the example sketch on the SainSmart product page had an example sketch which included these lines. The code they posted there is not compatible with the 1.6.3 IDE (sigh) but the information was helpful.

So, it took WAY too much time, and WAY too much work, but I have it working. Hope that helps someone else who comes along later.

A (not entirely simple) LCD display for the Arduino…

I am a big fan of Bill Meara N2CQR and Pete Juliano N6QW, hosts of the really great Soldersmoke Podcast. Together, they chat about homebrewing ham radio equipment, and what they’ve learned in their lessons along the way. Their “tribal knowledge” is of terrific help to someone like me who keeps making small forays into the world of homebrew.

Warning: this post may be written at a level either below or above any readers experience, and either might find it boring. You’ve been warned. Additional warning: I probably made this more complicated than it should have been. Skip to the bottom to find the resolution.

During Soldersmoke 175, they expressed some disgruntlement with what I call “the Arduino Tower of Babel”. Despite the reputation of the Arduino being the easiest way to get into using microcontrollers in your own homebrew electronics project, it can be really daunting and fraught with frustration and peril. In particular, they seemed to be having problems with trying to get various “sketches” to compile and run properly, depending on what version of the Arduino IDE they were running. Via e-mail, I offered to try to help out, perhaps being as the Arduino Sherpa that could guide them to success. While I know there are lots of people out there who are more skilled, knowledgeable and experienced than I, I have enough general computer experience to often be able to sort out this kind of problem. I thought that instead of writing this all down as an email to them both, this might serve as a good bit of knowledge of general interest to those just getting started in using the Arduino and/or programming. A lot of this won’t come as much of a surprise to practitioners of the digital arts, but perhaps it might be of some use to someone (and hopefully Bill and Pete, although it appears that Bill has at least made some headway).

First of all, the way most people interact with the Arduino is through the Interactive Development Environment, commonly referred to as the IDE. It is a pretty simple looking program (well, as such things go, it can be daunting for beginners) which is actually a wrapper around several different components. What the user typically sees is a window where he can enter “sketches” (what most people would call “programs”), and a series of buttons that will allow you to load, save, compile and download code to the target Arduino board that is connected via the USB port.

Like most software that is popular, it’s being constantly revised: new versions are being created all the time. Because it is what is called an “open source” project, it isn’t a single company that is responsible for changes, it evolves by the contribution of many different contributors. Each “release” of the code is tagged with a version number. As of this date, the latest version of the Arduino that you can download from the primary site is 1.6.3. Because people hate to upgrade software though, many people are using older versions of the software, with some common versions being 1.0.5.

I mentioned that the Arduino IDE consisted of many different components: among these are a set of standardized “libraries” that encapsulate common functionality that lots of people find useful. When you use the Serial or Wire libraries, you are actually using code that is shipped with the Arduino IDE. These “standard” libraries usually work well right out of the box, and don’t change all that often. Thus, if you had a sketch which uses those libraries, or even more basic calls like digitalRead or digitalWrite, you probably won’t notice a lot of differences.

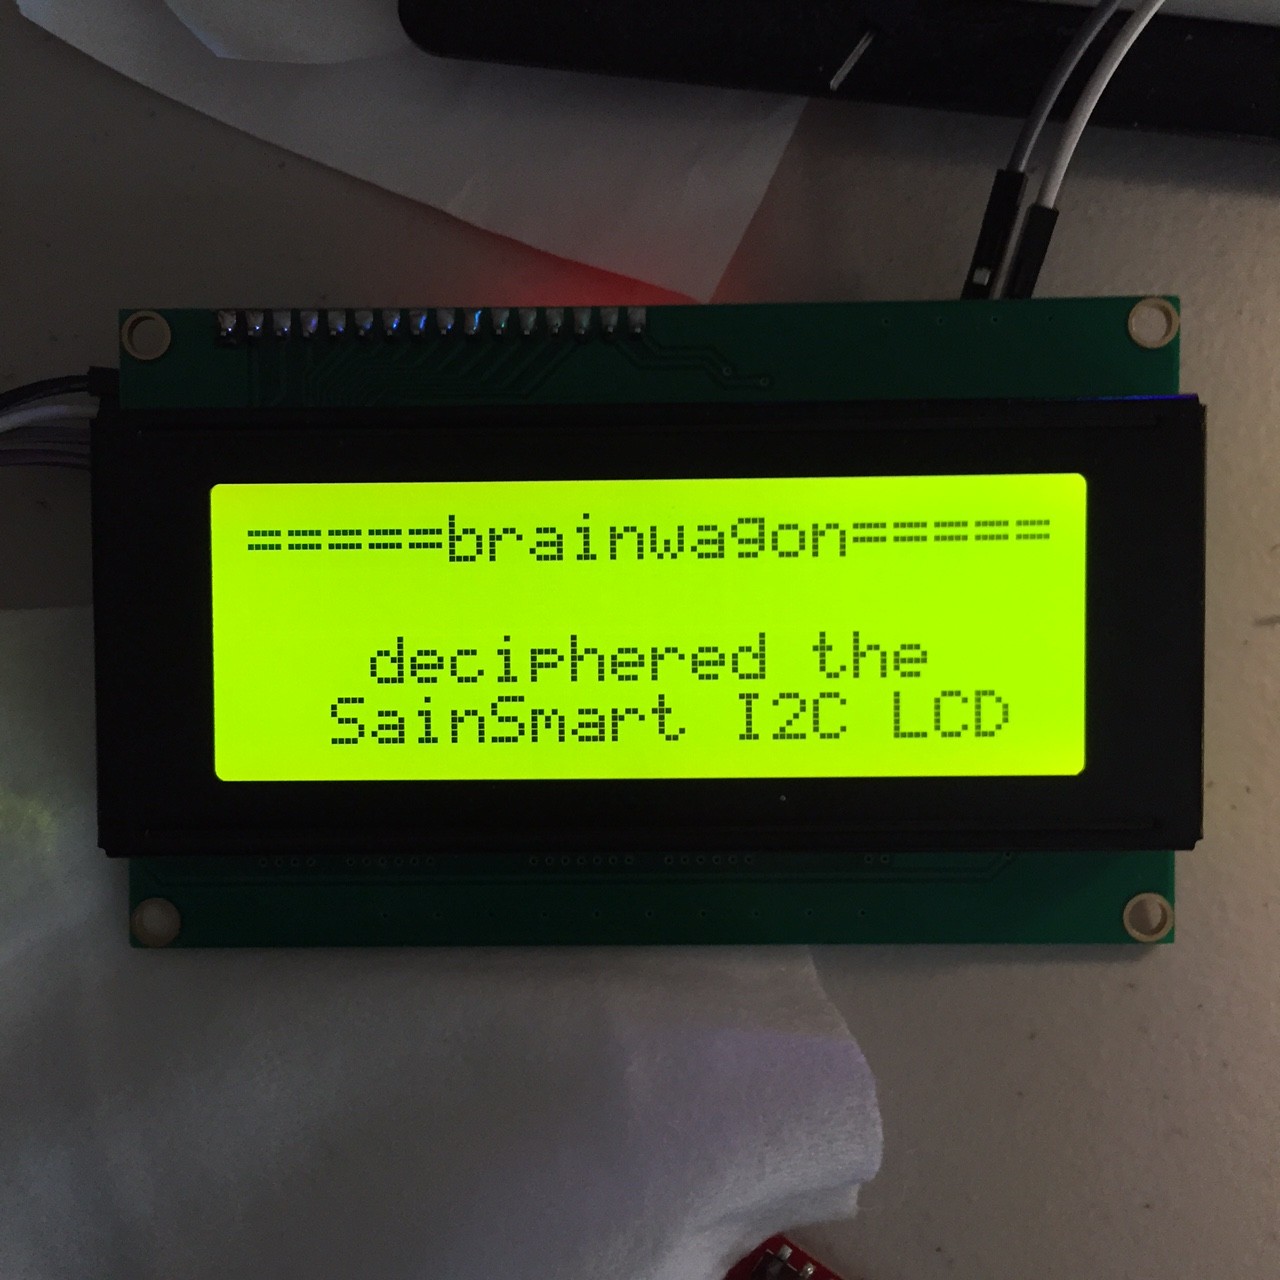
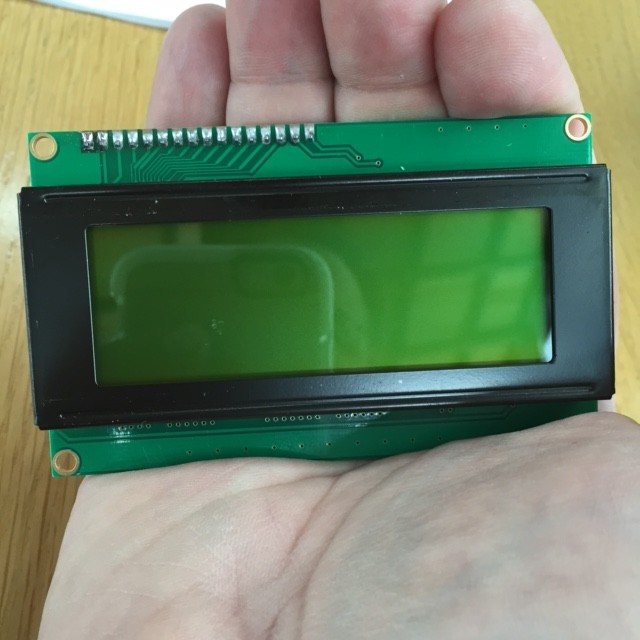
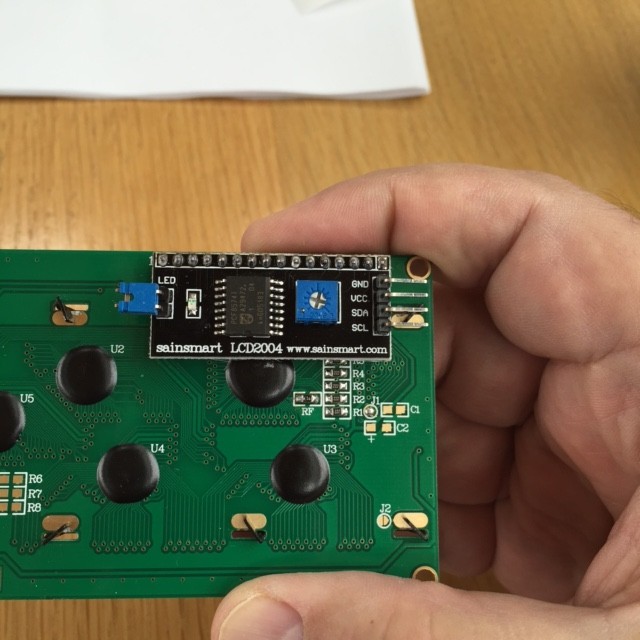
But some code is not part of the standard distribution. For instance, Pete was having difficulty getting an LCD display unit working properly with different versions of the Arduino IDE. I thought it might be a fun excuse to pick up an LCD panel to play with, so I asked him which one he used, and he emailed back this link, which seemed like a cool device. A mouse click, and two days via Amazon Prime, and I had one in my hand.

IMG_0009

IMG_0010

A pretty nice little unit, a little bigger than I expected. If you look at the back, you’ll see that it’s got a little board that looks a bit out of place connected to the back. It’s made by the company Sainsmart, and has four simple pins connected to the back. That board is an converter which turns the display board (which are fairly common, but require a lot more connections) to instead use what is called the “I2C bus”. To get this display working requires a lot less wiring: just +5v and ground, and then two data pins, called SDA and SCL (the “serial data” and “serial clock”, respectively). This makes hardware hookup a lot easier than the conventional (and somewhat cheaper) models.

If you had an ordinary LCD without this backpack, you could use the standard “LiquidCrystal” library that ships with the Arduino IDE (documented here.) If you read the manual page for the “constructor” (the statement which creates a “LiquidCrystal” object that you can interact with), you can see that there are a bunch of ways to create one, depending on how you wire it up. These standard LCD panels require somewhere between six and eleven connections (plus power and ground) which can be a headache.

By contrast, this panel requires only two lines. Awesome! What’s even more awesome is that you can attach other devices that use the I2C bus to the same two lines. Each peripheral has a unique “address”, so programs can talk to each device independently, without adding any more wiring.

But there is a seemingly small problem, one that is familiar to users of desktop computers. To use these special devices, you need a custom library (think of a custom Windows device driver) that knows how to talk to this device. And here begins the problems that Pete and Bill had.

The libraries that ship with the official IDE are usually pretty well thought out, checked to make sure that they work well with the IDE, and are compatible. But this requires a custom library, and those libraries are not always tested against all versions of the IDE. Sometimes they work. Sometimes, not so much.

And, what’s worse is that this code isn’t versioned or vetted. You can have different versions of the code with the same library name. It’s hard to know what versions are the best, which are later revisions and which are earlier, and which were created or modified by, shall we say, less good programmers?

Okay, back to our LCD display.

I did what I always do, I googled and found this this version of something called LiquidCrystal_I2C as the top response. That seemed promising. Version 2.0! I downloaded it and installed it (by the way, installing libraries can be annoying in the Arduino IDE, maybe I will rant about that some other day, but you can find out the “right” way to do it here), opened their “Hello World” program, compiled and downloaded and…

Nothing.

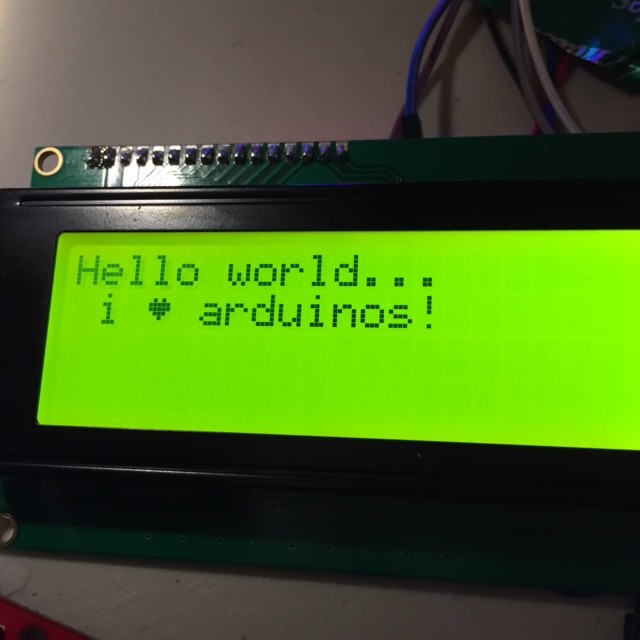
Screen glitched a little, and rows of black squares. Argh.

Double checked the wiring. Nothing seemed to be wrong. Hmmm.

Deleted that version of the library, and after some judicious surfing, uncovered this driver on the dfrobot website. They make a board which looks an awful lot like the sainsmart board. I thought I’d give it a whirl, even though it’s version 1.1 (and therefore presumably older).

Results:

IMG_0011

IMG_0012

It’s at times like this that I feel waves of, well, if not rage then annoyance. I haven’t had the chance to figure out what the issue is (I’m an hour into this already, and it’s supper time) and have no doubt that I’ll be able to figure out what’s going on, but it’s annoying to beginners and experts alike that we have to do this kind of spelunking. Until I sort out this issue, I’ll just make a few recommendations:

  • If you can use hardware supported by the standard libraries that ship with the Arduino, it’s probably worth doing.
  • If you can’t (or choose not to) then perhaps do some searches to find what other people are doing to get stuff working.
  • Document your success and failures as best you can on the web somewhere. Be specific as to which version and platform (Windows, Mac, Linux) you are using.
  • I actually recommend using the latest version of the IDE that’s available at arduino.cc, the official website. The older versions may “work just fine”, but you aren’t going to be able to take advantage of the many bug fixes and updates, and if you are interacting with other newbies, your code may not work. Best to get your own house in order, and then throw stones at whoever has code which doesn’t work properly with the latest official IDE.

To Bill and Pete: I feel your pain. I’d expect a device as common as this to work more or less out of the box. I’ll see if I can make a better suggestion soon. You might try using the code that worked for me, but that’s a poor solution really: I’m recommending using a modern IDE with old code. I’ll work on coming up with a better solution.

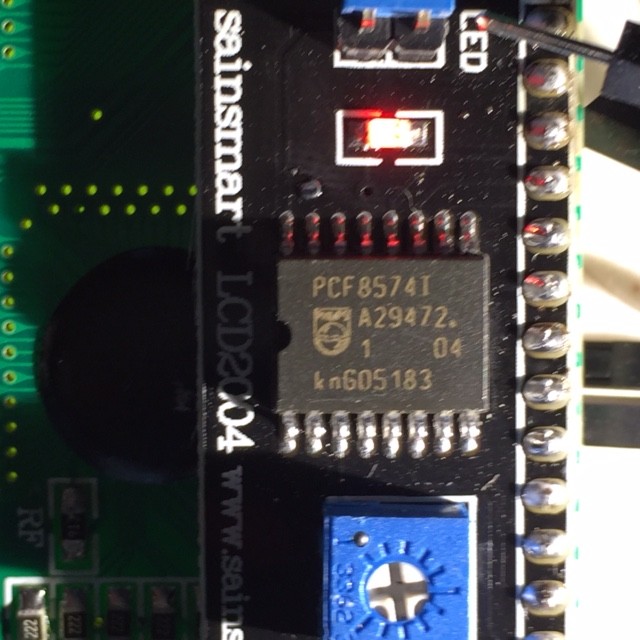
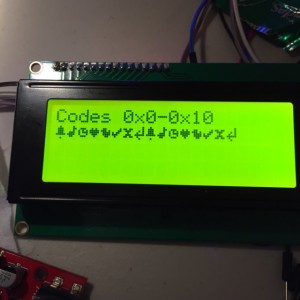
Addendum: Pete, in your email you indicated that the I2C address for your board was 0x3F. On mine, it actually turned out to be 0x27. I found this out by using an “I2C Bus Scanner”, a little sketch that runs on the Arduino and tries to find any devices by running through all 128 addresses. I was shocked to find that it’s not part of the standard examples, but if you google for “arduino i2c bus scanner” you can find code for many simple examples. It should be noted that this one I found screwed me up for a few minutes by printing the address in decimal, rather than hex.

Addendum2: Sigh. I may have been working too hard. Looking at the “official” distribution, it appears that the library does support I2C displays, although as near as I can tell, it’s completely undocumented, and none of the examples will work out of the box. I’ll figure out the right juju to get it to work soon, and will post it below.

Addendum3: In the words of Bill and Pete:


BASTA!!!!!!

Giving up for a moment, it’s acting stupidly on one of my dev machines. Hopefully what I said was not entirely wrong above, but it might be.

Addendum4: I was confused, but the rabbit hole keeps getting deeper. The version installed with 1.6.3 does not support I2C LCD displays. I was misled by looking at my installation on my Mac, which is not the standard 1.6.3, but is based on a system called platformio. When it installs code for the Arduino, it installs this version of the LCD library. You can download the code for it here. It supports both the traditional 8 and 4 bit parallel interfaces, as well as the I2C based version, and seems to be well documented. One bummer: it’s thought of as a direct drop in replacement for the standard system library, so you basically have to delete the installed LiquidCrystal library, and replace it with this one. Read the instructions here. It all looks good, except for one thing:

It doesn’t seem to work properly with the Sainsmart interface either.


BASTA!!!!!!

I know that part of this is that there are dozens of clones and near clones out there, and it’s hard for the library writers to know about all of them, but this is genuinely crazy.

Addendum5: Wow, this is totally crazy. If you go to the Sainsmart page for the “LCD2004”, you’ll find a rar file which includes the library to access this hardware. Except of course, that library is years old and will only work with versions 1.0 of the Arduino IDE.


BASTA!!!!!!

That’s it Bill and Pete. I’m giving up on digital electronics, and am going to spend the rest of the evening looking for good deals on dual gate FETs and crystals for filters.

New I2C peripheral: 6 DOF IMU, $5.89

GYU-52This little gadget arrived via Amazon Prime today: a three axis gyroscope/accelerometer that can be programmed via the I2C bus. I didn’t really have any reason to get one, other than simple curiosity, although I suspect that possibly mounting one on my (as yet unfinished) robot platform might be able to determine motion parameters of the robot.

The board itself is well documented on the Arduino Playground as the MPU-6050 Accelerometer + Gyro. The pinout is rather simple: your normal +5 and GND, SDA and SCL (I2C bus serial data and clock) one address pin (which lets you decide between two addresses for the chip) and an interrupt pin. The chip includes a FIFO buffer, and whenever the chip places data in the FIFO, it triggers the interrupt, indicating that there is data available for reading. Additionally, the chip includes two other lines (XDA AND XCL) which are a separate I2C bus that the chip can use to talk to a magnetometer. Probably won’t be using that anytime soon, but you never know.

IMG_0005As you can see from the picture, it’s really quite small, about the size of a postage stamp, and includes two mounting holes. When I get home, I think I’ll measure up the dimensions and put together the design for a little plastic case that can snap over it and provide some protection for it. The kit includes both right angle and normal headers, I think the right angle will do nicely.

More later.

Addendum: It’s later. Got the thing hooked up. It appears that I needed to ground the AD0 pin to set the address properly (I should double check this, I thought that if I left it floating, it would default to 0x69). Other than that, it’s dead simple. I wrote this code to get raw acceleration and gyro values from the sensor. I’m told that if you divide the raw values by 16384, you get the acceleration in terms of the gravitational acceleration “g”. In other words, if the board was lying perfectly flat on the tabletop, you’d expect that the X and Y accelerations were zero, and the Z would be 16384. Here’s a screen grab:

Screen Shot 2015-04-20 at 8.50.37 PM

As you can see, I wasn’t really quite flat, mostly tilted in X. If you find the lengths of the acceleration vectors, you find it’s something like 0.92 g (we are off by 8% or so). I don’t know what the specs on this thing are, I’ll have to check the datasheet. I know that despite returning 16 bit values, it does not provide 16 bits of accuracy.

Anyway, here’s a simple test sketch:

[sourcecode lang=”cpp”]
//
// A short sketch to read data from the MPU-6050, aka the GY-51
//
// Cribbed from online sources by mvandewettering@gmail.com

#include <Wire.h>

const int MPU = 0x68 ; // I did ground the A0 pin…

int16_t acc_x, acc_y, acc_z ;
int16_t temperature ;
int16_t gyr_x, gyr_y, gyr_z ;

void
setup()
{
Wire.begin() ;
Wire.beginTransmission(MPU) ;
Wire.write(0x6B) ;
Wire.write(0) ;
Wire.endTransmission(true) ;
Serial.begin(9600) ;
}

void
loop()
{
Wire.beginTransmission(MPU) ;
Wire.write(0x3B) ;
Wire.endTransmission(false) ;

Wire.requestFrom(MPU, 14, true) ;

acc_x = (Wire.read() << 8) | Wire.read() ;
acc_y = (Wire.read() << 8) | Wire.read() ;
acc_z = (Wire.read() << 8) | Wire.read() ;

temperature = (Wire.read() << 8) | Wire.read() ;

gyr_x = (Wire.read() << 8) | Wire.read() ;
gyr_y = (Wire.read() << 8) | Wire.read() ;
gyr_z = (Wire.read() << 8) | Wire.read() ;

Serial.print("\e[2J\e[H") ;
Serial.println("RAW MPU-6050 DATA") ;
Serial.println() ;
Serial.print("ACCX ") ; Serial.println(acc_x) ;
Serial.print("ACCY ") ; Serial.println(acc_y) ;
Serial.print("ACCZ ") ; Serial.println(acc_z) ;

Serial.print("GYRX ") ; Serial.println(gyr_x) ;
Serial.print("GYRY ") ; Serial.println(gyr_y) ;
Serial.print("GYRZ ") ; Serial.println(gyr_z) ;

Serial.print("TEMP ") ; Serial.println(temperature / 340. + 36.53) ;

Serial.println() ;

delay(1000) ;
}
[/sourcecode]

Addendum2: Here is a library for accessing the MPU-6050 well (it can return quaternions for orientation, no gimbal lock!).

Tinkering with individually addressable LEDs…

Blinking LEDS...While digging around looking for an LCD module I thought I had stashed somewhere, I encountered a bag with some of 8mm individually addressable RGB LEDs that I had never done anything with. For fun, I thought I’d wire a few of them up on my breadboard and see if I could get them to do something.

These things are cool. Most RGB LEDs have four leads, with one common annode (or cathode) and three other pins, each of which connects to the different color LED. To dim them and generate arbitrary colors, you need to have three pins which are attached to a pulse width modulated pin. To address a bunch of them individually would require a bunch of pins.

But these LEDs are different. It’s true, they have only four pins. But they are constructed to act independently. The four pins are a 5v power pin, a ground, and a data-in and data-out. You can chain arbitrary numbers of them together by hooking the data-out from one LED into the data-in of the next.

To demonstrate this, I thought I’d hook hook three of them together, and see what I could do. It wasn’t obvious to me from the datasheet that I found how the pins were label. Luckily, AdaFruit had a nice diagram that showed how the pins were ordered. I positioned the flat side of each led to the right, hooked all the +5V and ground connections up, and then wired the data-out of each stage to the data-in of the next stage. I then looked up the Arduino, which is dead simple: one output pin to the first LED data-in, and hook up the common ground.

led

To drive this requires a bit of code. The library that everyone seems to use is the Adafruit NeoPixel library. Oh, did I mention? The same LEDs are found in preformed strips like this one. If you need a lot of LEDs in a strip, this is a good way to go. But for just a few LEDs, these through hole parts can be fun.

I downloaded the Adafruit library, and wrote up this chunk of code.

[sourcecode lang=”cpp”]
#include <Adafruit_NeoPixel.h>

const int led_pin = 6 ;

Adafruit_NeoPixel strip(3, led_pin, NEO_RGB + NEO_KHZ800);

void
setup()
{
strip.begin();
}

int cnt = 0 ;

int col[3][3] = {
{255, 0, 0},
{0, 255, 0},
{0, 0, 255}
} ;

void
loop()
{
int i, idx ;
for (i=0; i<3; i++) {
idx = (cnt + i) % 3 ;
strip.setPixelColor(i, strip.Color(col[idx][0], col[idx][1], col[idx][2]));
}
strip.show() ;
cnt++ ;
cnt %= 3 ;
delay(500) ;
}
[/sourcecode]

Nothing too exciting, but it’s been a fun little thing to tinker with. It’s nifty to drive a large number of LEDs using only a single digital pin from a microcontroller. I’ll have to come up with a project to use them sometime.

More ESP8266 Experimentation: Giving it the Boot…

Got a chance to play around a bit more with the ESP8266 tonight. I dug out a nice little dual output power supply board that I had got from tautic.com with the hope that it would eliminate some of the erratic behavior that I had observed before. Sadly, that didn’t seem to solve my problem. Luckily, after a bit of googling, I think I see what’s going on.

First of all, the ESP-01 module I have is really limited in its number of pins. There are only a total of 8 pins brought on onto the header. They are:

ESP8266_pinout

  • UXTD — connects to the UART 0 transmit pin
  • CH_PD — must be tied high (to 3.3v) to boot
  • RST — pull low to reset
  • VCC — connect to 3.3V power supply
  • GND
  • GPIO2 — general purpose IO pin (but see below)
  • GPIO0 — general purpose IO pin (but see below)
  • URXD — connects to UART 0 receive pin

I had read that in order to flash, you needed to set GPIO0 low (tie it to ground) but for normal operation, you could either pull it high, or simply let it float. That seemed to work fine. Then, I tried to use GPIO2 to power a small led. It would work fine if I hooked it up after booting, but if I was wired up both the red and blue leds would come on, and it would not boot properly. It turns out that GPIO2 must be left high or floating for normal operation to occur.

This article explains some of the issues. It appears that a 2.2k pull up resistor will probably do the trick. It’s too late tonight for me to scramble around, but I’ll try it tomorrow.

Not all is easy-peasy with the ESP8266, with a short addendum

Okay, after I did my quick video record yesterday re: the ESP8266, I continued to play with it a bit more. And, it must be said, I had a little bit of difficulty which I thought I would write up so that other people who are experiencing the same issues might be able to comment, and hopefully benefit as we get the problem resolved.

First of all, I observed a couple of different issues in just repeatedly playing with the board. Occasionally, the board would seemingly hang when a new URL request was received. It would print out an informational message that said that a new client had connected, but it wouldn’t actually print the message that it received. I had to recycle the power to reset it.

Secondly, when I had the LED connected, it would sometimes just fail to boot my program entirely. It would spew random crud into the serial monitor. Not good.

I suspect that both of these things might have to do with inadequate power supply. I am powering it entirely from a little 3.3v FTDI cable I had lying around (I believe it is this one, now retired.) If I read the datasheet properly, it appears that it can only power about 50ma of external circuitry. That’s simply not enough: I’m kind of shocked that it can boot at all. Peak current draw is probably somewhere around 300ma. Most every page on ESP8266 development says that I should use a high quality 3.3v power supply able to supply at least 500ma.

Next experiments will try to feature a better power supply. MOAR POWER.

Addendum: The module that I am using is the ESP-01. As you can see, it’s very simple, has only 8 pins, and is not breadboard friendly. Luckily for experimenters, there are other varieties of boards available based upon the same chipset. For instance, the ESP-04 has seven GPIO pins broken out, and can needs an external antenna. The ESP-201 is much more breadboard friendly, and includes both an on-board antenna, and UFL connector for an external antenna. There are lots of other types too, all very reasonably priced. If you haven’t bought the ESP-01 already, some of these other boards might be better to experiment with. But there are also people making various adapters for the ESP-01, such as the ESP8266 buddy, which sells for a paltry $2.50 and can adapt the ESP-01 to your breadboard. I think I’ll be getting a few of these.

First electrons for the ESP8266…

IMG_5702In the telescope making world, we call the first time that a telescope is used to look at the sky “first light”. I’ve decided to call the first time I load some code onto a new development board “first electrons”.

A few weeks ago, when I did a video that illustrated some of the bucket of development boards that I had lying around, I decided that I should at least make a sincere effort to try to do something, anything, with each of them. Since then, I’ve discovered platformio which has enabled me to at least get some code running on the more obscure ARM based boards that I had lying around. Buoyed by that positive experience, I sought to see how I could get code running on some of the other boards. Tonight’s board was the ESP8266, a little cheap board (I paid $6 or so for mine, I’ve seen them on eBay for as little as $3) which are often used as serial-Wifi links, but which actually include a nifty little 32 bit SOC.

Luckily, the gods have smiled in the form of a three part article (Part 1 Part 2 Part 3) by Alasdair Allen for Make magazine. Previously, getting code to compile onto the ESP8266 required finding the right version of gcc and the download esptool, configuring it… Who has the time? What’s awesome is that now you can download a version of the Arduino environment that already has the necessary compiler and tools installed, and use the friendly, comfortable Arduino environment to compile and run code.

So, tonight, that’s what I did!

Conveniently, I had an 3.3V FTDI serial cable that I had purchased back when I was experimenting with 3.3V boards. That’s convenient, because otherwise I’d have to wire up a 3.3V voltage regulator, which isn’t hard, but at least takes one more step. Using the diagram in Part 2 of the article listed above, I setup some jumper wires to connect it all up. I then downloaded the necessary version of the Arduino environment (for my Linux laptop), installed it, loaded the WifiServer example application, modified it with my own network’s SSID and password, and tried compilation. It compiled fine, but when I tried to download the new code to the ESP8266, I got a communication error. I double checked all the connections against the diagram, no dice. Hmmph. There was one small bit of confusion that I always have when hooking up serial devices: the RX (receive) pin of one side needs to be connected to the TX (transmit) on the other, and vice versa. But when you try to document this, it can be confusing: if an end of your cable is labelled RX, does it mean that you should attach it to the RX? Or that the other end of the cable is RX, so you should connect it to TX?

I swapped RX and TX. And voila. The download works just fine.

To reboot and run the code, you need to remove one of the ground connections from the boad and cycle the power. I then fired up the serial monitor, changed the baud rate to 115200, and then watched it boot. It printed out that it was attempting to connect to my network, printed a series of periods, and eventually reported it’s IP address.

Nifty! I need to go dig up some current limiting resistors (maybe 220 ohms or so) so I can test it, but I verified that if I accessed http://192.168.1.116/gpio/0, it turns the gpio pin low, and http://192.168.1.116/gpio sends it high. Voila!

Well, with a few caveats. It seemed a little unreliable, and seemed to hang a couple of times. I’m not sure what the deal is. I’m suspicious about how much power my FTDI cable can actually supply, maybe that’s part of it. Or it could be software related. I’ll have to play with it more to be sure. But it’s pretty nifty. I’m sure I’ll be playing with it more. Good stuff.

Addendum: I dug up an LED and a 330 ohm current limiting resistor, and then recorded this trivial little demonstration.


More on Arduino v. Arduino…

Make just published this interview with Arduino founder Massimo Banzi about the internal schism that’s currently embroiling the Arduino community.

It is true that this represents only one side of the story, but it does seem that at a minimum, Arduino SRL (represented at http://arduino.org) has copied much of the Arduino LLC website without credit to the other creators. Whether that rises to the level of illegality, IMO it is, pardon my language, a dick move. The story spun on the arduino.org website here does not strike me as answering any of the criticisms, and has the general feel of dodging important questions.

Have any of the major Arduino distributors like SparkFun or Adafruit made any mention of how this internal spat is affecting their deals and supply chains?

Arduino? Perhaps we need OurDuino…

It’s no secret that I’ve been a fan of the Arduino. More than any other board, it’s got me into hacking little bits of hardware and programming in the small, and has been part of numerous projects that I’ve tinkered together, and others that I’ve helped mentor young people with. It’s a cute platform for a number of reasons:

  • They are widely available.
  • They are reasonably (well, sort of, more on this later) priced.
  • They are supported on all major platforms: Linux, Mac OS X and Windows
  • Their programming environment is a single, simple download.
  • Their programming libraries allow people to get started quickly.
  • There are a fair number of good shields to do hardware expansion.
  • And perhaps most importantly, they have a large community of people who develop and share code and techniques.

By my estimation, no other platform has this set of features.

Sadly, it appears that there is trouble in paradise. From this article on Hackaday:

Arduino LLC is the company founded by [Massimo Banzi], [David Cuartielles], [David Mellis], [Tom Igoe] and [Gianluca Martino] in 2009 and is the owner of the Arduino trademark and gave us the designs, software, and community support that’s gotten the Arduino where it is. The boards were manufactured by a spinoff company, Smart Projects Srl, founded by the same [Gianluca Martino]. So far, so good.

Things got ugly in November when [Martino] and new CEO [Federico Musto] renamed Smart Projects to Arduino Srl and registered arduino.org (which is arguably a better domain name than the old arduino.cc). Whether or not this is a trademark infringement is waiting to be heard in the Massachussetts District Court.

According to this Italian Wired article, the cause of the split is that [Banzi] and the other three wanted to internationalize the brand and license production to other firms freely, while [Martino] and [Musto] at the company formerly known as Smart Projects want to list on the stock market and keep all production strictly in the Italian factory.

Yikes.

I tend to side with Massimo for two reasons: one is, I’ve met Massimo at the San Mateo Maker Fair, and he was a nice, friendly, interesting guy. Second is that I think the value of the Arduino platform lies in design, rather than manufacturing. I’m willing to pay a premium for a product if it supports a company that provides excellent community support, and by and large I think Arduino LLC has done a good job. The motives of Arduino Srl seem much less community based, and more based upon maximizing the amount of money they can extract from the community.

I could be wrong, but that’s what it looks like to this observer.

But the fact is, both sides seem to be (to paraphrase my good friend, Tom) “burning down the tree of awesome, only to sow the weeds of suck”. This kind of public spat expends a lot of the good will that the community has, and only serves to drive people to other platforms, or simply Chinese clones of the existing products. Because here’s the other thing: there is not a lot of secret sauce in the Arduino. It uses a very popular 8 bit processor, but one which is underpowered and overpriced relative to other 32 bit chips on the market. If you wanted to build an Arduino yourself, it’s really easy to do with only a few parts, and the guys at arduino.cc will even tell you how to do it. The optiboot bootloader is open source. You can program them with avr-gcc and avrdude, also open source products. If your company is not going to work to support the community as a whole, it’s awfully hard to justify spending $25 for an official Uno when you can buy a compatible Red Board from Sparkfun (a great company that does lots of great work with the community) for $20, or the Diavolino kit from Evil Mad Scientist for just $13, or Chinese clones assembled for $13 or less. And of course companies like Seeedstudio are manufacturing clones as well as new designs which share the footprint of the traditional Arduino, but use ARM chips (like the Arch, a $20 board that uses a NXP LPC11U24, a 32 bit ARM chip that runs at 48Mhz).

To be honest, I’ve been looking to find a better development platform. You don’t have to go very far to find more capable boards: consider the Raspberry Pi Model A+, which sells for a piddling $21.70. Or the WRTnode for just $25. Need even more power? The Raspberry Pi 2 is just $44.39 today on Amazon, and the intended price is lower. Or maybe the Beagle Bone Black for just $50 or so. There are LOTS of choices.

The fact is that while Arduino LLC and Arduino SRL argue it out, we can already build what they make, and China can already do it cheaper. Whoever wins, they better have a plan for how to woo us back, because it’s not 2006 anymore, and we’ll end up picking what we like, not what they decide to give us.

After all, to paraphrase the bard, “An Arduino by any other name is really just an ATMEGA328 with a boot loader.”

Minor tweaks to Arduino Morse Sketch…

Commenter Andy wanted a version of my classic code that could generate a tone instead of just blinking an LED. I mentioned that I had done this before, but frankly couldn’t find the source code, so I modified my existing program to implement the simplest possible tone: a simple square wave.

Rather than using a speaker, I wired up a little piezo element which I had soldered a couple of leads onto my junk pile. These disks are terrible at reproducing low frequencies and have strong resonances, but for this purpose, it was convenient. You can substitute a speaker if you like. It’s probably a good idea to use a little drive transistor with an 8 ohm speaker to provide more drive: you can see the basic idea here. It is nominally targeted toward mbed microcontrollers, but nothing about it is specific to those. Anyway, I hooked the positive lead of the element up to pin 9, and the negative lead to ground.

IMG_5699

I also hooked up my oscilloscope so I could verify that the tone was coming out at the proper frequency. Indeed, it appears that it works just fine.

IMG_5697

Additionally, I made a few other small changes to my program. The prior version stored the static table in RAM, which is wasteful of a hundred or so bytes of RAM. It doesn’t sound like a lot, but there are only 2048 bytes of RAM available, so every little bit helps.

Addendum: If you want to generate nicer looking sine waves, you could do a lot worse than to use this circuit from Jason, NT7S which serves as a nice little oscillator. It’s a nice little Twin-T oscillator, followed by a very simple little amplifier. You could use an optocoupler in place of the key to drive it, or probably just key it with another 2N2222 or similar transistor.

Addendum2: If you want to go all out, a circuit like this one has a very pretty keying waveform.

[sourcecode lang=”cpp”]
//
// Simple Arduino Morse Beacon
// Written by Mark VandeWettering K6HX
// Email: k6hx@arrl.net
//
// This code is so trivial that I’m releasing it completely without
// restrictions. If you find it useful, it would be nice if you dropped
// me an email, maybe plugged my blog @ https://brainwagon.org or included
// a brief acknowledgement in whatever derivative you create, but that’s
// just a courtesy. Feel free to do whatever.
//
// At the request of Andy, I added support to use the Arduino Tone library
// to generate an audio signal (really just a square wave) at 700hz on
// pin 9 (can be any pin which supports PWM, on the Arduino Uno, those pins
// are 3, 5, 6, 9, 10 or 11, and are usually marked with a dash next to them).
//
// NOTE: the audio signals is just a square wave. It’s not got a great
// tone, and may click or chirp at the end. It’s mostly useful as a
// sidetone generator, and probably should not be fed into the mic input
// of a transmitter to send MCW.

// This defines the pin that will have the audio signal

const int sndPin = 9 ;

// Sound frequency (in Hz)
#define SND_FREQ (700)

// If you leave NOISY defined, the Arduino will print out each character
// as it is sent to the serial port. You might want to comment this out
// (put // at the start of the line) if you are especially cramped for
// memory, otherwise it doesn’t hurt to leave it in place, even if you
// don’t hook the serial port to anything.
//
// If NOISY is defined, then the size of the program is…
// Program: 4938 bytes (15.1% Full)
// (.text + .data + .bootloader)
//
// Data: 399 bytes (19.5% Full)
// (.data + .bss + .noinit)
//
// If NOISY isn’t defined
// Program: 2964 bytes (9.0% Full)
// (.text + .data + .bootloader)
//
// Data: 48 bytes (2.3% Full)
// (.data + .bss + .noinit)
//

#define NOISY

struct t_mtab { char c, pat; } ;

// Compared to my earlier version of this code, we can
// save some precious RAM by storing this constant table
// in flash memory.

const struct t_mtab morsetab[] PROGMEM = {
{‘.’, 106},
{‘,’, 115},
{‘?’, 76},
{‘/’, 41},
{‘A’, 6},
{‘B’, 17},
{‘C’, 21},
{‘D’, 9},
{‘E’, 2},
{‘F’, 20},
{‘G’, 11},
{‘H’, 16},
{‘I’, 4},
{‘J’, 30},
{‘K’, 13},
{‘L’, 18},
{‘M’, 7},
{‘N’, 5},
{‘O’, 15},
{‘P’, 22},
{‘Q’, 27},
{‘R’, 10},
{‘S’, 8},
{‘T’, 3},
{‘U’, 12},
{‘V’, 24},
{‘W’, 14},
{‘X’, 25},
{‘Y’, 29},
{‘Z’, 19},
{‘1’, 62},
{‘2’, 60},
{‘3’, 56},
{‘4’, 48},
{‘5’, 32},
{‘6’, 33},
{‘7’, 35},
{‘8’, 39},
{‘9’, 47},
{‘0’, 63}
} ;

#define N_MORSE (sizeof(morsetab)/sizeof(morsetab[0]))

#define SPEED (12)
#define DOTLEN (1200/SPEED)
#define DASHLEN (3*(1200/SPEED))

const int LEDpin = 13 ;

void
dash()
{
digitalWrite(LEDpin, HIGH) ; // turn on the LED
tone(sndPin, SND_FREQ) ; // and the sound output..
delay(DASHLEN);
digitalWrite(LEDpin, LOW) ; // then back off
noTone(sndPin) ; // and silence…
delay(DOTLEN) ;
}

void
dit()
{
digitalWrite(LEDpin, HIGH) ; // again, LED on…
tone(sndPin, SND_FREQ); // and sound…
delay(DOTLEN);
digitalWrite(LEDpin, LOW) ; // off…
noTone(sndPin) ; // quiet…
delay(DOTLEN);
}

void
send(char c)
{
unsigned int i ;
if (c == ‘ ‘) {
#ifdef NOISY
Serial.print(c) ;
#endif
delay(7*DOTLEN) ;
return ;
}
for (i=0; i<N_MORSE; i++) {
if (pgm_read_byte(&(morsetab[i].c)) == c) {
unsigned char p = pgm_read_byte(&(morsetab[i].pat)) ;
#ifdef NOISY
Serial.print(c) ;
#endif
while (p != 1) {
if (p & 1)
dash() ;
else
dit() ;
p = p / 2 ;
}
delay(2*DOTLEN) ;
return ;
}
}
/* if we drop off the end, then we send a space */
#ifdef NOISY
Serial.print("?") ;
#endif
}

void
sendmsg(const char *str)
{
while (*str)
send(*str++) ;
#ifdef NOISY
Serial.println("");
#endif
}

void setup() {
pinMode(LEDpin, OUTPUT) ;
pinMode(sndPin, OUTPUT) ;
#ifdef NOISY
Serial.begin(9600) ;
Serial.println("Simple Arduino Morse Beacon v1.0") ;
Serial.println("Written by Mark VandeWettering <brainwagon@gmail.com>") ;
Serial.println("Check out my blog @ https://brainwagon.org") ;
Serial.print("LED will blink on pin ");
Serial.println(LEDpin);
Serial.print("Sound will be generated on pin ");
Serial.println(sndPin);
Serial.println("") ;
#endif
}

void loop() {
sendmsg("K6HX/B CM87") ;

tone(sndPin, SND_FREQ) ;
delay(20000);
noTone(sndPin) ;
delay(3000) ;
}
[/sourcecode]

Tiny BASIC on a Tiny Display…

IMG_5694Early in 2012, I posted a small version of Tiny BASIC that I had adapted to run on the Arduino. It is based upon code which was written by Mike Field, and based upon an earlier version of TinyBasic for the 68000 written by Gordon Brandly, which owes its roots to Palo Alto Tiny BASIC, written all the way back in 1976 as one of the first examples of a free software project.

I had done a couple of extensions to that code to include simple commands to read and write digital and analog I/O pins, implement simple delays, and even generate simple tones. But then the project languished. Tonight, I dusted that code off and made a number of improvements.

First of all, the original program didn’t have very much memory to store programs. This is due largely to the fact that the Arduino Uno has only 2048 bytes of RAM to use for any purpose at all, so every byte is important. What I realized in staring at the code tonight was that a significant number of bytes (well, significant in this context) number of bytes were used to store some static data tables that defined the keywords and functions available to the interpreter. By changing those to “const” tables, I could move them to be stored in the flash (read-only) memory, and free up a couple hundred additional bytes of storage. That may not sound like a lot, but every little bit helps. Now when the system boots, it has 1146 bytes of memory to store programs.

Next, I thought it would be fun to use the OLED display that I’ve been tinkering with to act as an output display. I did a little quick math: I liked an 8×13 font for display, so that meant I could just get 4 lines of 16 characters on the display. That meant that I’d need 64 bytes of ram to store the contents, but that should be a small price to pay. I wrote up a new “outputchar” routine that would deposit printed characters at the the cursor location in the memory buffer, and then increment the cursor position, and handle scrolling. Refreshing the LED screen is not very fast, since it is occurring over the I2C bus, so I thought about a couple ways to “batch” the printing of individual characters, and only refresh the screen when a bunch of output has occurred, only when the screen was “dirty”, and when a time interval had passed. It took me a couple of tries to get this right, but it seems like it worked.

I filmed a short demo of the system working. The keyboard input is still coming from the serial monitor, but display is going to the OLED.


I’d be happy to release the code in a few days after I tinker a bit more. Right now, command line editing is a bit rough, and I’d like to get that working better.

Addendum: This code (the original authors, not mine) has served as the basis for additional versions, some more capable than mine. TinyBasicPlus includes commands to save and chain programs from the internal EEPROM, and store them to SD cards. Very neat.

Using the Parallax PING))) ultrasonic distance sensor

I intended to play around with some of the NRF24L01 radio modules I have around, but my brain didn’t feel up to it after a day of debugging. So, instead i dusted off a Parallax PING))) sensor that I’ve had around for a long time. I thought it might be fun to see if I could use the OLED display to display the distance measured by the sensor. While watching Agents of Shield, I came up with the following tiny bit of code, demo’ed below.


[sourcecode lang=”cpp”]
#include "U8glib.h"

U8GLIB_SSD1306_128X64 u8g(U8G_I2C_OPT_NONE);

// _
// ___ (_)__ ___ _
// / _ \/ / _ \/ _ `/
// / .__/_/_//_/\_, /
// /_/ /___/
//
// A simple rangefinder program using the Parallax PING sensor
// Writes display out to my tiny OLED display…

const int pingPin = 7 ;

char dbuf[10] ;

void
draw()
{
u8g.setDefaultBackgroundColor();
u8g.drawBox(0, 0, 128, 64);
u8g.setDefaultForegroundColor();
u8g.setFont(u8g_font_10x20);
u8g.drawStr(14, 42, dbuf);
u8g.drawStr(94, 42, "cm");
}

void
setup()
{
Serial.begin(9600);
}

void
loop()
{
long duration ;

pinMode(pingPin, OUTPUT);
digitalWrite(pingPin, LOW); // Make sure we drive the pin low…
delayMicroseconds(2);
digitalWrite(pingPin, HIGH); // Pulse high for 5us
delayMicroseconds(5);
digitalWrite(pingPin, LOW); // Finish the pulse…

pinMode(pingPin, INPUT); // Get ready to read…
duration = pulseIn(pingPin, HIGH); // Wait for the echo pulse to drop back to low

// The speed of sound is 29 us per cm… j

float cm = duration / (29. * 2.) ;
dtostrf(cm, 8, 2, dbuf) ;

u8g.firstPage() ;
do {
draw() ;
} while (u8g.nextPage()) ;
}
[/sourcecode]

Addendum: I’ve been snapping short videos with the Vine app, and then posting them to Twitter and Facebook. Irritatingly, these don’t seem to actually play properly when I embed them back in my website. I’ll figure out a better workflow next time.

Addendum2: Goofing around a little, it appeared that this sensor worked out until about 70cm or so, and then snaps to 340cm. Not sure what that is about: the sensor should behave more accurately than that. I’ll experiment more tomorrow. I should also note that these Parallax sensors are fairly pricey: list price is almost $30. I like the Parallax guys a lot, but that’s pretty spendy. You can get much cheaper modules on Ebay, with costs as low as around $1.50. I haven’t got any of these, but they are worth trying, although various sources on the web suggest that you might get what you pay for. Try googling for “HC-SR04” for more information.

My version of minilife2 for the Arduino…

Without a lot more explanation, I did a bit more work on my implementation of Conway’s life, reducing the overhead so I can implement the full 128×64 bit resolution of the OLED display. I also hardcoded an initial pattern: the classic Gosper glider gun. It runs at about 1.625 frames/second, so a new glider is emitted every 18 seconds or so. Eventually, they wrap around and destroy the glider gun by colliding with it. I can think of a few more optimizations that are easy, but I doubt they are very important.


[sourcecode lang=”cpp”]
#include "U8glib.h"

U8GLIB_SSD1306_128X64 u8g(U8G_I2C_OPT_NONE);

#define XSIZE (128)
#define XMASK (127)
#define XSIZE_UINT8 (XSIZE/8)
#define YSIZE (64)
#define YMASK (63)

// We use the extra lines as buffer space…
uint8_t c[YSIZE][XSIZE_UINT8] ;

#define MODX(x) (((x)+XSIZE)&XMASK)
#define MODY(y) (((y)+YSIZE)&YMASK)

#define ISSET(a, x) \
(a[MODX(x)>>3] & (0x1<<(MODX(x)&7)))

#define SET(a, x) \
a[MODX(x)>>3] |= (0x1<<(MODX(x)&7))

#define SETXY(a, x, y) \
a[y][x>>3] |= (0x1<<((x)&7))

#define CLR(a, x) \
a[MODX(x)>>3] &= ~(0x1<<(MODX(x)&7))

void
initrandom()
{
int i, j ;
for (j=0; j<YSIZE; j++)
for (i=0; i<XSIZE_UINT8; i++)
c[j][i] = random(256) ;
}

void
initgun()
{
memset(c, 0, sizeof(c)) ;
SETXY(c, 70, 28); SETXY(c, 68, 29); SETXY(c, 70, 29); SETXY(c, 58, 30);
SETXY(c, 59, 30); SETXY(c, 66, 30); SETXY(c, 67, 30); SETXY(c, 80, 30);
SETXY(c, 81, 30); SETXY(c, 57, 31); SETXY(c, 61, 31); SETXY(c, 66, 31);
SETXY(c, 67, 31); SETXY(c, 80, 31); SETXY(c, 81, 31); SETXY(c, 46, 32);
SETXY(c, 47, 32); SETXY(c, 56, 32); SETXY(c, 62, 32); SETXY(c, 66, 32);
SETXY(c, 67, 32); SETXY(c, 46, 33); SETXY(c, 47, 33); SETXY(c, 56, 33);
SETXY(c, 60, 33); SETXY(c, 62, 33); SETXY(c, 63, 33); SETXY(c, 68, 33);
SETXY(c, 70, 33); SETXY(c, 56, 34); SETXY(c, 62, 34); SETXY(c, 70, 34);
SETXY(c, 57, 35); SETXY(c, 61, 35); SETXY(c, 58, 36); SETXY(c, 59, 36);
}

void
setup()
{
#ifdef TIME_ME
Serial.begin(9600) ;
#endif

randomSeed(analogRead(A0));
initgun() ;
}

void
draw()
{
u8g.setDefaultBackgroundColor() ;
u8g.drawBox(0, 0, 128, 64) ;
u8g.setDefaultForegroundColor() ;
u8g.drawXBM(0, 0, XSIZE, YSIZE, (const uint8_t *) c) ;
}

void
line(const uint8_t *a, const uint8_t *b, const uint8_t *c,
uint8_t *out)
{
int i ;
for (i=0; i<XSIZE; i++) {
int sum = 0 ;
if (ISSET(a, i-1)) sum ++ ;
if (ISSET(a, i )) sum ++ ;
if (ISSET(a, i+1)) sum ++ ;
if (ISSET(b, i-1)) sum ++ ;
if (ISSET(b, i+1)) sum ++ ;
if (ISSET(c, i-1)) sum ++ ;
if (ISSET(c, i )) sum ++ ;
if (ISSET(c, i+1)) sum ++ ;

if (ISSET(b, i)) {
if (sum == 2 || sum == 3)
SET(out, i) ;
else
CLR(out, i) ;
} else {
if (sum == 3)
SET(out, i) ;
else
CLR(out, i) ;
}
}
}

void
loop()
{
int j, op ;
uint8_t obuf[2][XSIZE_UINT8] ;
uint8_t otmp[XSIZE_UINT8] ;

#ifdef TIME_ME
unsigned long time_start, time_stop ;

time_start = millis() ;
#endif

line(c[YSIZE-1], c[0], c[1], obuf[0]) ;
line(c[0], c[1], c[2], obuf[1]) ;
op = 0 ;

// We need this for the wrap around.

memcpy(otmp, c[0], XSIZE_UINT8) ;

for (j=2; j<YSIZE-1; j++) {
memcpy(c[j-2], obuf[op], XSIZE_UINT8) ;
line(c[MODY(j-1)], c[j], c[MODY(j+1)], obuf[op]) ;
op = 1 – op ;
}

// We still have three lines we need to copy back…
// And one more buffer to compute with line()

memcpy(c[YSIZE-3], obuf[op], XSIZE_UINT8) ;
line(c[YSIZE-2], c[YSIZE-1], otmp, obuf[op]) ;
op = 1 – op ;
memcpy(c[YSIZE-2], obuf[op], XSIZE_UINT8) ;
op = 1 – op ;
memcpy(c[YSIZE-1], obuf[op], XSIZE_UINT8) ;

// compute one generation..

u8g.firstPage() ;
do {
draw() ;
} while (u8g.nextPage()) ;

#ifdef TIME_ME
time_stop = millis() ;

Serial.print(time_stop – time_start) ;
Serial.println() ;
#endif
}
[/sourcecode]