Category Archives: Optics

The lunar eclipse was just an excuse to haul out my binoculars…

Tonight was a total lunar eclipse…

eclipse

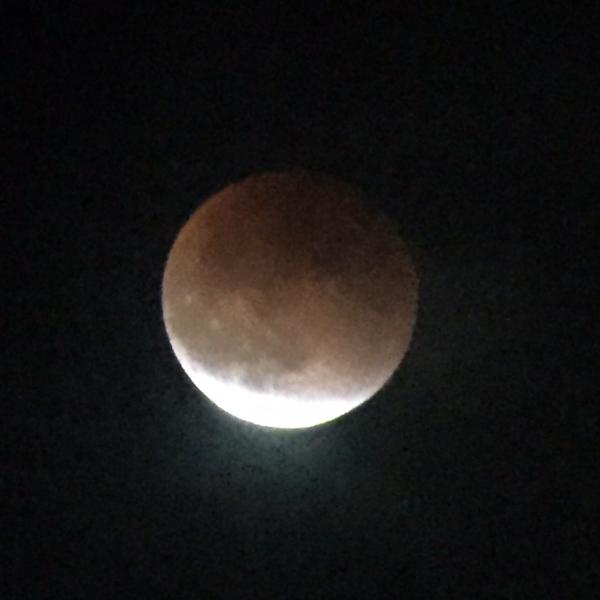
Lunar eclipses are pretty, but not super rare. Tonight’s started before moonrise, and by the time I got out to snap a picture or two, totality was already over. More interesting perhaps than the eclipse was the optical gadget that I pulled out to have a look.

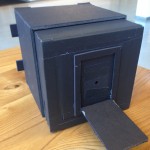
Over the years, I’ve acquired a bunch of optical gadgets at auctions and garage sales, and through my hobby of building telescopes. One of my best acquisitions were a pair of tripod mounted binoculars. I haven’t had them out in a few years, but the eclipse gave me an excuse.

IMG_0536

IMG_0538

IMG_0539

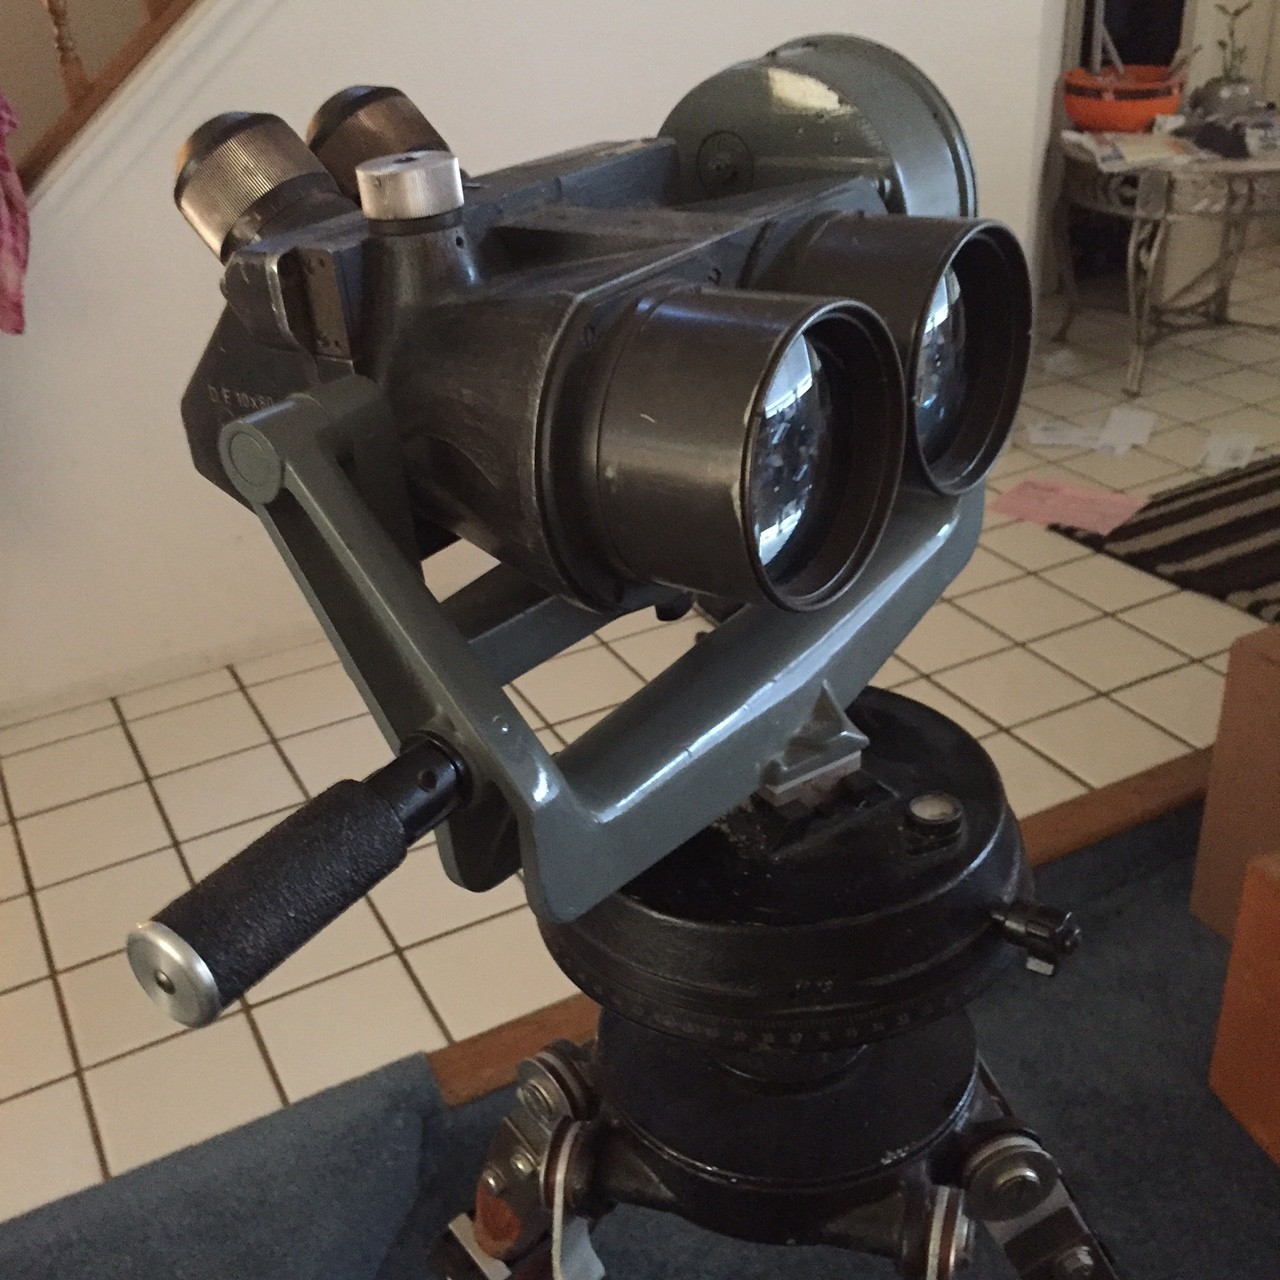
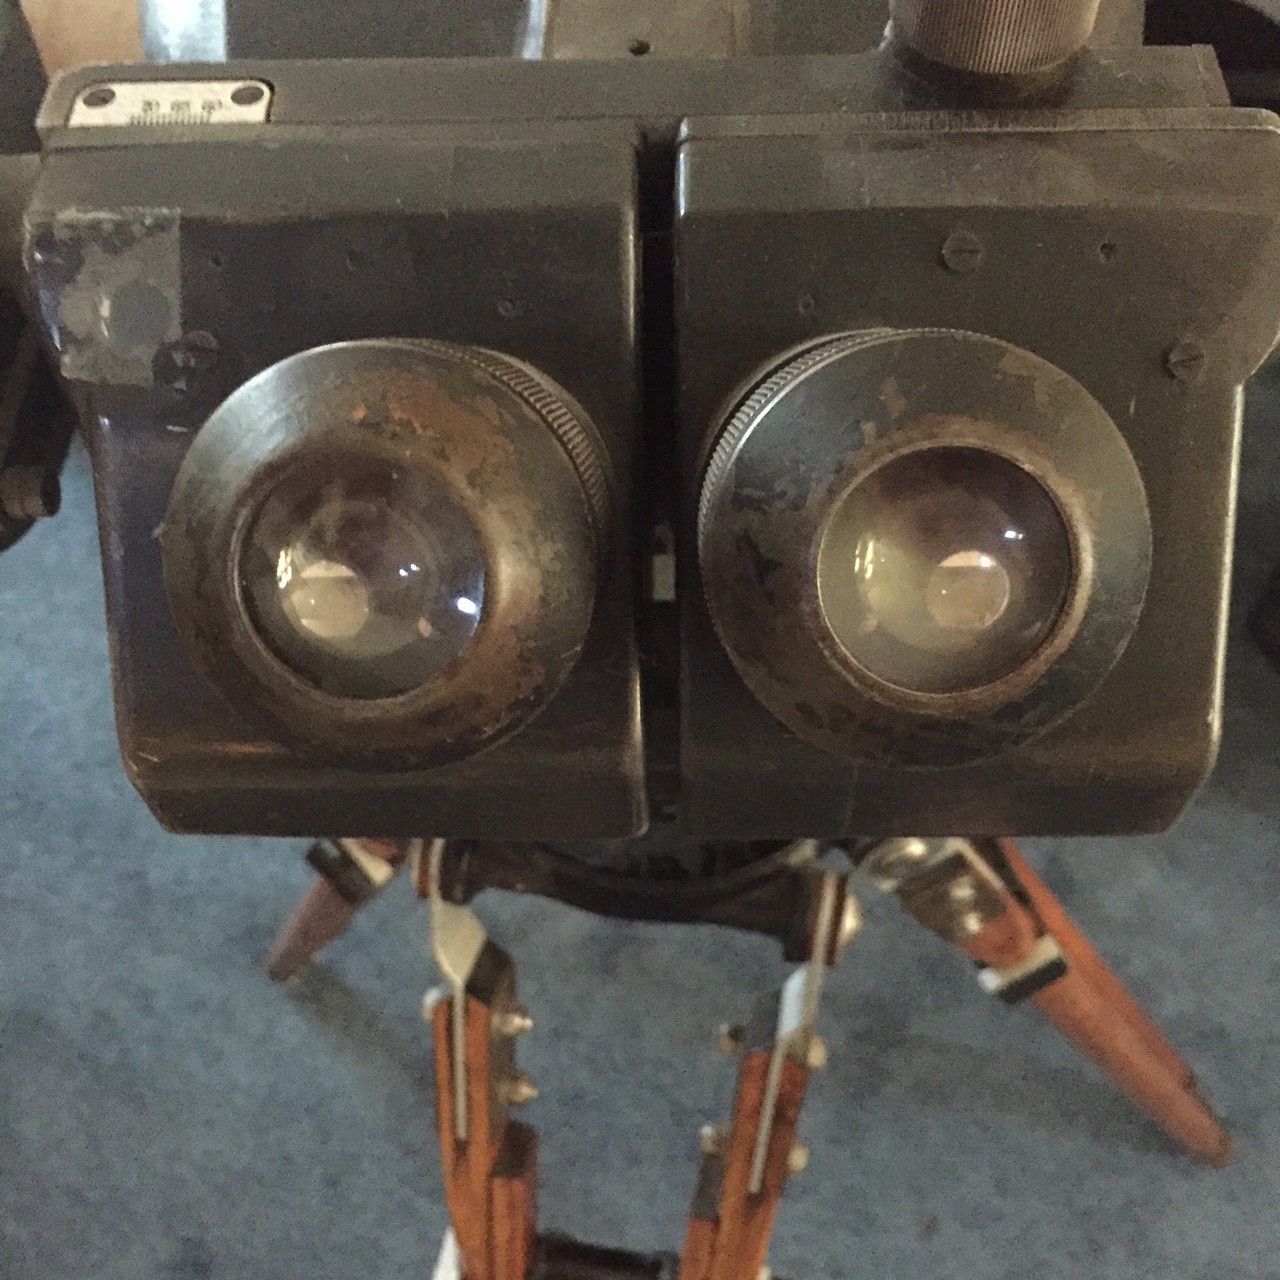
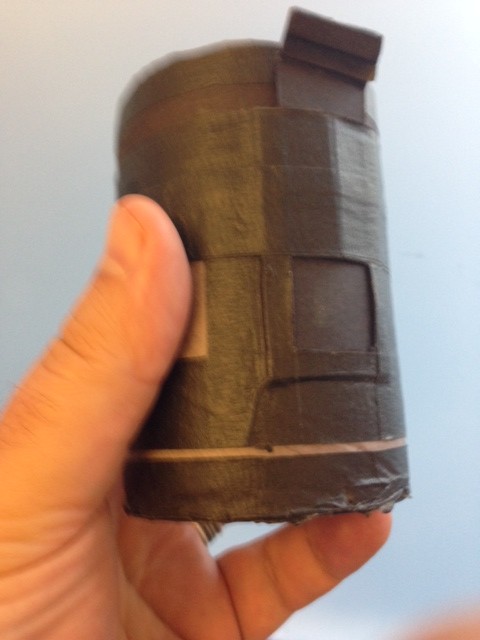
These are German WWII aircraft spotting binoculars, probably manufactured after 1942. I got them at an auction of optical gadgets from the estate of a Chabot Telescope Makers Club (whose name is shamefully escaping me at the moment). I do remember that Kevin Medlock was the auctioneer, and made sure that I didn’t get them too cheaply. I believe that he had a pair that he restored, and if memory serves, he replaced the eyepieces with better Erfle eyepieces (which he machined to fit in the original barrels) and had the objectives sputter coated.

Mine aren’t so cool, but they are in pretty good shape.

I know I looked up some details on them when I acquired them, but I am not certain I wrote anything down, so tonight I dug around trying to find more information about them.

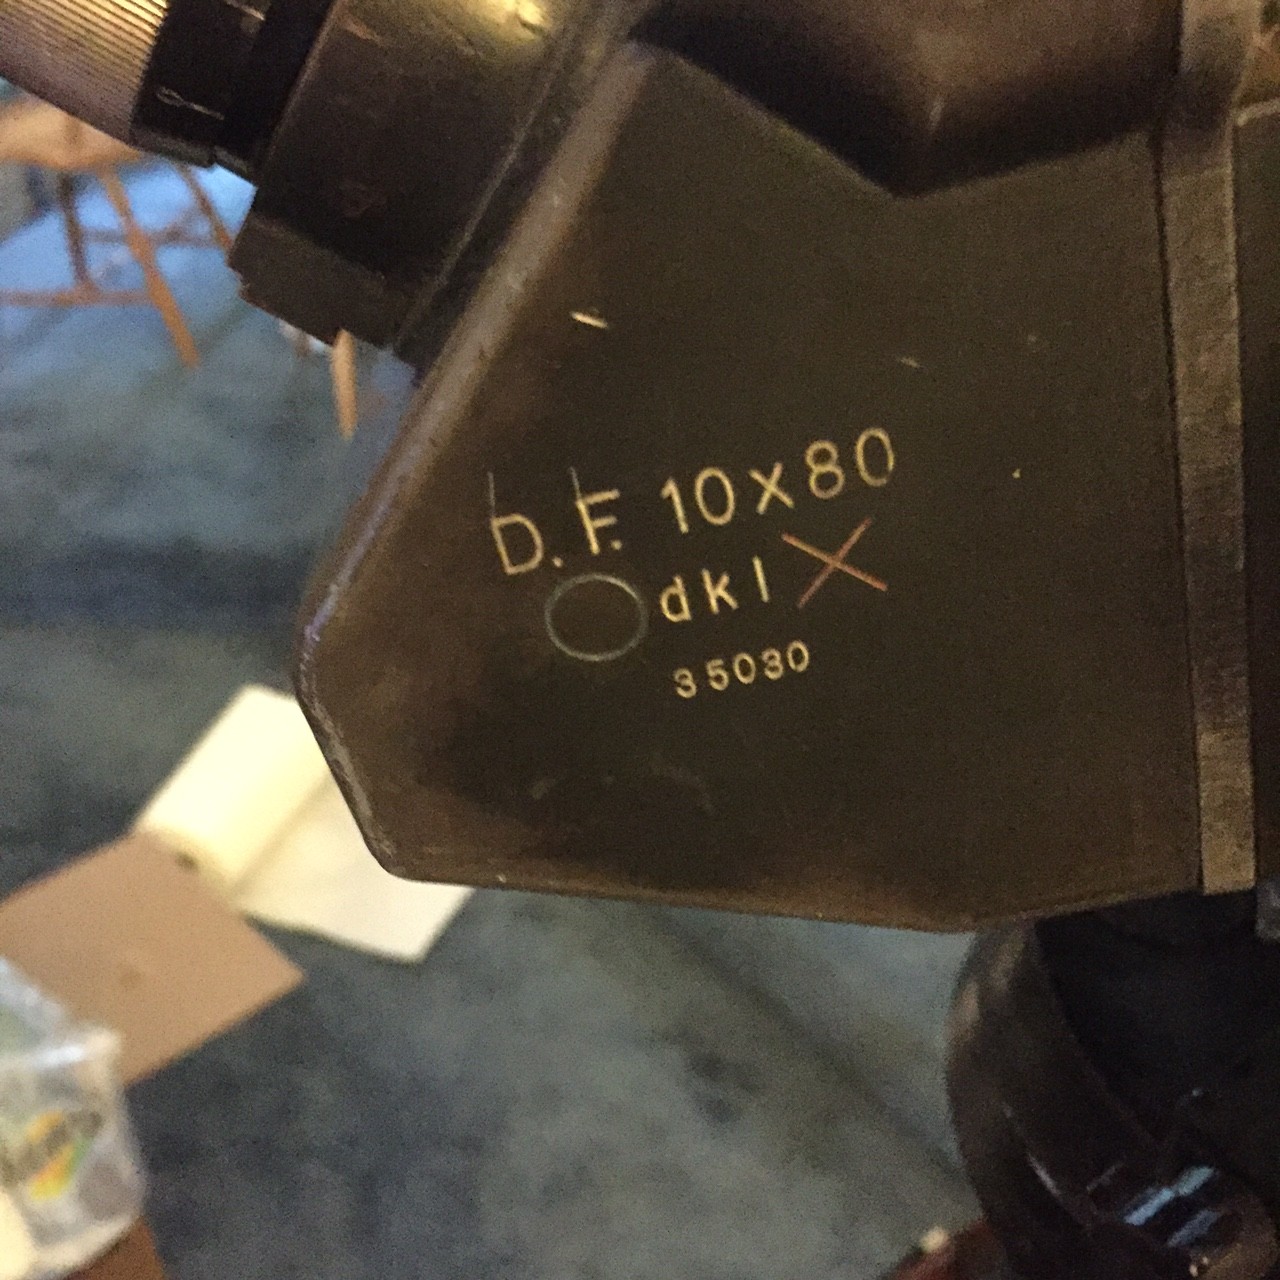
Looking at the markings is helpful. 10×80 is the specification of the binoculars, just like modern binoculars. 10×80 indicates that the objectives are 80mm, and they magnify 10x. D.F. stands for Doppelfernrohr (double telescope). The initials above the serial number are “dkl”, which indicates that they were made by Josef Schneider, Kreuznach. Binoculars of this type were manufactured by a number of different companies, all comparable in terms of their performance and quality.

A nicer pair (without the tripod and mount) were auctioned off at Bonhams for a lot more than I paid for them.

Here’s an article on restoring them.. He includes some great information about the type:

In 1936, Emil Busch AG of Rathenow won a contract to produce a 10x binocular for air observation for the German military. Leitz and Möller each produced competing prototypes, but the Busch model was chosen for its lighter weight (6.5 kg vs. 9.25kg for the Möller and 8.5kg for the Leitz) and greater field of view (131m at 1000m vs. 105m/113m for the Möller/Leitz models). Production began soon afterwards and continued through the war, when the Busch design was also produced by other firms in Germany and occupied Poland. The markings of the different factories are listed in the following section. All models have identical optical systems: 80mm cemented achromatic objectives with 280mm focal length, 70-deg eyepieces, 45-deg Schmidt roof prisms. Due to allied bombing, the 10x80s were primarily used for identifying attacking aircraft and directing the large 4m rangefinders, searchlights and cannons of the anti-aircraft batteries around German cities. They also proved useful on the battlefield, and a version with 20-deg inclined eyepieces was produced for use at sea. A single half of the 10×80 binocular served as Z.F. (Zielfernrohr) 10×80, a sight for the 8.8cm artillery.

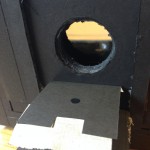
Mine are missing a few parts: there is some sort of mounting block which is over the top, and mine is missing the filter wheel that is toggled from a (missing in my pair) knob to the left of the viewer. I’ve put a piece of Scotch tape over the empty hole to keep dust from getting inside. Mine are also missing

Thousands of these were made, and a lot of them are still kicking around. They are pretty awesome for doing astronomy. The tripod I have is made from a solid hardwood (oak, I suspect) and is super strong and stable. A lot of the ones I see on eBay and the like have been stripped of their original finish, and often are buffed to a comically shiny bare metal look. Yuck. I suppose since many are recovered from damaged condition, not much is loss, but mine are in pretty good shape, so I think I’ll try to keep them as original as I can.

Tonight’s picture was captured by just holding my iPhone to one of the eyepieces. The view through the eyepieces is quite a bit nicer, the low light makes the autofocus not function well, and you can see there is a lot of noise in the sensor.

Over the next few days, I might do a similar post about my microscope. Stay tuned.

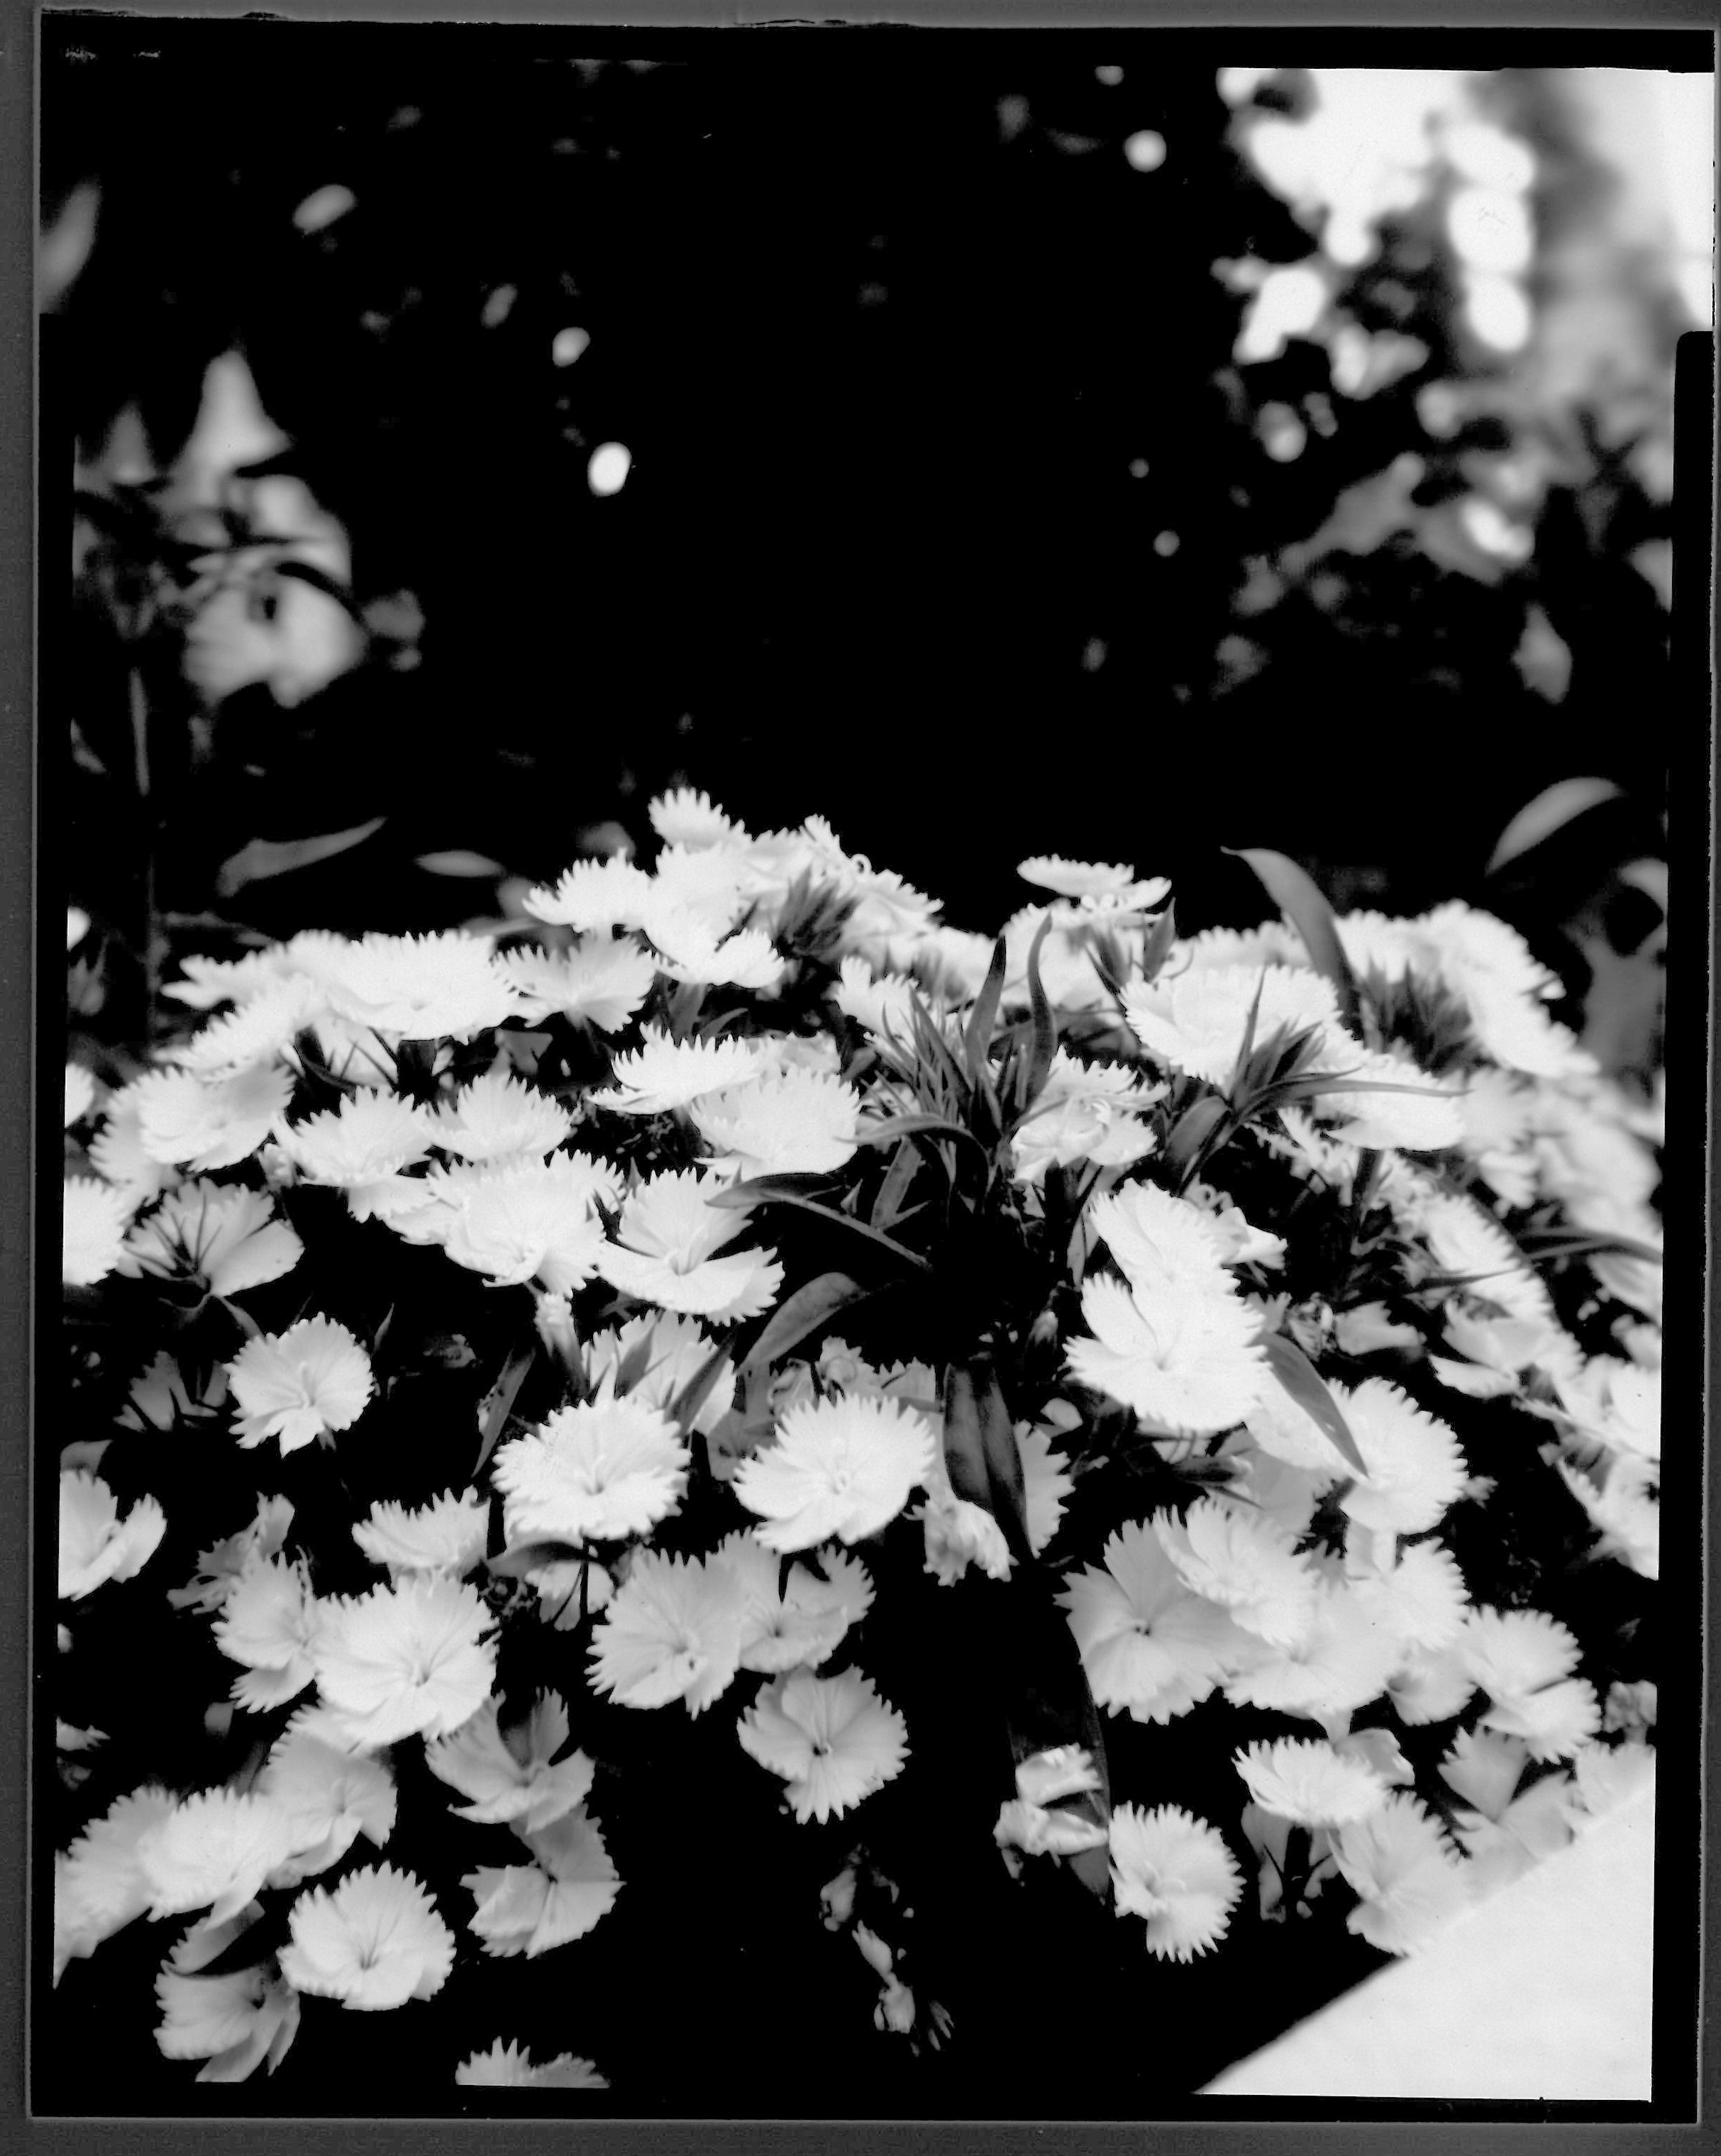
Addendum: After totality had completely ended, I went out and took this shot. It was difficult to get the iPhone to set the exposure correctly, and I used the digital zoom feature to get it large. The result has a pretty good view of the larger features, but is kind of mushy and looks like it was painted, rather than photographed. Still, you can see the system of rays emanating from the crater Tycho. I wonder if there are camera applications for the iPhone that allow better adjustment of parameters. I may try again sometime soon.

Got a first generation (obsolete!) Lytro Camera…

I spent a couple years of my life working on a light field motion picture camera (and got named on two patents) as part of my former work, so I’ve been interested in light field photography and computational photography more generally. The company Lytro was basically the first to market such a device, and recently they were discontinued. Because of that, they were pretty cheap on woot.com, and I couldn’t resist picking one up. It arrived today.

Here’s my first picture. Try clicking on it in various places, or clicking on it and dragging a bit.


I may do a video review of the product, not so much as a product, but basically as an introduction to light field photography, which I still think is interesting, even though the technology isn’t quite their yet.

Stay tuned.

Addendum: The Lytro Meltdown site documents the Wifi protocol for the camera, which means that I might be able to hack together some python code to extract the images from the camera. I might use the Raspberry Pi to experiment. Basically, the camera creates a private wifi network, which you can connect to. Once on that network, you connect to the camera and issue commands over special ports, in a bizarre format. Why they didn’t choose to use HTTP? That’s why the product is no doubt discontinued.

Two more pictures from my foamcore 4×5 camera…

Here are two more photos I took at last night’s camera workshop. I wanted to take something slightly more beautiful than a selfie, so I chose the Luxo statue outside the Steve Jobs building at Pixar, and some white flowers from the garden. Both were taken rather late in the day, under partly cloudy skies using a 4 second exposure on some paper with an ASA value of around 4, and a 4 second exposure (timed by my accurately counting “Mississippis”). Both were shot at f/24. I scanned them using our copy machine at 600dpi, and then inverted them in gimp. I didn’t do any further processing on the Luxo. With the flowers, I adjusted the curve slightly to bring out some details in the darks between the flowers. I saved these versions as JPEGs, click on them to see them full resolution.

luxo

flowers

If you look to the upper right of the Luxo, you can see that there are some significant off-axis aberrations, as is also apparent in the background of the flowers. But the center of the field is remarkably sharp, considering. I’m rather pleased.

An Experimental 4×5 Camera with a ridiculous lens… and a ridiculous selfie

Over the years that I’ve been interested in computer graphics and telescopes, I’ve managed to pick up a bit of knowledge about optics in general, and specifically about camera lens design. In the past, I’ve been particularly interested in old cameras and photography, and in a kind of photographic minimalism. But it has remained mostly an academic interest, with no real practical results.

Until recently.

I was recently asked to provide a little bit of background on camera lenses and lens design at an informal workshop. The purpose of the workshop was for each participant to build and use a camera of their own construction. I’ve taken similar courses before where we did pinhole photography. Here’s the apex of that experiment, a picture of my desktop:

pinhole3-pos

Taken with this camera. Note the curved back, which results in the odd panoramic distortion of the previous picture.

pinhole

But this time class was a bit more ambitious. We were going to make cameras that would shoot on 4×5 film, and use a real lens (or lenses) to give us faster focal ratios and interesting distortions and other effects. We ordered some lenses with focal lengths of around 150mm from Surplus Shed for a few bucks apiece (favoring some positive meniscus lenses, as well as some with about 300mm that we thought we’d experiment with some symmetrical lens arrangements, got some 4×5 sheet film holders, and a pile of black foamcore and gaffer tape. Each person’s camera was a bit different. Here’s mine:

It’s a pair of boxes about 7″ across which telescope together. To create a bit of a light trap, there is both an inner and an outer box in the back, and the section which holds the lens slips in between those two, and also provides a rough focussing mechanism. The lens is a meniscus with about 150mm focal length, and about 50mm in diameter. It’s not an achromat, just a simple lens, configured as a Wollaston landscape lens. 220px-WollastonMeniscus-text.svgI constructed a small box to hold it about 1 inch behind the front of the camera, and then punched a 1/4″ hole in some black paper to serve as a stop. Instead of a true shutter, I decided to just make a little trap door. For our first tests, we were going to image directly onto photographic paper, which had an ASA rating of around 3 or 4. With the 1/4″ stop in place, my camera operates at around f/24. To make my first “selfie” in room light, I guestimated an exposure time of 30 seconds. The first exposure was far too light. I then caved and used a smartphone app to give a better estimate, and it suggested a three minute exposure time. I shot this on ASA 3 positive paper. I triggered the shutter myself, then sat down and tried to be as still as possible. When the time was up I got back up and closed the shutter. Into the darkroom… and bathing in the rinse!

photo 1

I cropped the picture and scanned it, cropped it, did a very tiny exposure tweak to darken it a bit (probably should have left it in the developer a touch longer), and here’s my selfie:

portrait

I’ll try to get some new shots next week. But it’s a fun project, I urge anyone to give it a try. These simple lenses are more effective than you would think.

On early camera lenses…

I like it when my life’s experience and interests toss me an opportunity, and out of the blue last week I received an invitation to help with a class a colleague is trying to put together to help people build their own cameras, and he wondered if I could give an hour or so introduction into camera lens design. It’s really odd that I know anything about camera lens design, but when I was really into building telescopes, I acquired and read a fair number of books on optics and cameras, and in my job it’s proven occasionally useful. (I even managed to be a coinventor of a light field motion picture camera.) But really, it’s always been pretty much just a hobby.

Which isn’t to say it isn’t fun, and interesting, and an opportunity to build some cool stuff.

The history of camera lens design is actually pretty nifty, and goes back over two centuries, even predating the invention of film (early lenses were used in camera obscura). I remember reading (and subsequently forgetting a great deal) of the history of the camera lens in a borrowed copy of Kingslake’s History of the Photographic Lens (a great work, I should someday purchase a copy of my own). But I do have copy’s of Conrady’s Applied Optics and Optical Design. This book was written in 1922, and detailed the mathematical design methods used to design a variety of optical instruments. In particular, I recalled a particular design consisting of a “stop” in front of a simple, concave forward positive meniscus lens. I couldn’t recall the name, but a few minutes of Googling reminded me that it was called the Wollaston landscape lens.220px-WollastonMeniscus-text.svgThe lens is, well, just lens and a stop, but can yield surprisingly good images. The simplicity also makes it a great lens for experimenting with simple primitive cameras. The lens is typically mounted in a barrel that accepts cards with different size holes for the stop, about 15% of the focal length in front of the meniscus. When the lens is stopped down to about f/16, the performance can be quite good over fields of about 45 degrees or so. Conrady’s book covers the design of such a lens, and tells you exactly how to optimize the system, but frankly it probably doesn’t matter that much. I’ll probably review that material, but I doubt doing any math is called for in this class. I suspect we’ll just select some roughly appropriate lenses from Surplus Shed and have at it.

A former Pixarian and colleague, Craig Kolb (along with Don Mitchell and Pat Hanrahan), did a really nice paper back in his Stanford days entitled A Realistic Camera Model for Computer Graphics which showed how you could simulate more complex camera lenses which have many subtle effects not usually captured by the simple pinhole projection model used by most rendering software. I can’t remember if I reviewed the paper for SIGGRAPH, or if I just talked to him about it, but I always thought it would be cool to try to simulate one of these simple camera lenses and show how the “defects” of these simple lenses could be appropriately simulated in CG. He never did it, and neither did I. It still remains on my list of projects to do.

One good thing about looking at these old designs is that a lot of information can be had from materials which you can get for free online. A bit of googling revealed this nifty little book (digitized by Google and available on Google Play) which has a lot of good information about the Wollaston landscape lens, and other simple lenses of the day. It’s conveniently out of copyright, so free to all.

Bolas and Brown’s The Lens

Hopefully more on this to come.

Addendum: Bolas and Brown’s book is not without it’s problems: I saw this diagram while reading it, and realized that it’s not accurate. Off axis parallel rays should be focused, well, off axis, this diagram shows them coming to focus on the optical axis. Whoops!