I haven’t got a lot of details about my solar project available, but Project Curacao has all the details of a much more impressive version of the basic idea to serve as inspiration. Basically, the guys at SwitchDoc decided to mount a small solar setup with some lithium polymer batteries, a Raspberry Pi and an Arduino that could gather weather and image data unattended from a location in Curacao. My own attempts are much more meager, and not in such an exotic locale, but it will serve as good inspiration.
Category Archives: Raspberry Pi
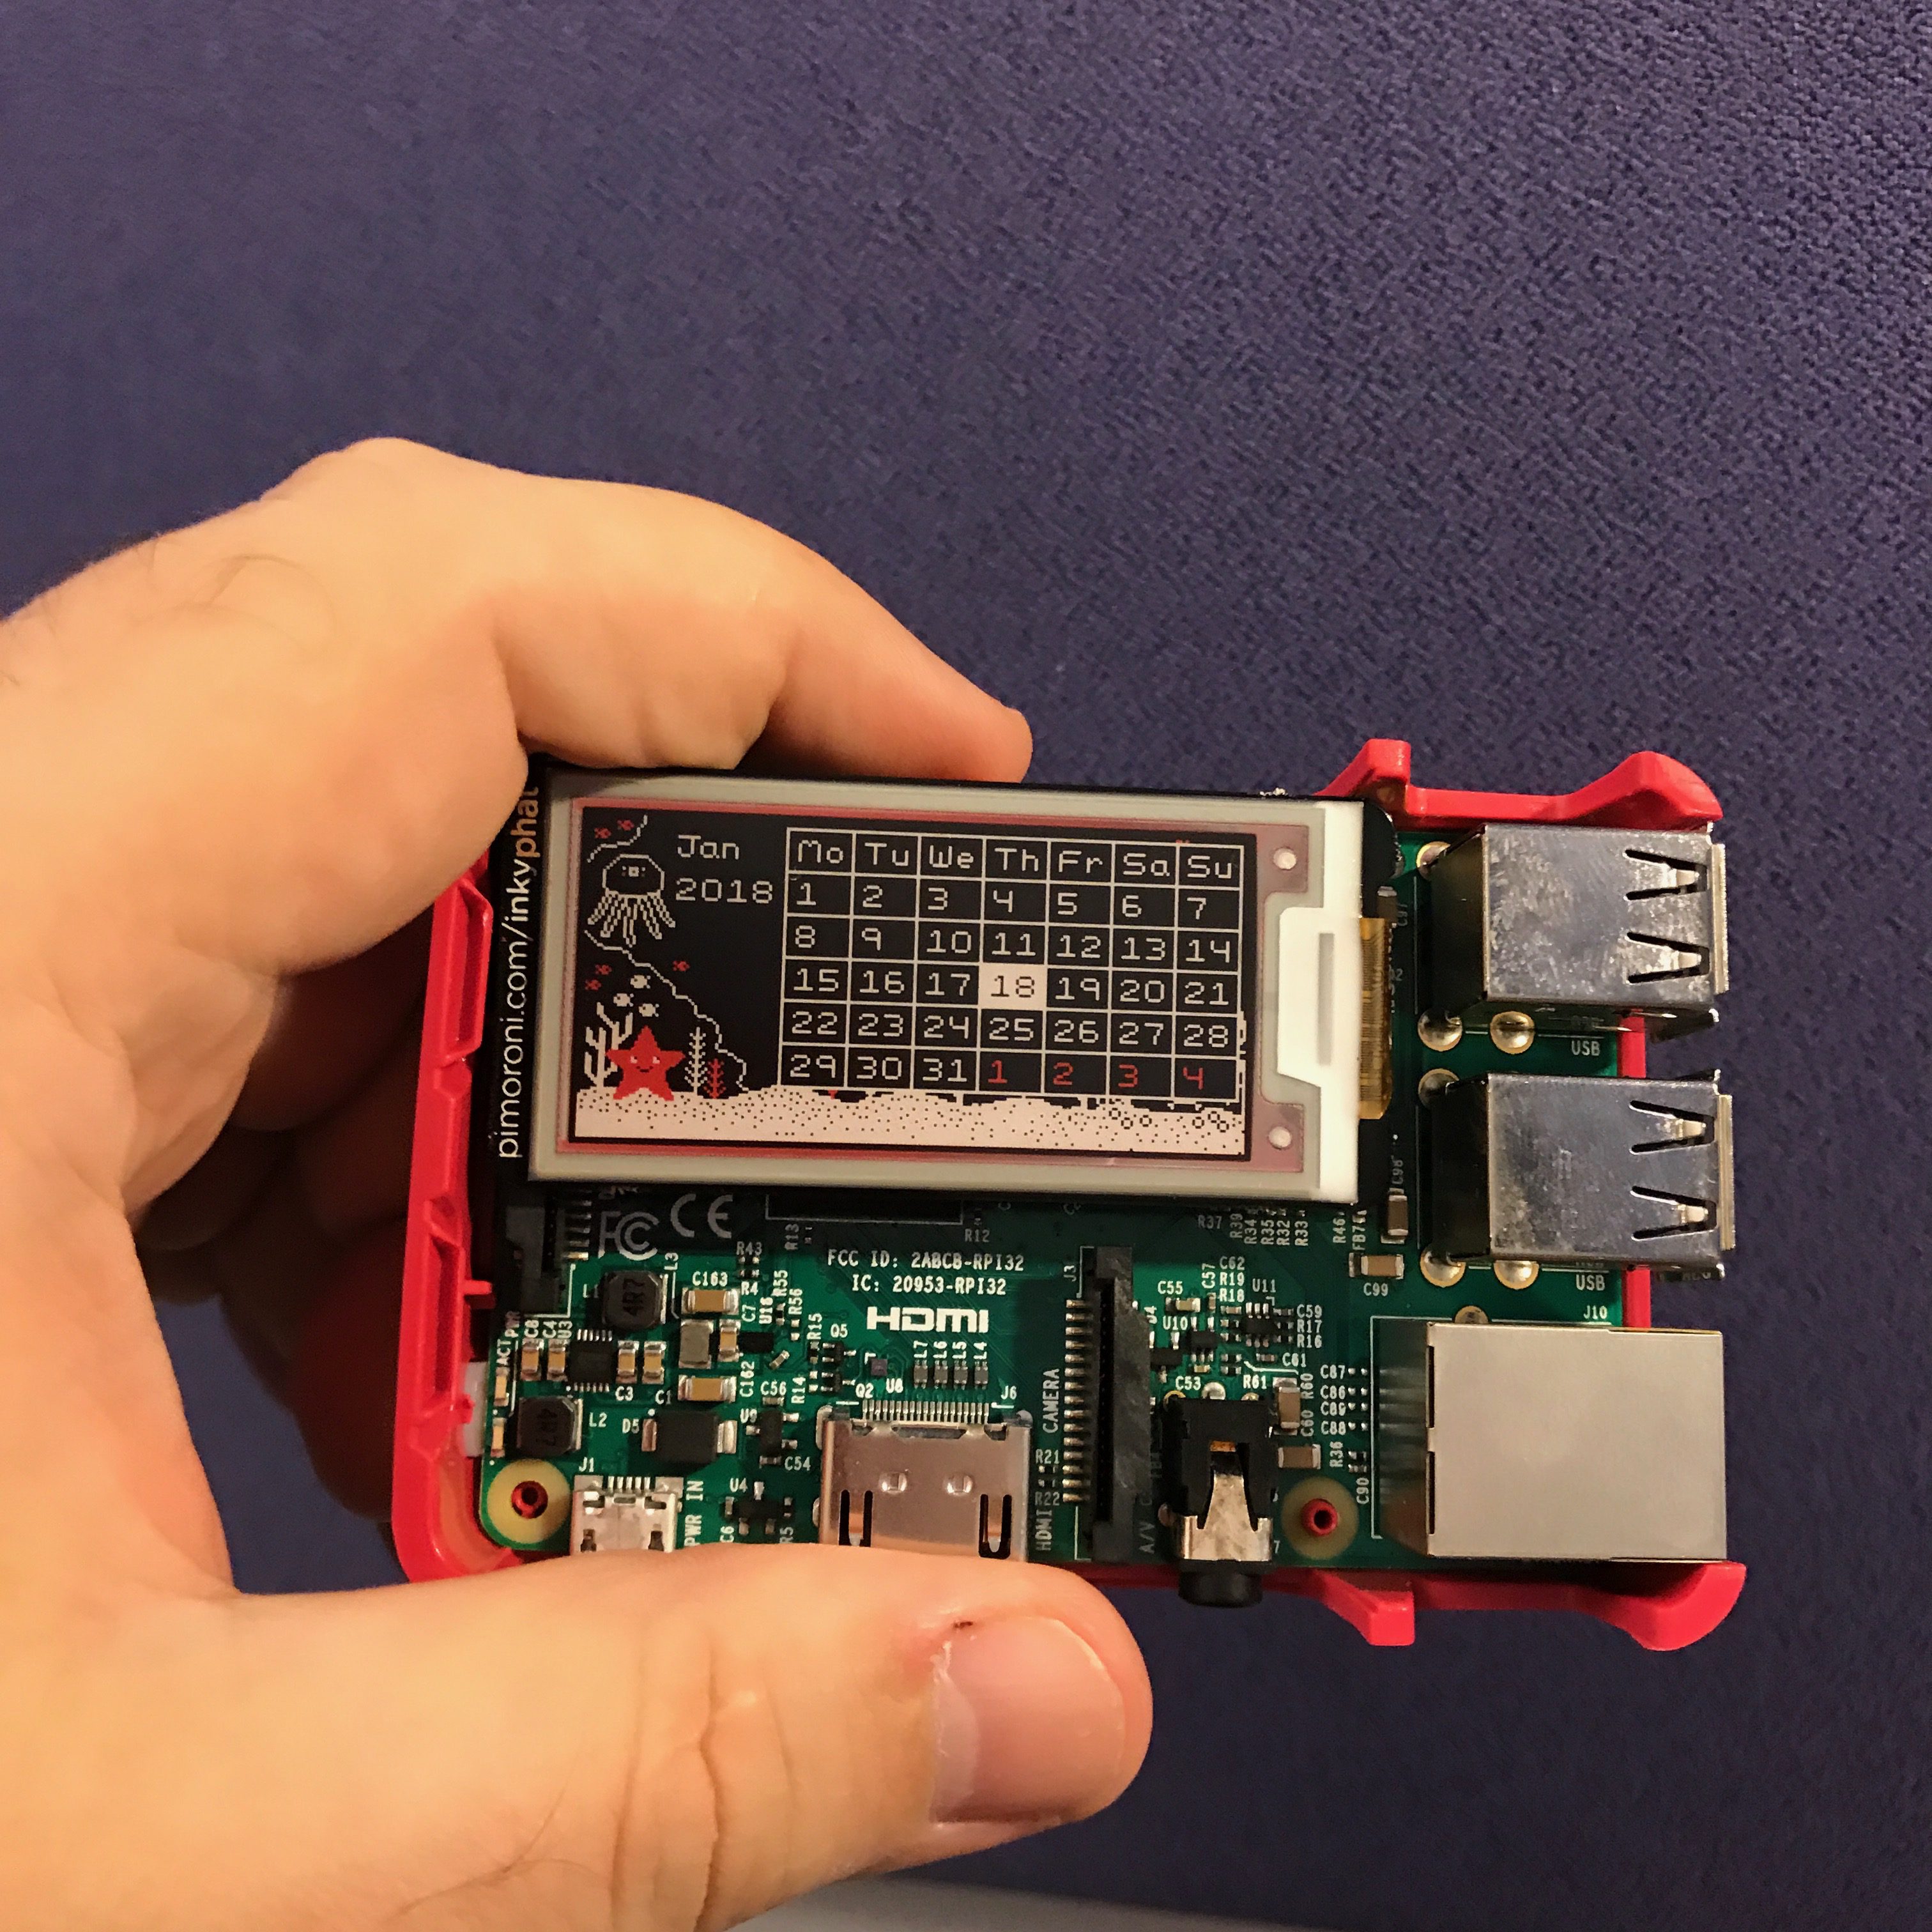
A few quick thoughts on the Inky pHAT
Okay, I got it working. See!
But I had a number of really annoying problems, none of which really had to do with the hardware:
- I installed it on a Pi3 I had lying around that previously had been running my 3D printer using Octopi. I tried to do an “apt-get update” and “apt-get upgrade” so I could install the python modules, but it complained with some obscure error messages. Since I had a fresh img file of a more recent version of raspbian, I thought I’d just ignore the problem and shift to that.
- But, of course the computer gods hated me yesterday. It took a couple of tries for me to decide on using the latest Debian Stretch based distribution. I used the “lite” version without any desktop because, well, I could.
- I still had trouble doing an “apt-get upgrade”. For some reason, I couldn’t reach “mirrors.ocf.berkeley.edu”. I suspected something to do with nameservers, but couldn’t really track it down. I eventually hardcoded a different server into my /etc/apt/sources.list, and got it to update.
- I then had to install python-dev, which took a very long time, mostly because numpy takes forever to install.
- I then installed python-pip, without incident, and did a “pip install inky-phat”. That gave me an error while installing “Pillow”, caused by a missing dependency for libjpeg. I eventually figured I needed a “sudo apt-get install libjpeg-dev” and then reran the pip command.
- Then, for fun I cloned the git repository for the library so I would know where the examples are (after installing git of course) and then I could finally run their example code.
- Oh, except you need to run “raspi-config” to enable the SPI driver, or it won’t work.
Phew. All in all, a pretty frustrating time, but in the end it works well.
A couple of more comments.
When it was shipped to me, the “white” of the display seemed pretty yellow and not very pleasing, but after running the demo program, it refreshed pretty well, and the whites (while not exactly brilliant) are much better.
As you can tell by the picture above, the image remains visible even when power is completely disconnected which is kind of cool. But the reality is that the Pi is pretty slow to cold start and draws a lot of power, so having a low power display on the Pi isn’t actually as interesting as a similar display would be on a lower power board like the ESP32. But that being said, I really like the display.
I mounted it on Pi 3. The board has a 40 pin female header pack (2×20) on the back, which mates with the pins of the Pi3. If you have a Pi Zero W, you’ll probably need to solder a bunch of male pins on the board to mate up with it.
The case that I have for the Pi3 isn’t well suited for the combination, and won’t close. I might have to design and 3d print something.
I’ll try to write some code for it shortly.
Inky pHAT arrives: a 3 color E-ink display for the Raspberry Pi
For some reason, I’ve always been attracted to E ink displays. They combine a number of interesting features like low power (none when not being refreshed), high contrast and a wide viewing angle. But they only recently have begun to get cheap enough to play with. The other day I was surfing around and discovered the Inky Phat from Pimoroni. Which is a cute little 212×104 display which has three colors (black, white and red). It was about $25, and interfaces directly with the Raspberry Pi. It’s basically the same size as a Pi Zero W, but can also be used on any other Pi with the standard 40 pin Pi connector.

I haven’t done anything with it yet, but it’s calling to me, telling me to rush home and give it a whirl. I haven’t got a project in mind for it, but it comes with a Python library to drive it, which suggests that it might serve as a good display for a small satellite tracker using my Plan 13 library.
I’ll try to get a short demo video of it up tonight.
Two bits of hardware on order…
Yes, my fascination with cheap computing devices continues. I’ve got two bits on order at the moment.
First is the Pine A64 from Kickstarter. This one won’t be showing up for a while, but seems to be a pretty nice piece of kit. You can think of it as a competitor for the Raspberry Pi, but it’s got a few additions that seem pretty interesting. You can order them with up to 2G of RAM, it can drive a 4K display, it has a real time clock, and it’s actually cheaper than the Pi.
Second is the LinkIt Smart 7688 Duo from Seeedstudio. It should ship to me fairly quickly, and I’m pretty excited by it. It runs Linux OpenWRT, which I have had some experience with on other router hardware. It’s tiny and limited, but still powerful. I view it as basically competition for the WRTnode, which has similar specs and also runs OpenWRT, but this one nicely includes a microSD card slot. I will try to get it up and running and maybe do a comparison between the two when I get it.
Stay tuned.
New arrivals from Adafruit, and minor updates…
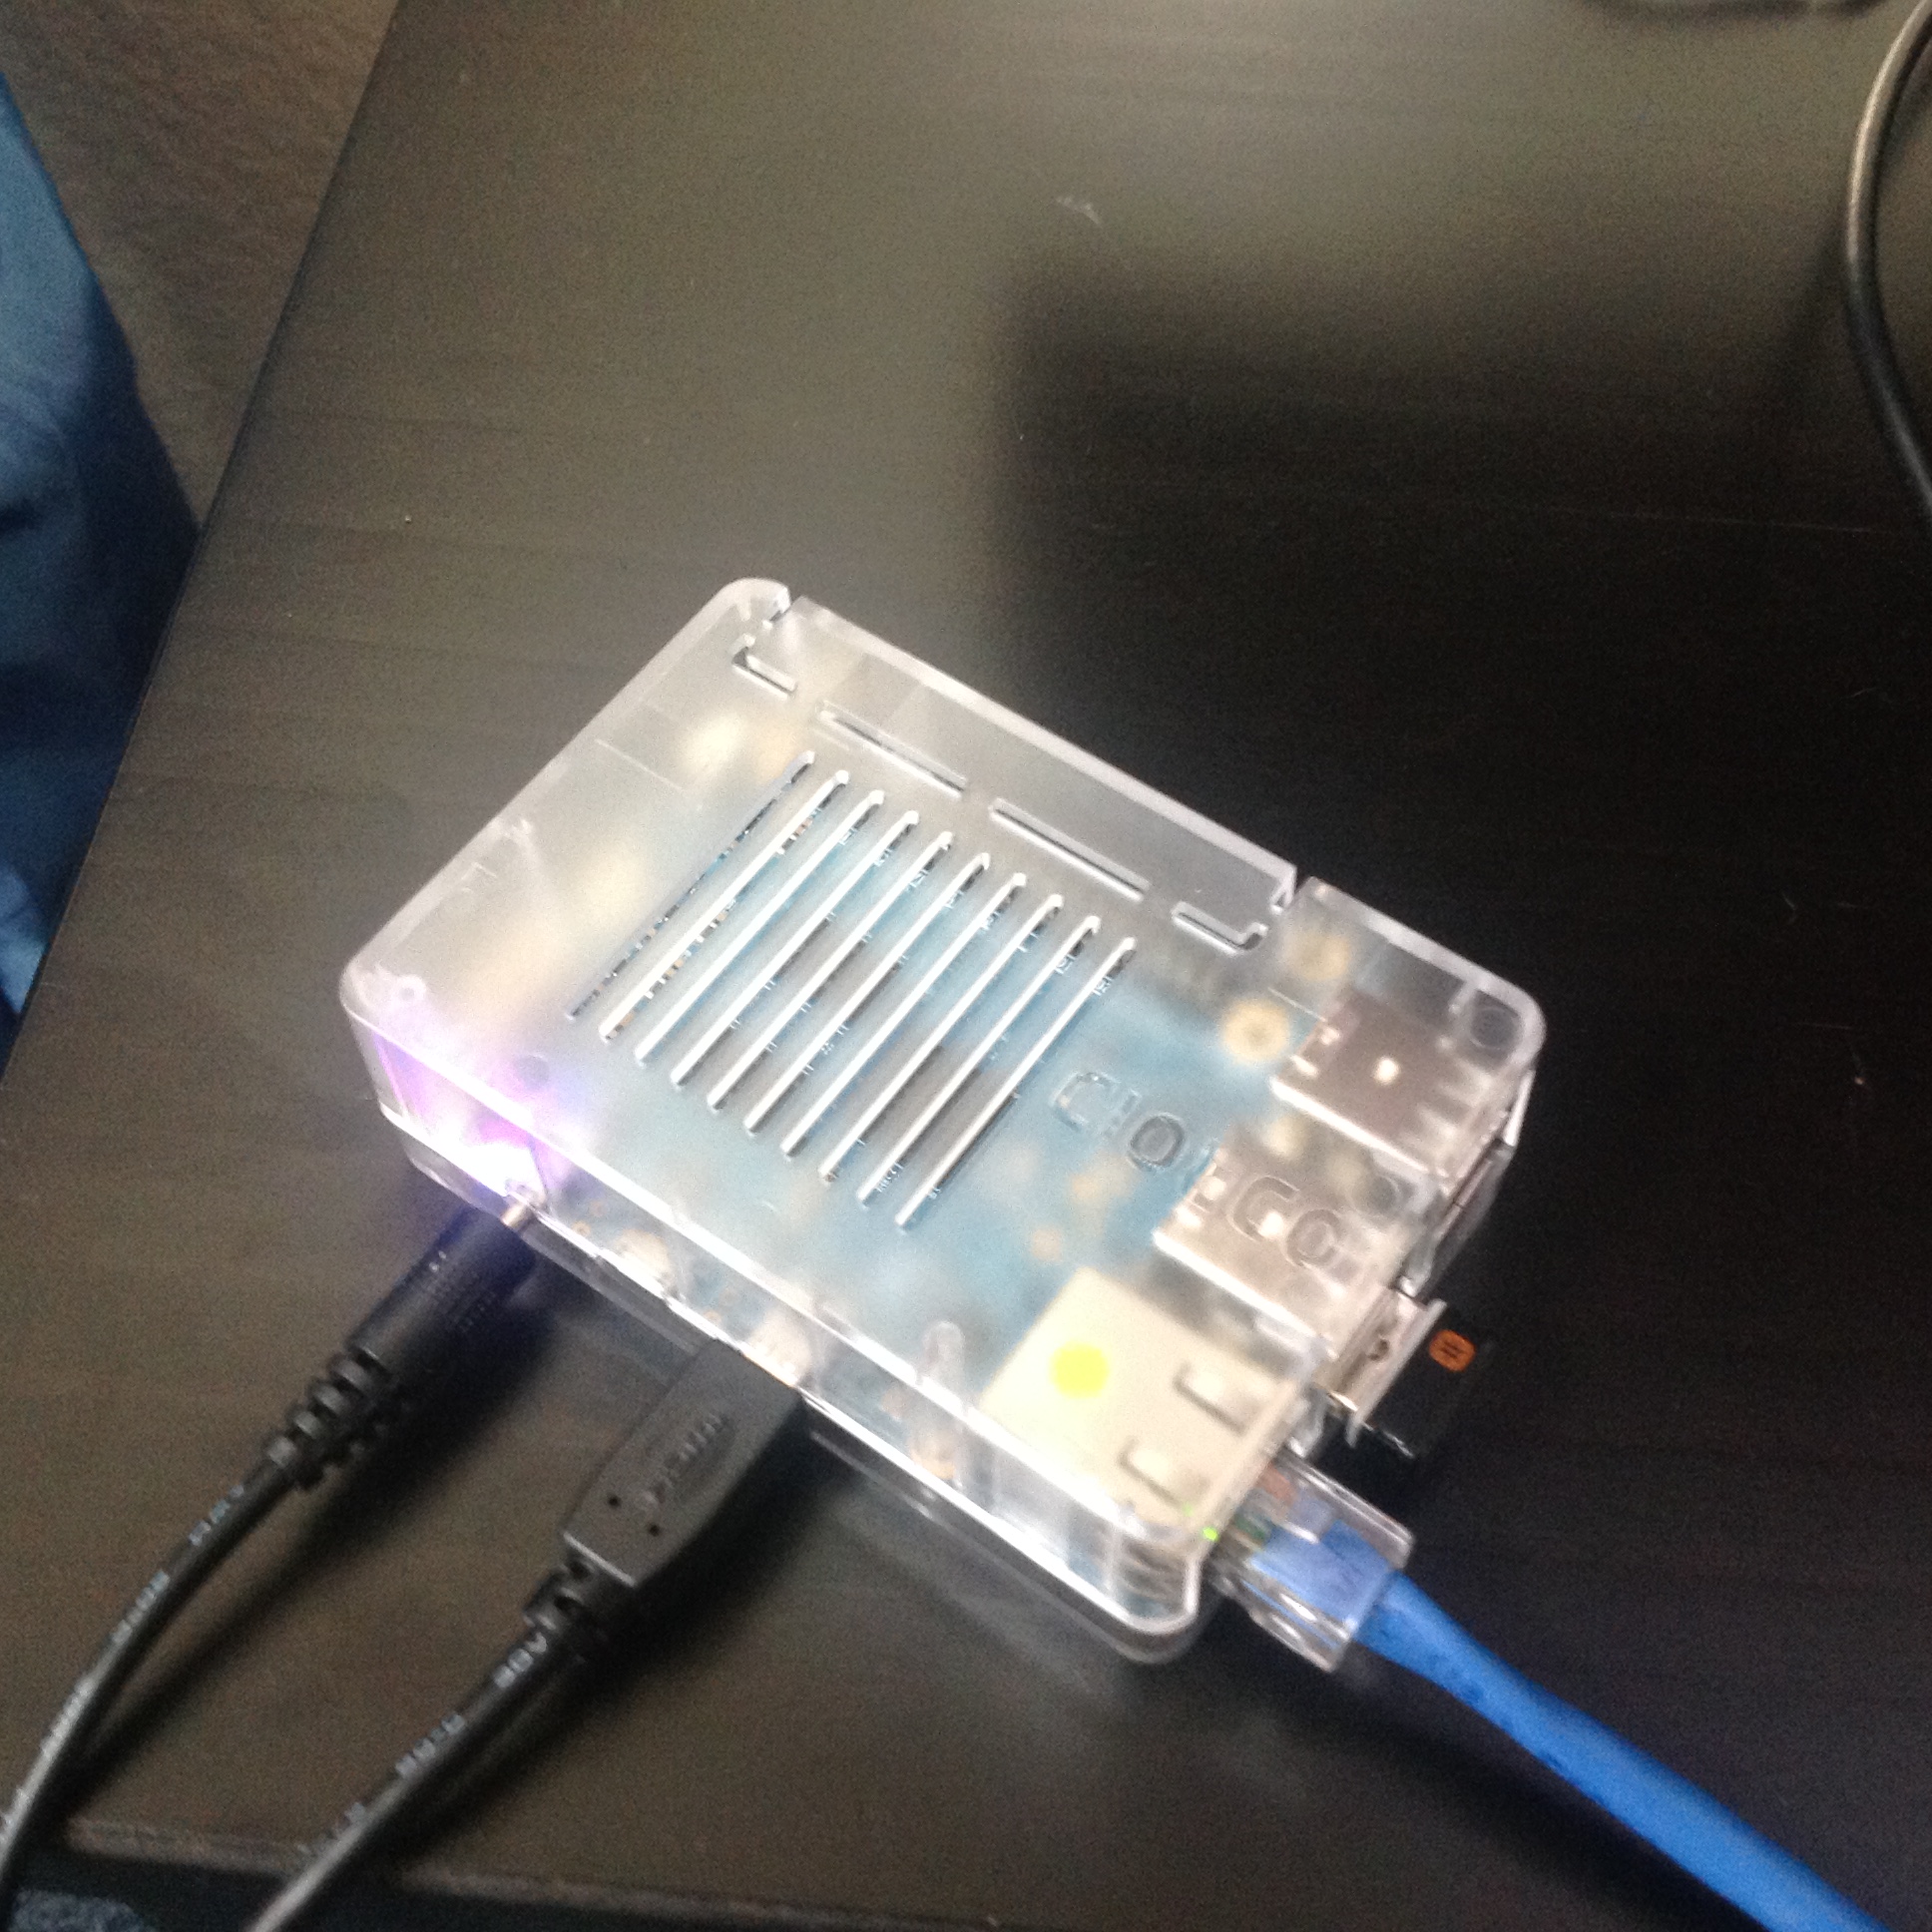
I think Bill and Pete have been having way too much fun with the radio projects centered around the Arduino and the SI5351, so I decided to join them and ordered one of Adafruit’s SI5351 boards (I still have the kit from Jason’s Kickstarter which will almost certainly be better once I get up the nerve to do a little surface mount soldering). At the same time, I noticed that Adafruit had the new quad-core Raspberry Pi 2 boards in stock. It’s likely that my hummingbird cam may be resurrected onto this board to give me a little extra CPU oomph.
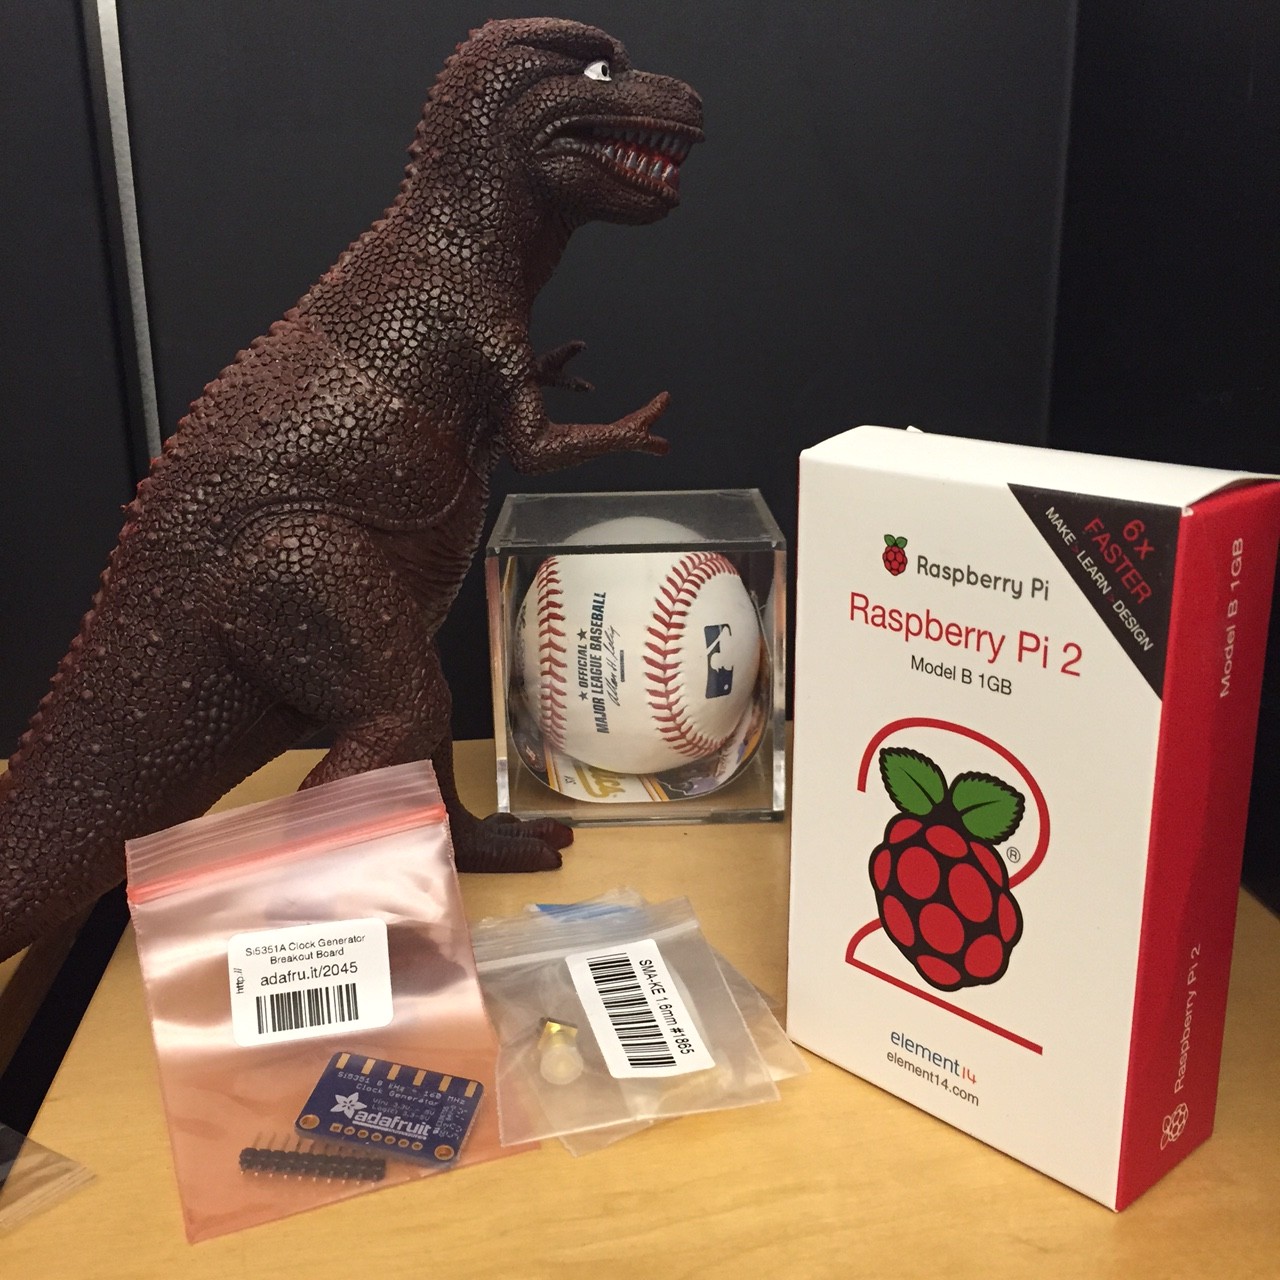
Oh, and the other items? I like to have plastic dinosaurs in my office, and the baseball was a ball I caught during an (otherwise completely forgettable) Oakland Athletics game.
I was informed by email that Pete was unable to achieve the same minor level of success that I had following my directions on how to get the Arduino 1.6.3 environment working with the I2C LCD display. For now, Pete seems content to use the 1.0.x versions, which I suppose is okay, but maybe we will revisit this sometime in the future. In the meantime Bill has had greater success in getting his Si5351 board working as a VFO/BFO, and has it mounted on some copper clad. Looks very nice. I should do a project like this.
Anywho… today’s aquisitions will likely show up in a future post/video. Stay tuned.
More camera experiments…
Tonight’s tinkering was inspired by the script by spikedrba that I mentioned in yesterday’s post. I took down the hummingbird camera for a little maintenance, and while it was down decided to do some bench testing with new ideas inspired by what I read.
Sadly, I didn’t have anything as photogenic as hummingbirds to stare at, so instead I just pointed it me in my slightly darkened living room as I hacked on the couch. The video is incredibly boring, but I will post a single frame:
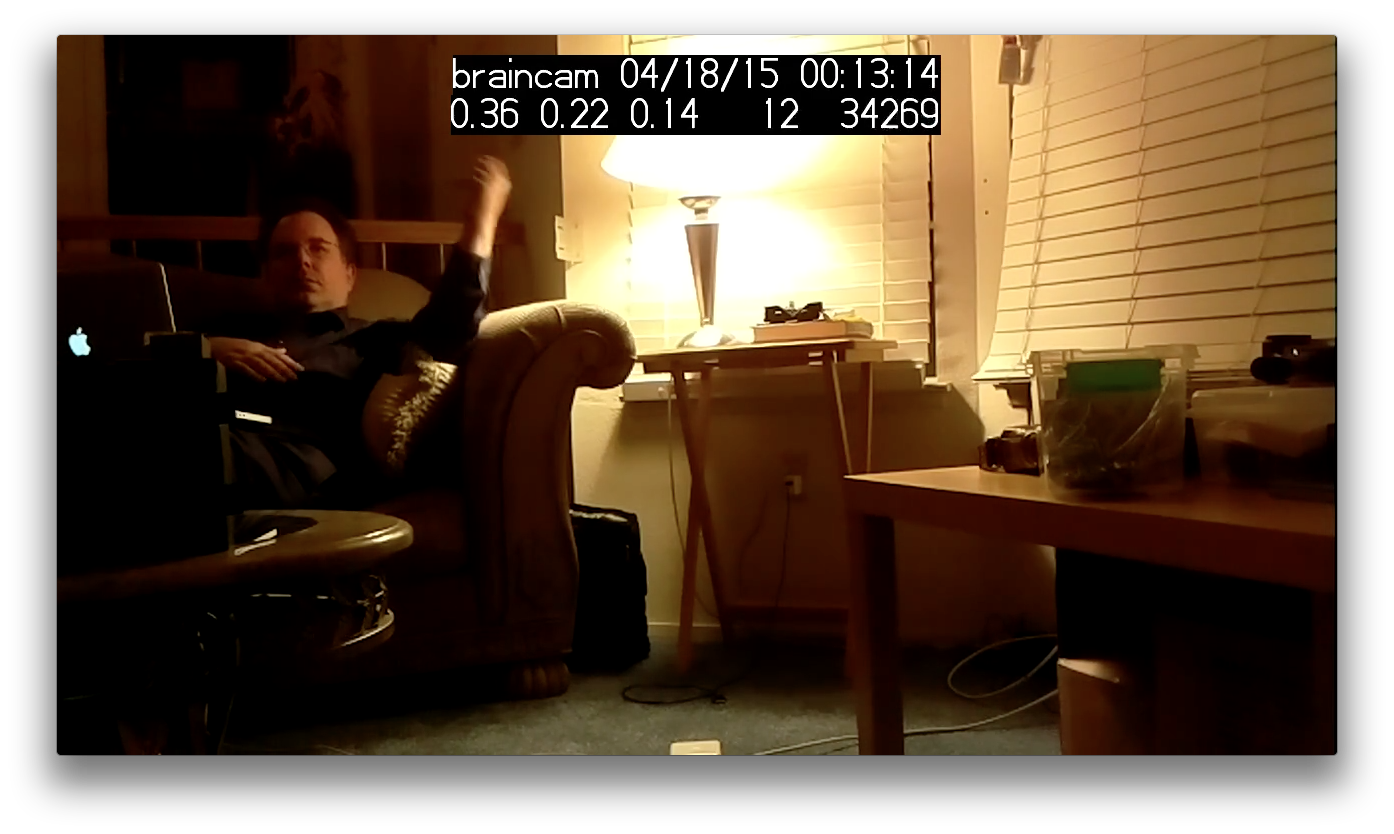
First of all, I’ve added a text annotation with the time and date to every frame. In my hummingbird camera application, it’s not clear to me that I want it overlaying every frame, but it’s probably useful in a variety of security applications, so I thought it was worth trying. On the line below, you can see three numbers, which represent the load averaged over one, five and ten minutes, followed by two numbers. The first is the number of non zero-length motion vectors that the camera returns, and the second is the sum of the absolute value of differences between adjacent frames. Currently, this application was recording 1280×720 video at 25 fps, and you can see it was using around 36% of the available cpu. Not bad at all. While this version of the script doesn’t actually trigger motion detection recording, it is probably doing virtually all the work that such a script would do, so it’s pretty clear that my stock, non-overclocked model B can easily keep up at this frame rate and resolution.
Spikedrba’s script was very instrumental in figuring out how to setup the pipeline properly to handle this. I also spent some time reading more of the discussion on the picamera github page, and reading the code for the module itself. I’m really very impressed by this.
Once I tighten this up a bit more, I’ll be posting a new revision.
Motion detection in my hummingbird camera…
My goal in experimenting with the Raspberry Pi camera was to try to make an efficient and effective camera which can detect motion. Previous incarnations of the camera script merely looked at the differences in pixel values between adjacent frames, thresholded them at some value, and then counted the number of pixels which exceeded this value. What I discovered was that it was pretty hard to tune the two threshold values in a way that would not pick up changes due to wind motion of the grassy background.
But it turns out that the Raspberry Pi Camera and its associated software picamera has some other tricks up their sleeves. In addition to recording the h264 encoded video, you can record an alternative stream which contains “motion data”, which is essentially some of the raw data that is used by the h264 to do motion coding. Essentially this data provides 4 bytes of data for each 16×16 image block: two signed 8 bit image displacements (in x and y) which represents the estimated image velocity, and a 16 bit value which is the sum of the absolute difference of all the pixels in the block from the previous frame. Both would be rather expensive to compute (certainly in Python) but are quick and easy to extract when computed by the camera itself.
To test my understanding, I modified my camera script to acquire this data, and then transferred it along with the normal video, and then hacked together some scripts using python and gnuplot to superimpose this data atop the background video (which I’ve faded a bit to make the data more legible). The black contours represent the difference data, and are spaced at intervals of 100. The red vectors represent the motion data plotted atop the image.
One thing leaps out at me immediately: the motion data is very good at finding the hummingbirds, even when the birds are relatively stationary. While this clip was not taken in particularly high wind, it’s pretty clear that those vectors aren’t very large in the case of plant motion. Hence, it seems clear I could make a better motion detector by taking advantage of the precomputed motion vectors.
A couple of things remain though: there are obviously drop outs where the contour data drops out entirely. I’m not sure what that is about: it could be a bug in my conversion script, or something more insidious. I’ll go back to the data and find out. Secondly, I’m not sure how capturing this motion data interacts with another feature I use of the picamera: it’s ability to record into circular memory buffers. When I figure out these two issues, I’ll post (and likely github) another version of my watcher script.
Hope this is of interest to someone out there.
Addendum: While doing more reading on the picamera github site, I found a link to this awesome script, which points out a lot of clever things that can be done. I’ll be swiping ideas from it soon!
Skeleton of a motion detecting video capture program for the Raspberry Pi + Camera…
Last week I was playing around with using “motion-mmal” to capture pictures of hummingbirds feeding at my feeder. That was fun, but if I wanted to get high resolution pictures, I could not get very high frame rates (maybe 2-5 fps at best). I thought that perhaps by writing my own capture application in C, perhaps I could do better. After all, the graphics processor in the Pi is capable of recording HD video and directly encode it as H264 video. There should be some way to use that hardware effectively, right?
As it turns out, there is.
As a tease, here is some of the video I captured yesterday:
It’s recorded at 1280×720 and 25fps (more on that later). It takes about 20% of the cpu available on one of my older Model B Raspberry Pi. The motion detection is done on the camera entirely in Python, and is a bit crufty, but works well enough to get some good video.
Warning: this code is presented as-is. If you aren’t a python programmer, you may not have the skills necessary to understand or use this code, but it is a good basic outline that spells out most of the parts you need. Feel free to adapt the code to your needs. If you redistribute it, it would be nice if you could give a nod to this code and my blog in some fashion, but I’m not going to be insulted if you don’t. And if you have any improvements, I’d love to hear about them.
[sourcecode lang=”python”]
#!/usr/bin/env python
# __ __
# _ _____ _/ /_____/ / ___ ____
# | |/|/ / _ `/ __/ __/ _ \/ -_) __/
# |__,__/\_,_/\__/\__/_//_/\__/_/
#
#
import numpy as np
import io
import os
import os.path
import fractions
import time
import random
import picamera
import picamera.array
import datetime as dt
import warnings
import platform
from pkg_resources import require
import subprocess
print platform.platform()
print "Using picamera version", require(‘picamera’)[0].version
#warnings.filterwarnings(‘default’, category=DeprecationWarning)
prev_image = None
image = None
def detect_motion(camera):
global image, prev_image
with picamera.array.PiYUVArray(camera, size=(256,144)) as stream:
camera.capture(stream, format=’yuv’, use_video_port=True, resize=(256,144))
#print "%dx%d:%d image" % (stream.array.shape[1], stream.array.shape[0], stream.array.shape[2])
if prev_image is None:
prev_image = stream.array.reshape([256*144, 3])[:,0]
return False
else:
image = stream.array.reshape([256*144, 3])[:,0]
diff = np.abs(prev_image.astype(float)-image.astype(float))
diff = diff[diff>35]
# print diff.shape[0]
prev_image = image
return diff.shape[0] > 200
def write_video(stream, fname):
# Write the entire content of the circular buffer to disk. No need to
# lock the stream here as we’re definitely not writing to it
# simultaneously
with io.open(fname, ‘wb’) as output:
for frame in stream.frames:
if frame.frame_type == picamera.PiVideoFrameType.sps_header:
stream.seek(frame.position)
break
while True:
buf = stream.read1()
if not buf:
break
output.write(buf)
# Wipe the circular stream once we’re done
stream.seek(0)
stream.truncate()
with picamera.PiCamera(framerate=fractions.Fraction(’30/1′)) as camera:
dir = "/var/tmp/capture"
camera.resolution = (1280, 720)
camera.framerate = fractions.Fraction(’30/1′)
camera.vflip = True
camera.hflip = True
camera.start_preview()
seconds = 5
stream = picamera.PiCameraCircularIO(camera,seconds=seconds, bitrate=8000000)
print "[ Buffer %s seconds/%d bytes ]" % (seconds, stream.size)
camera.start_recording(stream, format=’h264′, bitrate=8000000)
try:
while True:
camera.wait_recording(1)
if detect_motion(camera):
print "Dumping."
# generate a filename…
base = ‘cam_’+dt.datetime.now().strftime("%H%M%S")
part1 = os.path.join(dir, base+"-A.h264")
part2 = os.path.join(dir, base+"-B.h264")
camera.split_recording(part2)
write_video(stream, part1)
camera.wait_recording(15)
while detect_motion(camera):
camera.wait_recording(1)
camera.split_recording(stream)
with open("files.txt", "a") as f:
f.write("file %s\n" % part1)
f.write("file %s\n" % part2)
print "Dumped %s %s" % (part1, part2)
# Copy files to remote server
dst = ‘markv@conceptron.local:capture’
print "Copying %s to %s…" % (part1, dst)
rc = subprocess.check_call([‘scp’, ‘-p’, ‘-q’, part1, dst])
if rc != 0:
print "PROBLEM: (rc = %d)" % rc
else:
os.unlink(part1)
print "Copying %s to %s…" % (part2, dst)
rc = subprocess.check_call([‘scp’, ‘-p’, ‘-q’, part2, dst])
if rc != 0:
print "PROBLEM: (rc = %d)" % rc
else:
os.unlink(part2)
# ready to record some more…
camera.wait_recording(seconds)
finally:
camera.stop_recording()
[/sourcecode]
This would not be possible without the awesome picamera Python module and lots of careful engineering by the Raspberry Pi + Camera designers. They clearly foresaw this kind of possible application, and did everything that they needed to make it run efficiently and reasonably.
A few more short notes:
- The motion detection code is terrible. It works after a fashion, but clearly could be tuned better.
- To save space on my Pi, after capture it uploads each video file to one of my local servers, and then delete the file. I hardcoded it to use scp via subprocess. If you want to do something else, you can figure out what that might be and do it there. It won’t record new video while the scp is occurring: you could spawn a thread or some such to handle the copy and then dump back to the loop if you like.
- You might want to write to a tmpfs file space, so it doesn’t eventually wear out your flash card with repeated writes and deletes, particularly if you can transmit these video files off as they are generated.
- The picamera documentation is quite helpful. Indeed, it was my reading of that documentation which formed the basis of this initial script, which likely could not have been done (or not as easily) without them.
I will probably produce a tidier, better annotated version of this code and put it on github soon.
Hope this is of interest to some of you.
Addendum: If you want to see what the hardware looks like, you can see it here. Really just a cardboard box holding a pi, a powered hub, and the pi camera taped to the top, hung in the window.
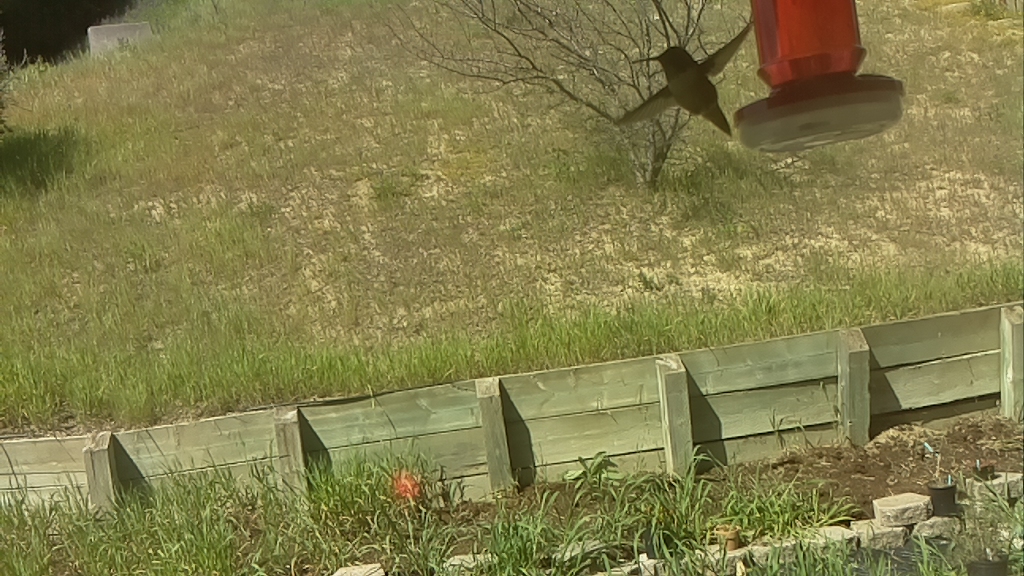
Another hummingbird shows up on the camera…
When I got home today, it appeared that I had a few more images from my hummingbird cam. Luckily, I got several nice frames of him her (probably), so I put them together into an animated GIF. Nifty. When I get a chance to do more stuff on it this weekend, I hope to get even better recordings, and setup the camera closer. Till then, it’s been a fun project.

Addendum: I converted the individual JPEG images into an animated GIF using the ImageMagick toolkit on Linux. The command was:
convert -crop 512x576+512x576 +repage -loop 0 -delay 200 frames.*.jpg loop.gif
The -delay value probably could have been shrunk a bit. I used the -crop option to just select the right half of the screen. When you post animated gifs in WordPress, you need to post them at full size, the shrunken versions won’t animate.
Minor tweak to my Hummingbird Camera…
One thing I didn’t realize when I setup the Raspberry Pi camera to monitor my humming bird feeder was that it has a bright red led which turns on when the camera is enabled. In most cases, this light isn’t a big deal, but I am pointing it out the window, so the reflection of it is kind of annoying. You can see it in my earlier pictures, but I didn’t realize what it was until later, when I got this picture:

Luckily, it’s easy to disable. Just edit the file /boot/config.txt, and add a line which looks like:
disable_camera_led=1
and then reboot. Voila. All is fixed. This might be handy if you wanted to setup a stealth security camera as well. Just noted here, so I don’t forget.
Motion Detecting Hummingbird Camera: Prototype
 I like to see hummingbirds. They seem completely incredible to me, like little hyper Swiss Watches, buzzing around the garden. I’ve seen a few of them in our yard, but I’ve been meaning to encourage them showing up more, so I recently installed a feeder. While the syrup level has gone down, I have never caught one actually feeding.
Of course, the way to solve this problem (as is true of all problems) is to apply technology! So, I quickly hacked together a little prototype camera that I could hang on my window and stare out at feeder. I’ve been thinking of doing this all week, and gotten proofing. In the end, I wasn’t getting anywhere, so this morning I decided on what I thought was the simplest possible prototype. I took one of my old Raspberry Pi’s, a DLINK powered USB hub to power it, and a Raspberry Pi camera, and taped them all in the cardboard box for an old laptop hard drive. My original idea was simply to duct tape it to the window facing the bird feeder, but a quick trial of this wasn’t promising: the duct tape kept relaxing, and the box was slowly drifting down. So, instead I got some wire and made a little hanger that would attach to two paperclips that I jammed in each side. It isn’t the greatest way to go, but it works.
I hung it from the top of the blinds in the kitchen, aimed it only very coarsely, and took my first picture by logging in and running raspistill. The aim isn’t very good, I only got the feeder at the edge, but this is just a prototype: if I start getting pictures of hummingbirds, I will refine the design/aim, and probably mount the camera outside so I can be a bit closer.
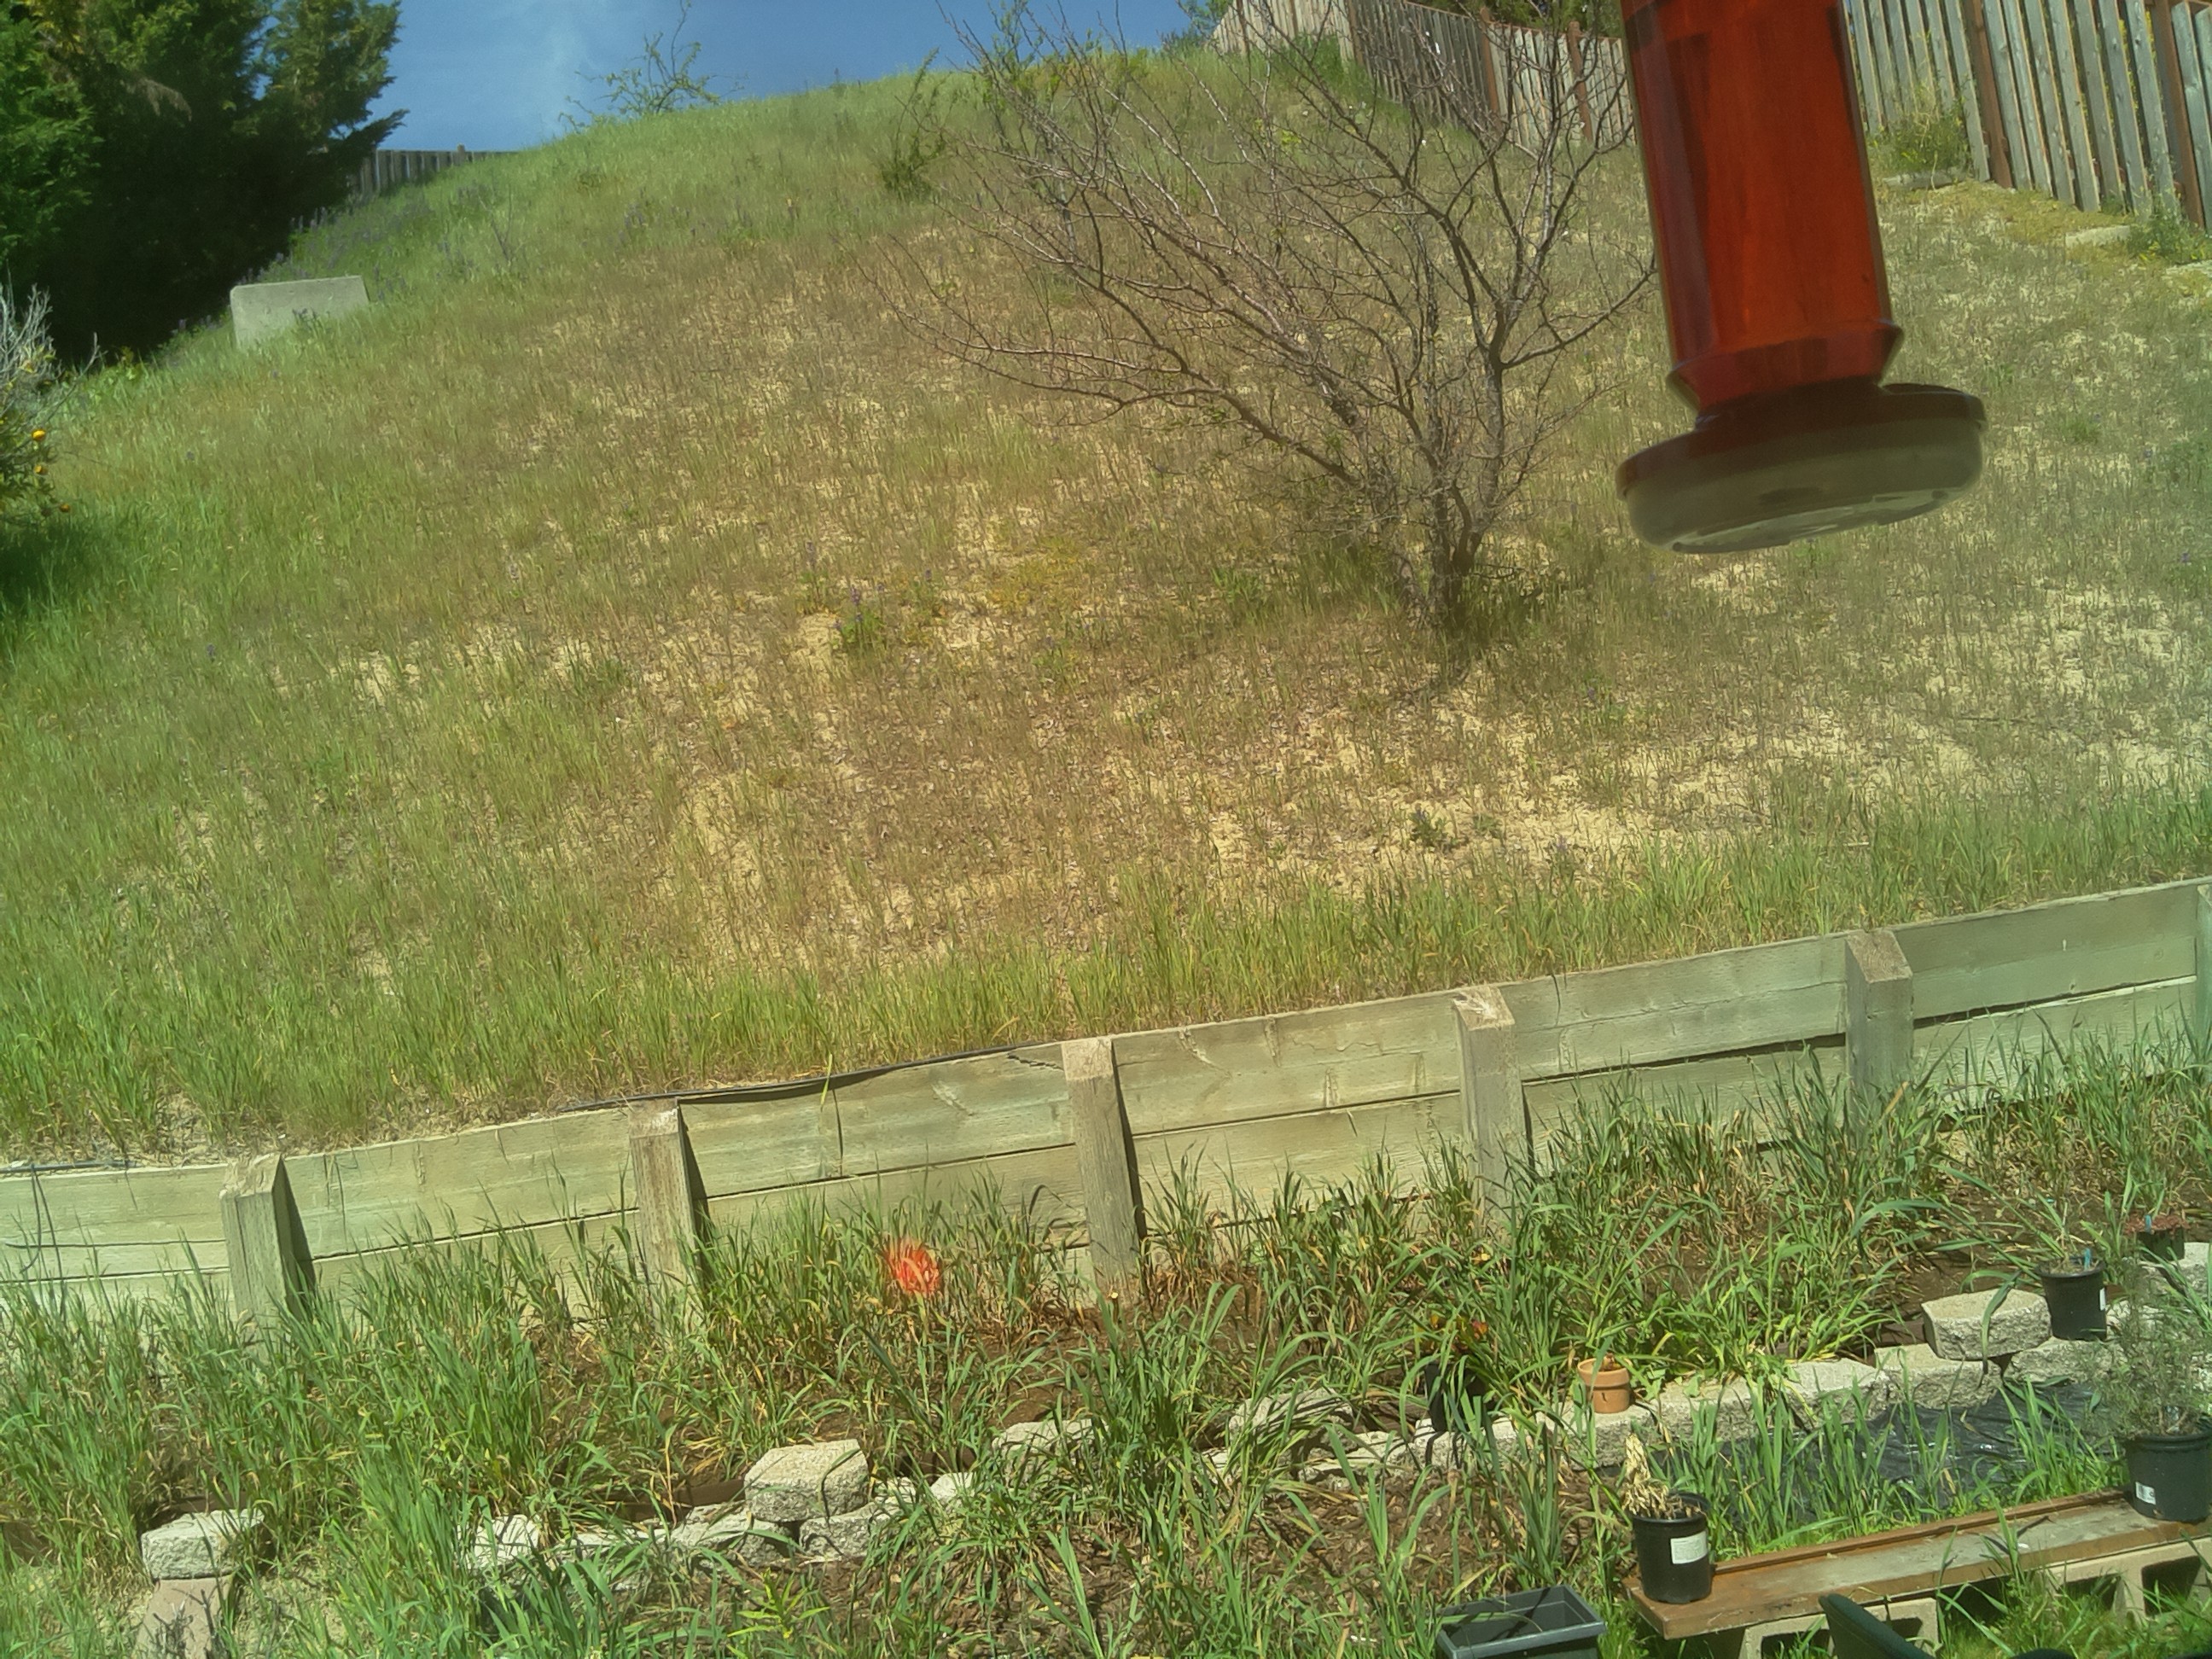
Of course all you see are the drought stricken side of my hill, but if I get any pictures of birds, I’ll be posting them soon.
Addendum: I wandered outside as a quick test of the camera. While I am bigger than a hummingbird, I didn’t have any problem tripping the camera. I am concerned that the small, fast motion of a hummingbird may not be sufficient to trip the camera, but we shall see.
 i
i
A couple of additional words on the software. I use the “motion-mmal” program, a port of the popular “motion” program that is widely used on Linux with conventional webcams, but has been extended to use the Raspberry Pi camera, which are both high quality and inexpensive. The way I have this configured is that it does motion detection on a downresolution version of the video feed, and when it detects motion, it dumps the frame with the biggest difference to a local disk. Eventually, I may try to get it to capture video, and/or upload it automatically to google drive like I have done before for my cat camera. More later.
Addendum2: Huzzah! Within an hour of setting this camera up, I got my first picture! I guess it works. I’ll have to get it aimed a bit better and see how often I can catch birds, and maybe try to set it up to do motion capture too, not just stills.
A New Development Board: the ODROID-C1
 One of my recent posts highlighted the big pile of development boards that I have lying around. This week, I actually added to that pile in a couple of ways: I found a pair of Beagle Bone Blacks that I had misplaced, a couple of Propeller boards, and most significantly, I ordered an ODROID-C1 from ameriDroid. Stupidly, I didn’t read their website carefully enough, so I ended up making TWO orders from ameriDroid, the second to get the somewhat odd power supply needed (5V, 2A, with 2.5mm barrel) and to which I added the clear case you see, and also a micro HDMI cable (I know I have one some where, but I couldn’t find it). The prices for the additional goodies swell the price a bit, but are quite reasonably priced: $4.95 for the case, $5.95 for the HDMI cable, and $6.95 for the power adapter. Consider carefully before ordering and you’ll save a round of shipping.
ameriDroid did an excellent job of shipping: I had BOTH orders delivered just two days after ordering. They even included this nice hand written thank you, which makes more sense when you realize I had this delivered to my work address.
Oops, forgot the pic! #odroid pic.twitter.com/aDGIiQnWW2
— Mark VandeWettering (@brainwagon) March 11, 2015
In the following discussion, when I mention the Raspberry Pi, I am speaking of the older variation model B and the B+. I do not yet have a Raspberry Pi 2, which upgrades to a 900Mhz quad core with 1GB of DRAM.
Given that I have four Raspberry Pis and three Beagle Bone Blacks of various generations, what compelled me to look at the ODROID-C1? You can read the specifications yourself, but here are the things that were most intriguing to me:
- Quad core 1.5Ghz ARM processor. Compared to the 700Mhz single core ARM in the Raspberry Pi and the 1Ghz CPU in the Beagle Bone Black, one might expect that this little board could handle a lot more stuff.
- 1GB of Dram, double most of my other boards. Nice!
- Supports some little eMMC4.5 flash boards, which are supposed to be faster than existing microSD cards (more on this below).
- 4 USB ports + 1 USB OTG port. Lots of expansion capabilities.
- Includes an infrared receiver built onto the board. Might be cool for remote/home theater applications.
- Supports both Ubuntu and Android. I’m mostly a Linux guy, but the possibility of using recent Android builds is interesting too.
Okay, so on to my experience…
I didn’t order any of the memory cards from ameriDroid with the operating systems pre installed. Why? I’m kind of a cheapskate, and I have a couple of spare 16GB microSD cards lying around. I started with a class 10 Lexar card. From my Ubuntu laptop, I downloaded their version of Ubuntu (1.1GB compressed, around 4gb uncompressed) and did the usual dance using the Linux “dd” program to copy it to the flash card. I also got an Edimax Wifi dongle from one of my other Raspberry Pis, and the wireless keyboard dongle. Plugged all this stuff together, plugged the microHDMI cable into my old Samsung TV, and powered it on. And…
Nothing. Screen went black on the TV, and the two LEDs on the board (red and blue) were steady and mixing to purple color. Hmmph.
A little googling revealed that if Linux had booted, it would be flashing the blue led as a heart beat indication. I decided to go ahead and try reburning Linux onto my other flash card (which it turns out is a slower class 6 Lexar card). After all, earlier this week I discovered that one of my unbootable Raspberry Pis was in fact an issue with SD card compatibility.
And, of course… that worked! Up until a point. My TV is rather old, and just supports 720P. When it booted, I ended up with my tv saying “Video Mode Not Supported”. Grrr. It turns out that you can change that by modifying the boot.ini file on the card (easy to edit if you have another Linux box, mount the card, edit the file to select 720p, save, eject, and reboot).
And that worked. Again, up until a point. On my TV, overscan is a bit of an issue: a significant amount of the screen (including all of the all-important task bar) was actually off screen on my TV. Grr… I drug out a monitor which didn’t have the overscan issues. And rebooted.
Into a nice X-windows desktop. It wasn’t the Unity layout that I was familiar with from my desktop, it’s more old school. On the desktop is a README and an icon labelled “ODROID Utility”. You click on it, and it allows you to do some features similar to those performed by the “raspi-config” program on the Raspberry Pi: most notably, to upgrade the kernel/firmware and expand the root partition to take full advantage of the entire microSD card. If you select the “upgrade kernel”, it actually doesn’t do that, it tells you that you can use the normal “sudo apt-get update; sudo apt-get upgrade; sudo apt-get dist-upgrade” commands to update. But I did try to expand the drive, rebooted, setup the wireless network using the desktop utility, and then started the apt-get stuff…
But something along here went wrong. Even after rebooting, it didn’t appear that the card was expanded, but I didn’t notice until the upgrade was underway. There were a couple of other oddities: ssh didn’t appear to be working right, I couldn’t login remotely. And the Edimax Wifi was really, really slow: just a few kb per second. That upgrade was going to take forever. And while that was happening, I noticed the odd “unexpanded” root partition, which appeared to be out of space. Argh!
So, I redid the entire process again: reflashed the OS, and redid everything again. I also decided to ditch the Edimax connector, and instead plugged the board into my wireless router via Ethernet.
And somehow, things worked better. I’m not sure what I did wrong, but when I tried to expand the root FS, it told me to check to make sure that the root device was on /dev/mmcblk0p2. I exited first, and ran df to check, and it told me that it couldn’t access the mount table. “What the heck?” I decided to reboot again, and it showed up properly, not sure why. In any case, I expanded the root fs and rebooted. This time, I saw 11GB free, and decided to proceed with the apt-get upgrades.
Now that I was hooked up via Ethernet, things seemed to work much better. It still took a couple of hours to update all this stuff, but it did, and now it’s running pretty well.
If you “cat /proc/cpuinfo”, you get:
odroid@r2d2:~$ cat /proc/cpuinfo
Processor       : ARMv7 Processor rev 1 (v7l)
processor       : 0
BogoMIPS        : 3.27

processor       : 1
BogoMIPS        : 3.27

processor       : 2
BogoMIPS        : 3.27

processor       : 3
BogoMIPS        : 3.27

Features        : swp half thumb fastmult vfp edsp neon vfpv3 tls vfpv4
CPU implementer : 0x41
CPU architecture: 7
CPU variant     : 0x0
CPU part        : 0xc05
CPU revision    : 1

Hardware        : ODROIDC
Revision        : 000a
Serial          : 1b00000000000000
Nice! Quad core. It still doesn’t seem super fast, no doubt because of the slow flash cards. You can ssh in using the login odroid password odroid. You can run sudo or su with the same password.
It was a bit of a hassle, but it appears to work.
Overall, the biggest problem I have with the ODROID thusfar is the Ubuntu distribution is just too bloated. It loads a whole bunch of software that might be reasonable on a desktop, but seems out of place (at least by default) on a small system. The Raspbian distribution of Debian actually walks this line pretty carefully: it feels fleshed out, but by default doesn’t include absolutely everything you might want, because after all, you might not want all this stuff, and resources on these small boards are fairly scarce. I don’t think I need the jdk, cups, kido (I had to look it up too), samba, chrome and firefox (runnable, but not all that pleasant in low memory systems) and god knows what else. This also means that getting your system up to date is slow too, because there is just so much software to update. Bleh.
It’s also pretty clear that the ODROID distribution is just less polished. The Raspberry Pi might annoy me with its (understandable) insistence on setting your keyboard up for UK English, but it’s easy enough to change, and raspi-config handles most of it. Ubuntu on the ODROID seems curiously to come with the default time zone set to Australia/Adelaide, and I had to google for the dpkg-reconfigure magic to fix it. Your expectations and experiences might be different.
One of my twitter followers asked whether I had bought the eMMC card with Ubuntu pre-installed. I did not, and the reason is simple: I’m a cheapshake. I think I paid ~$10 for my last 16gb microSD card, whereas the 16gb eMMC cards sold by ameriDroid cost $40 (more than the entire rest of the computer). Whether they are speedy or not, it didn’t seem like economy to me.
A few last thoughts after my first day as an ODROID-C1:
If you are a relative beginner to Linux, I don’t think I’d allow myself to be seduced by the ODROID’s higher speed. Get yourself a Raspberry Pi 2: definitely setup better for newbies, and has a much larger community to draw from. I found the learning curve for the ODROID to be a bit steeper than I think newbs could handle.
The ODROID-C1 could use a more disciplined Ubuntu distribution. The existing one includes everything and then some. A smaller but more reasoned distribution would be nicer.
I have not figured out what the deal is with the microSD card that wouldn’t boot. I am told that Samsung cards are in general better, but more investigation is clearly needed. I’ve no doubt that the class 6 card I’m using is slow, but the class 10 card I tried didn’t work. More experimentation is clearly (but sadly) still needed.
I should experiment with wireless again. I’ve had good luck with the Edimax dongles on the Pi, not sure what the issue might be.
Buy the AC adapter when you order one. And the HDMI cable if you don’t have one.
A lot of the documentation is obviously kind of bad translations. Even their videos can be a little bit mumbly and hard to understand:
Are any of my other readers using the ODROID-C1? I’d love to hear your comments and experiences.
A Big Bin Full O’ Development Boards at BrainWagon Labs…
I have an odd obsession with small, relatively cheap hardware development boards. Over the last few years, I’ve acquired a bunch of them, from Arduino to Raspberry Pi to BeagleBone Black. I thought it might be nice to just do a short video showing what I have around. So I did. Here’s a little 25 minute video demoing what I’ve got lying around.
- Arduino, the classic board. Based upon the ATMEGA328, an 8 bit processor, 32K of flash, 20Mhz. Great user community.
- Beagle Bone Black Very cool Linux based machine.
- Raspberry Pi Perhaps my favorite board, I don’t have the version 2 board yet, but the version B+ boards are really nice. I particularly like the Pi Camera boards you can use with them.
- WRTNode A very cool, very cheap Linux box, with WiFi. Runs OpenWRT, a stripped down version of Linux, but still cool.
- Wild Fire board A very nifty little board by Wicked Devices, who supplied me with a couple. During the video, I mentioned that I thought these boards were a bit expensive, but checking their website, I see them selling for about $49. If you need an Arduino compatible board with some extra punch, it’s a great little board.
- ESP8266 The tiniest and cheapest board that I had. Often used as simple serial->WiFi chips, they are actually quite powerful and can be reprogrammed. This lua based firmware is a cool example.
Another bit of programmable hardware: the WRTnode
I’ve got a weak spot for cheap, programmable hardware. In my junk drawer I’ve got a collection of Arduinos, Parallax Propellor boards, a couple of STM32 based ARM boards, and several Beagle Bone Blacks and Raspberry Pis. Today, another entry arrived: the WRTnode.
I’ve only had it out of the box for a few hours, and a little bit of tinkering, but here are my initial impressions.
 A few basics first: it’s a small, cheap Linux computer. Nominally, the list price is supposed to be $25, but I ordered mine via the Amazon store and paid a bit of a premium: it cost $35, but shipped in two days via Amazon Prime. It comes in a small plastic box the size of an Altoids tin, and includes a little USB cable that allows you to chain an extra USB device to it, as well as provide power. I plugged mine into a little D-Link USB hub I had lying around. Seems to work fine.
In terms of capability, it falls somewhere between the Arduino and a Raspberry Pi. The processor is actually not ARM based, it’s an MTK MT7620N MIPS processor that runs at 580Mhz. It has a 512Mbit DDR2 RAM and 128Mbit of SPI flash ROM. This is quite a bit less than the Raspberry Pi, but it does have one cool added feature: it’s got a 300Mbit wireless networking chip on board which can do 802.11n. It also can handle USB host mode. Basically, you can think of this as the brains to a fairly reasonable wireless router. It’s a very small board, only 45mm x 50mm, and includes 23 GPIO pins, as well as JTAG and SPI.
Because of it’s rather limited memory, it can’t run full Debian. Instead, it runs the OpenWRT distribution, a small distribution which is often used on tiny embedded boxes that serve as routers. It runs BusyBox, has the tiny shell “ash”, as well as the LuCI web based configuration interface, which is based upon the uhttpd webserver.
Setting it up was pretty darned easy: I plugged the supplied USB cable into it, and the other end into my powered hub. A small blue LED comes on, and about 20 seconds later, a new wireless access point was visible called WRTnode9DDB. If you attach to that network, you are asked for a network password, which defaults to 12345678, and then you can telnet to the device, which defaults to IP address 192.168.8.1. You can login as root with no password. If you run passwd you can enter a new password, and then you can use ssh to connect to it.
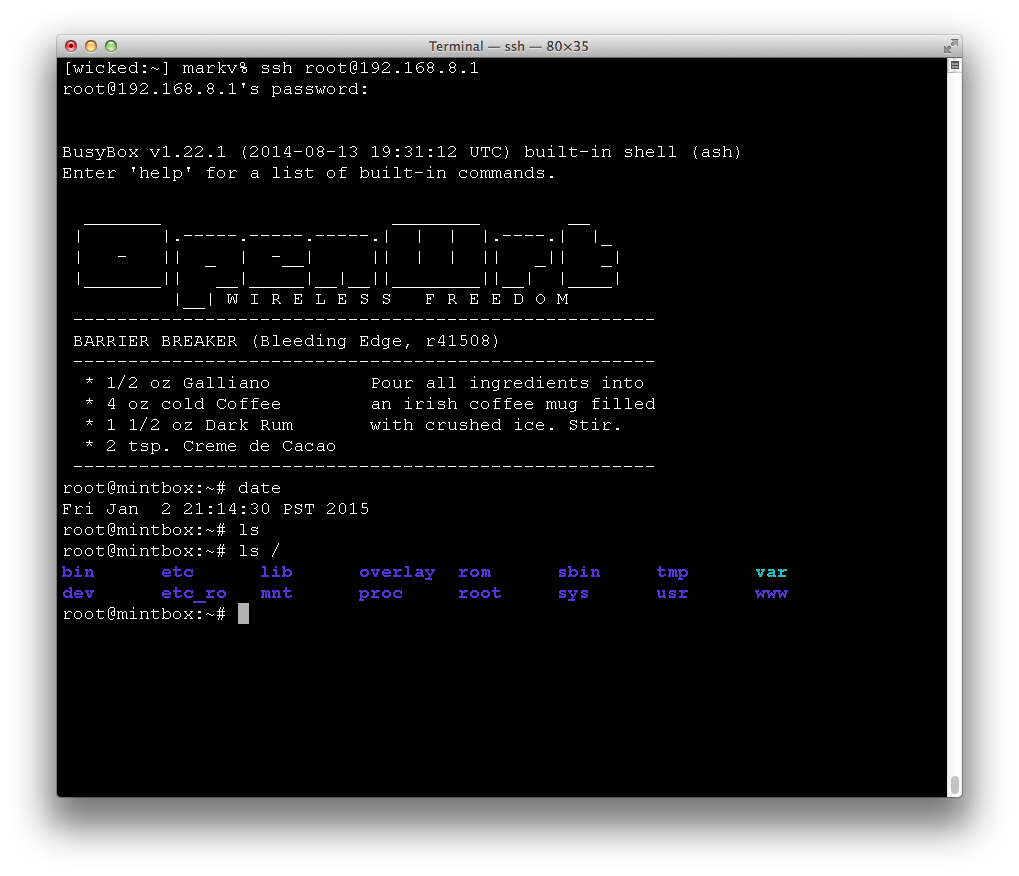
Nifty! If you cat /proc/cpuinfo you can get information about the processor:
system type		: Ralink MT7620N ver:2 eco:6
machine			: WRTNODE
processor		: 0
cpu model		: MIPS 24KEc V5.0
BogoMIPS		: 398.13
wait instruction	: yes
microsecond timers	: yes
tlb_entries		: 32
extra interrupt vector	: yes
hardware watchpoint	: yes, count: 4, address/irw mask: [0x0ffc, 0x0ffc, 0x0ffb, 0x0ffb]
isa			: mips1 mips2 mips32r1 mips32r2
ASEs implemented	: mips16 dsp
shadow register sets	: 1
kscratch registers	: 0
core			: 0
VCED exceptions		: not available
VCEI exceptions		: not available
and ditto for cat /proc/meminfo:
MemTotal:          61852 kB
MemFree:           22516 kB
Buffers:            4828 kB
Cached:            17928 kB
SwapCached:            0 kB
Active:            14292 kB
Inactive:          10744 kB
Active(anon):       3772 kB
Inactive(anon):       76 kB
Active(file):      10520 kB
Inactive(file):    10668 kB
Unevictable:           0 kB
Mlocked:               0 kB
SwapTotal:             0 kB
SwapFree:              0 kB
Dirty:                 0 kB
Writeback:             0 kB
AnonPages:          2296 kB
Mapped:             1960 kB
Shmem:              1568 kB
Slab:               6028 kB
SReclaimable:       1784 kB
SUnreclaim:         4244 kB
KernelStack:         296 kB
PageTables:          292 kB
NFS_Unstable:          0 kB
Bounce:                0 kB
WritebackTmp:          0 kB
CommitLimit:       30924 kB
Committed_AS:       6948 kB
VmallocTotal:    1048372 kB
VmallocUsed:        2204 kB
VmallocChunk:    1032516 kB
OpenWRT isn’t as full featured as some Linux distributions, but it’s not bad. It includes ssh, Python and Lua. It’s got vi. It runs its own small package manager called opkg, which has a pretty good selection of precompiled packages available for install (although its good to be careful, you don’t have an infinite amount of space). Scanning the list, it’s got installation packages for lighttpd, Asterix, and a bunch of other goodies.
I haven’t had a lot of time to mess with it, but I’m fairly impressed so far. I have a feeling I’m going to miss having a C compiler/make setup on the board, but it looks to be pretty simple to cross compile to it from my main Linux box. I have already rebuilt the distribution, and will probably try flashing it sometime soon.
If you are in the market for a little machine with features like this (esp. with WiFi), it might be worth it.
Schrödinger’s Cat
I’ve long suspected that my cat Scrappy had teleportation powers:
Okay, okay, I know he doesn’t really. But it was kind of funny.