Monthly Archives: December 2011

Alan’s Advent Calendar of Circuits 2011

A couple of years ago, I was big into QRSS and wrote some software to do unattended captures of the portion of the 30M band where people were operating beacons. It was through this rather unconventional means that I first discovered Alan, VK2ZAY, as his callsign scrolled across in DFCW. If you look at this capture from February, 2009, you’ll see Alan’s call near the top, with VK6DI at the bottom, and … NM5DV I think? across the middle.

I soon discovered that Alan had a very interesting blog with all sorts of good electronics stuff. But during this holiday season, he’s raised the bar again: he’s doing one circuit for each day of the Advent calendar. And the circuits are amazing. Thought provoking. Simple. And yet useful.

If you haven’t checked them out, be sure to do so.


Project Completed: My $.99 Christmas LED hat, with ATtiny13 controller

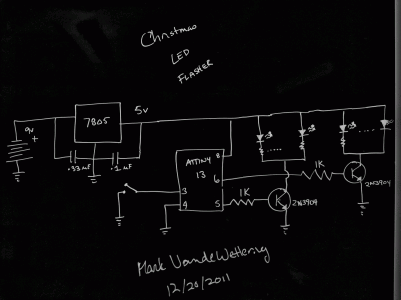
Well, it’s done! Here’s my ATtiny13 controlled Christmas LED hat. It consists of an 8 pin, ATtiny13 microcontroller, a pair of 2N3904 transistors and some 1K resistors, a 7805 voltage regulator with two filter caps, and a switch, all mounted on a Radio Shack perfboard inside an Altoids tin. I’m rather pleased with the way it turned out. I always like it when a project goes from the breadboard to a final mounting in a box.


Addendum: Here’s the schematic for the entire circuit. Nothing too surprising, but you should be able to follow it if you need to.

Christmas Lights powered by an ATtiny13

While waiting for my bread to rise the other day, I moved my breadboard ATtiny13 circuit that blinked two leds to a small Radio Shack perfboard, added a couple of switching transistors (2N3904s) to power the LEDs, and built a small 7805 regulator (which doesn’t yet have any filter caps, I’ll get to that). But, I couldn’t resist powering it on. And after finding a small solder bridge (a hairlike strand that spattered and connected two of the microcontroller pins), it worked!

Hopefully this stuff will get mounted in a hat this weekend. Stay tuned for the final video.

Addendum: I received one request for the source code. It’s trivial. Here you go.

[sourcecode lang=”cpp”]
#define F_CPU 1200000UL

#include <avr/io.h>
#include <util/delay.h>

/*
* xmas.c
*
* A small program for the ATtiny13 that can control two strands of
* Christmas lights. I found a set of batter powered LED Christmas
* lights at CVS on sale for $.99 each. I took the lights out, and
* found that they consisted of two strands: one of 4 red and 4 yellow
* LEDs, and the other of 4 blue and 3 green LEDS. Each strand is
* wired in parallel and draws about 20ma at 3 volts. I have a few
* ATtiny13’s lying around, which can use between 2.7 and 5.5 volts supply.
* I think for this test, I’ll wire up a little 7805 regulator to provide
* 5V, and then control each strand with one of the two PWM outputs.
* If I want to drive the strings directly from the microcontroller,
* I’ll have to insert another 50 ohms of resistance to limit the current
* to around 20ma per pin. I could also add a 1K resistor and a small
* NPN transistor to drive each pin at the higher voltage. At 5V, the
* strand will draw about 120ma.
*/

#define LED0 PB0 /* pin 5 on the ATtiny13 */
#define LED1 PB1 /* pin 6 on the ATtiny13 */
#define SWITCH PB4 /* pin 3 on the ATtiny13 */

int brite, dir ;

int swd = 0 ;
int swu = 0 ;

int
main(void)
{
DDRB |= (1 << LED0) ; /* set both LEDs as outputs */
DDRB |= (1 << LED1) ;
DDRB &= ~(1 << SWITCH) ; /* and the switch as an input */
PORTB |= (1 << SWITCH) ; /* and activate the internal pull up */

/* This configures the PWM outputs to be in "Fast PWM" mode. */
TCCR0A |= (1 << WGM01) | (1 << WGM00) ;

/* Timer is clocked at F_CPU/8 */
TCCR0B |= (1 << CS01) ;

/* COM01 COM00
* 0 0 | normal port operation, output compare disconnected
* 0 1 | toggle output on compare match
* 1 0 | clear output on compare match
* 1 1 | set output on compare match
*/

TCCR0A |= ((1 << COM0A1)) ;
TCCR0A |= ((1 << COM0B1)) ;
OCR0A = 0;
OCR0B = 0;

for (;;) {
/* SOLID ON */
for (;;) {
OCR0A = 0xff ;
OCR0B = 0xff ;
_delay_ms(1) ;
if ((PINB & (1<<SWITCH)) == 0)
break ;
}
while ((PINB & (1<<SWITCH)) == 0) ;

/* CROSS FADE */
brite = 0 ;
dir = 1 ;
for (;;) {
OCR0A = brite ;
OCR0B = brite ^ 0xFF ;
brite += dir ;
if (brite == 0 || brite == 255)
dir = -dir ;
_delay_ms(2) ;
if ((PINB & (1<<SWITCH)) == 0)
break ;
}
while ((PINB & (1<<SWITCH)) == 0) ;

/* BLINK */
brite = 0xff ;
for (;;) {
OCR0A = brite ;
OCR0B = brite ;
_delay_ms(500) ;
brite ^= 0xff ;
if ((PINB & (1<<SWITCH)) == 0)
break ;
}
while ((PINB & (1<<SWITCH)) == 0) ;

/* CROSS BLINK */
for (;;) {
OCR0A = 0xff ;
OCR0B = 0 ;
_delay_ms(500) ;
if ((PINB & (1<<SWITCH)) == 0)
break ;
OCR0A = 0 ;
OCR0B = 0xff ;
_delay_ms(500) ;
if ((PINB & (1<<SWITCH)) == 0)
break ;
}
while ((PINB & (1<<SWITCH)) == 0) ;

}
}
[/sourcecode]

More on no-knead bread…

Tonight I baked up my second loaf of no knead bread. The first batch was promising, but was a bit dense. I used ordinary all purpose flour, and for whatever reason, I didn’t seem to get as high of a rise as I thought I should. This time, I decided to try some King Arthur unbleached bread flour, and made sure that I got the yeast well mixed into the dough. I also chose the top of my fridge as the best location to give it arise (the weather has been cold, and the top of the fridge is a bit warmer). That seemed to be a good move: the dough seemed quite a bit livelier.

I turned it out onto a floured towel for its two hour rest/rise. I then started to work on my Christmas hat project, and got absorbed in what I was doing. Two and a half hours later, I remembered that I had bread sitting out, and set the oven (and my Dutch oven) preheating for thirty minutes. When I flopped the dough in, it stuck to the towel (next time more flour on the towel, and perhaps less time sitting on the counter). That mucked up the top a tiny bit, but I flopped it into the Dutch oven. Into the oven. Thirty minutes covered, and twenty uncovered.

Smell: good. Looks, well, check it out for yourself:

As it was cooling on the rack, I could hear the outer crust crackling. Tapping it, the bread sounded nice and hallow, and the crust was very dry and crackly. Slicing into it, the inners were much less dense than my previous entrant, with many larger holes. The flavor was even better than the first loaf: light, yeasty and delicious. I think going the extra five minutes uncovered was actually a mistake: it made the outer crust just a little too dry. Also, the bottom of the loaf is a bit tougher and thicker than I would like, but the flavor is still good.

I proclaim this a complete success. Yum.

The creator of the no-knead bread, Jim Lahey, has a book entitled My Bread: The Revolutionary No-Work, No-Knead Method which looks good. Perhaps it will show up in my Christmas stocking. 🙂

Lightweight Web servers

Don’t you hate it when you see something that you want to investigate further, but then you can’t remember what the project is called? That’s what happened to me: I recently saw some cool little web server, implemented as a single C file, and that could either embed or be embedded in other applications.

And for the life of me, I can’t remember the name.

While searching, I did find this cool list of lightweight web servers that was collected by IBM. It’s got a lot of them, and included most of the ones I knew about, but none seem to be the one I was looking for. I’ll keep looking, but I’m archiving this link because it will undoubtedly be useful in the future.

List of Lightweight Web servers, courtesy of IBM

Addendum: The one I was looking for was Mongoose..

Addendum2: The link above appears to be dead. But Wikpedia provides this comparison of lightweight webservers which may provide links to the information you need. I’ve used nginx, mongoose, boa, and thttpd, and all seemed very good with some interesting varying features. Check them all out.

No-Knead Bread from the New York Times

Frequent readers of this blog might be shocked to learn that I’m not entirely consumed by the usual geeky topics that I post about. Among other things, I also like to cook, and as the holidays approach, I like to try to find a few new recipes and techniques. This week’s experiment was one of the most basic: breadmaking.

While I’m not exactly inexperienced in the kitchen, I don’t do a lot of baking, and have never really done any serious incursions into breadmaking. We have a breadmaker, but frankly, the bread it makes was just not very exciting. It’s been unused for a few years. If I want bread, I go to a bakery and buy it. I just figured that bread was too hard and complex for a guy of average skill and equipment to master.

But then I read a recipe which seemed simplicity itself: Jim Lahey’s recipe for No Knead Bread. Flour. Yeast. Salt. Water. And time. Simplicity itself. It is cooked inside a cast iron Dutch oven. It doesn’t require kneading or working. How good could it possibly be?

Recipe: No-Knead Bread – New York Times

Well, here’s the loaf as it comes from the oven:

After it was cooled a bit, I sliced in with a good bread knife:

My first attempt wasn’t perfect, but was very promising. The crust is awesome: crusty, but not too thick. Carmelized, pretty, and beautiful. The inside was just a trifle too moist to be called perfect, but still is much better than any bread you’d get off the shelf at the megamart. I think I could have done a bit better job integrating the yeast during the first mix, and it probably should have left the bread in the oven for 30 minutes covered and 30 uncovered (I only did 15 uncovered). I was concerned about the bread sticking to my cast iron Dutch oven, but it just flips out. I won’t worry next time.

I’ll be trying this bread again shortly. I got some unbleached bread flour for next time instead of the ordinary all purpose flour I used. If you haven’t given it a try before, check it out! For the price of three cups of flour and a pinch of yeast (only one quarter teaspoon) it’s even economical.

If you try this, let me know how it works out.

Carmen makes an Arduino Stoplight

Today, Carmen decided that she wanted to give Arduino programming a try. She’s an experienced programmer, but had never tried any of this small embedded stuff, and knows relatively little about electronics, but with a little direction from me, she got the Arduino development environment installed, and we did a bit of playing around. I showed how we could blink an LED, and then showed her how to read switches and even drive a servo motor. She then walked through some of Lady Ada’s tutorials and ended up scavenging a red, green, and yellow LED from some old throwies we had, and coding up a little stop light application:

Here’s the code:

[sourcecode lang=”cpp”]
// Stoplight
// Introductory Arduino program – Carmen & Mark VandeWettering 12/11/11
// with thanks to : http://www.ladyada.net/learn/arduino/lesson3.html
//
int redPin = 12; // Red LED connected to digital pin 12
int greenPin = 11; // Green LED connected to digital pin 11
int yellowPin = 13; // Yellow LED connected to digital pin 13
int delayTime = 1000; // initiate a delaytime amount here

void setup() // run once, when the sketch starts
{
pinMode(redPin, OUTPUT); // sets the digital pin as output
pinMode(greenPin, OUTPUT); // sets the digital pin as output
pinMode(yellowPin, OUTPUT); // sets the digital pin as output
}

void loop() // run over and over again
{
digitalWrite(redPin, HIGH); // sets the Red LED on
delay(delayTime); // waits the delayTime
digitalWrite(redPin, LOW); // sets the Red LED off
digitalWrite(greenPin, HIGH); // sets the Green LED on
delay(delayTime*5); // waits the delayTime * 5
digitalWrite(yellowPin, HIGH); // sets the Yellow LED on
digitalWrite(greenPin, LOW); // sets the Green LED off
delay(delayTime); // waits the delayTime
digitalWrite(yellowPin, LOW); // sets the Yellow LED off (and continue the loop)
}
[/sourcecode]

If you have any experience with programming at all, the Arduino should be pretty easy. If you don’t, it will take a bit more work, but it’s still doable. Give it a try!

The Lunar Eclipse…

Okay, I did wake up for the lunar eclipse this morning. At 5:30 my alarm went off. I pulled on some clothes, wandered out to the front yard, and sure enough, the moon was already being devoured by the Earth’s shadow. I went back inside, and got my old pair of tripod-mounted aircraft spotting binoculars, and set them up across the street. Carmen joined me, and we got a nice view as the shadow covered the moon. I had Carmen’s Canon G11 but I don’t use it often enough, and was frankly too sleepy to figure it out, but I did manage to snap a few shots of it using my iPhone through the binoculars. Here is one of the best.

By the time 6:30 rolled around, the skies were brightening and the moon was sinking into the offshore clouds. We headed to Starbucks, and got a coffee, but that was it.

The eclipse was very dark though: darker than I remember seeing. And deep red. And my bifocals aren’t the greatest thing for staring at distant objects. But the binoculars worked out great.

The “Hello World” of Servo Programming on the Arduino

This morning I woke up around 5:30AM to catch the lunar eclipse. It was pretty nice: totality began around 6:05AM and the moon became incredibly dark and red. But 30 minute later, it had progressed low enough that it entered the offshore clouds that signaled the arrival of the morning fog. So, I came back, and went to bed.

When I woke up, I knew that I wanted to try something easy with my Arduino. A few weeks ago, I was in a Radio Shack (gasp!) and saw that they carried the Parallax servos (rebranded Futaba servos, if memory serves) so I picked one up, thinking “I should hook this to an Arduino, because I’ve never done that.”

Well, so I did.

So… what can I do with this?

I could use it to pan a webcam back and forth, perhaps under control of a web page.

I could hook up an ultrasonic sensor, and scan for obstacles.

I could rotate an object, and create an animated gif allowing you to see all sides

And ultimately, I could do some kind of animatronic thing.

I know, it’s not very impressive. But it’s a start. And as I’ve heard before, the journey of a thousand miles begins with a single step.

More on $.99 Christmas lights…

I didn’t have a lot of time to do anything significant tonight, but I wanted to test a few things about this strand of Christmas lights using a multimeter and some simple math.

Recap: there are two strands of LEDs, each wired in parallel. One strand consists of 4 red and 4 yellow LEDS. The other has 4 blue and 3 green LEDs. When powered by two AA alkaline cells, the two strands combine to draw about 40ma of current.

While mulling what I could do with them during the day, it seemed obvious that I could use my ATtiny13 pumpkin circuit to drive the LEDs. While the ATtiny13 is just an 8 pin DIP, it has two PWM outputs, each of which could drive one strand. My pumpkin was powered by 2 AA batteries. The ATtiny13 should have no problem sinking 40ma of current on two pins. Since the LED strands can be powered by just 3V, I could run the entire thing off just the two AAs.

But there is one thing that is a bit wonky: the yellow LEDs. They are really dim compared to the other LEDs. One is sort of okay, but the other three are really feeble. I thought it was possible that maybe the yellows were just feeble (they usually aren’t as bright as good red or green LEDs), but I had another hypothesis: that the forward voltage for those leds was really close to 3v, and they weren’t really conducting properly.

To a first approximation, until the voltage across the diode reaches the forward threshold value, the diode doesn’t conduct. If the yellow LED was barely meeting (or not) meeting its forward voltage, then it’s not passing as much current as the other LEDs. In fact, in this parallel arrangement, it means that the other LEDs are passing more current than you would think (the overall current is still limited by the current limiting resistor in the circuit, but the balance is wrong).

So, I hypothesized that if I raised the voltage perhaps I’d get more even illumination. I hooked up a 5v supply, and… yes! the lights did seem a bit more even, and the yellows, while not exactly blazing, were at least reasonably illuminated. I then hooked up a ammeter to measure the current through the circuit. I knew it would be higher (obviously, since the LEDs were brighter). Indeed, it measured 120ma or so, nearly 3x the current. To keep the same 40ma current, I’d need some additional current limiting resistance. I tried inserting a 220 ohm resistor, and the green and blue strand were nearly completely extinguished, and only the red LEDs of the red/yellow strand were illuminated. Obviously the voltage drop across the resistor was too great to cause the forward voltage of most of the LEDs to conduct.

So, I dusted off a small 200 ohm pot from my junk box, and inserted that. I then tuned the resistance to match the 40 ma of current that we saw at 3v. And, indeed, while the current draw was the same, the illumination was quite a bit more even: the yellow LEDs were quite reasonable.

This suggests that maybe the right thing to do is to drive the LEDs with a bit higher voltage. I’m now thinking that I’ll power the ATtiny and the LEDs with a 9v battery into a 5v regulator. Since the capacity of the 9v battery is a bit lower, it won’t last as long, and we are wasting more energy in the current limiting resistor (I need to add about 47 ohms of resistance to lower the current draw to just 40ma) but I’ll get better illumination.

We’ll see how this works when I get it on the breadboard.

Upcoming Total Lunar Eclipse

Yep, there is an upcoming total lunar eclipse this Saturday, on the morning of Dec 10. It will be the last total lunar eclipse visible from San Francisco until April of 2014, so I think I’ll be trying to get up and see if I can view it and take some snapshots. From San Francisco, will enter the penumbra at 3:34 local time. You should start seeing it enter partial eclipse around 4:46, and it will begin totality around 6:06 (at only 12 degrees of altitude). Totality ends around 6:57, with the moon at about 3 degrees altitude.

I’ll probably get out my aircraft spotting binocs, and try some ghetto “through the eyepiece” photography. Stay tuned.

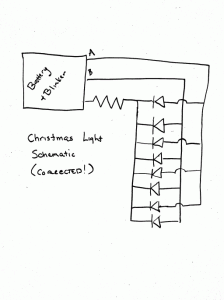
Correction: Schematic for $.99 Christmas Lights

I was in a hurry yesterday, and didn’t draw the LED connections in my schematic for the $.99 Christmas lights properly. Mike pointed it out to me on twitter, so I thought I’d post a corrected version of the schematic. I’ve also updated the schematic in the original post, so no one will be led astray by haste and carelessness.