Sometime last week, I got my Etherkit OpenBeacon kit in the mail. Like many of my projects, it was probably destined to sit on the shelf for some time, but in a fit of personal productivity (for a loose definition of productivity) this week I cleared a few hours of my time and got it assembled, and now is on the air with the cloud warming power of 100mw. I positioned it’s signal in the middle of a bunch of QRSS signals as received by my IC-735, so it should be within the QRSS sub-band on 30m, but my IC-735 itself is rather poorly calibrated (off by 150 Hz or so) so I’m not as yet certain of it’s exact frequency. But it should be in the ballpark. I’d love to here from anyone who hears it and can provide a signal report. It’s currently sending DFCW3.
But I got ahead of myself. About the kit: it is a very nice PC board, well laid out and not too cramped. All components are traditional through-hole. It requires that you wind three toroidal coils: two ordinary ones with sixteen turns, and one bifilar transformer of ten turns. If you haven’t wound coils before (and I’ve only wound a few) you probably will find that the most daunting part of the construction.
The instructions are.. well… I’d characterize them as barely adequate. They consist mostly of a BOM and a few rough pointers. If you look carefully, you can install things incrementally, but it’s kind of a pain to do things that way. I began by simply installing all the caps and resistors, and then enough to test the microcontroller was functional. The board uses an ATtiny85 by Atmel, and runs software which allows it to appear as a USB device. That all worked fine the first time I booted it up, no great surprises. When I finished fleshing out the oscillator, I was slightly confused because it didn’t appear to start, and I noticed that the red LED indicator wasn’t on. A bit more careful examination of the schematic showed that unless the 2N7000 was installed that would probably be the case, so I ignored it and simply fleshed out the rest of the rig. In the end, it all turned out fine. I think they could be a bit clearer on how to mount the power transistor: the double line indicates the backside (non-label side) of the transistor. That would be easy to screw up if you weren’t careful.
When I powered it on, I could hear it’s signal about 4Khz low on my IC-735, even without any antenna hooked up. You have three adjustments: one cap controls the frequency, one controls the bandwidth of the modulated signal, and a trim pot controls the output power. By the time I finished this, I was a bit tired, and didn’t have much desire to do detailed testing. I hooked up my SDR-IQ to accurately measure the output frequency, and tweaked it to be right around 10.140000 Mhz. The tuning is fairly twitchy, even small turns of the tuning cap can send the oscillator two or three hundred hertz from where you start. But with the SDR-IQ, you can watch fairly easily, and I soon had it on frequency.
I didn’t have a dummy load or anything yesterday, but I put it on the air. I didn’t see any sign of it on W4HBK’s Florida grabber (most closer ones appear to be off the air for now), but I think it was all working.
Today, I wanted to make a more accurate estimate of the output power. I constructed a small dummy load out of 4 180 ohm resistors wired in parallel (yes, that’s just 45 ohms, so sue me). I then clipped my handy Rigol scope on either side of the resistors, and measured the RMS voltage. Setting it to 4.5V into a 45 ohm load should make for 100mw. I also checked the limits: right around 300mw, just as described in the documentation.
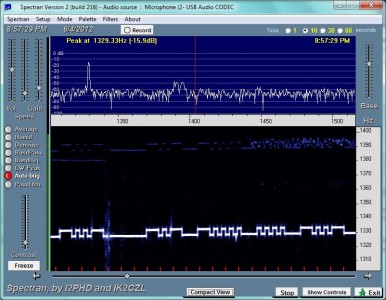
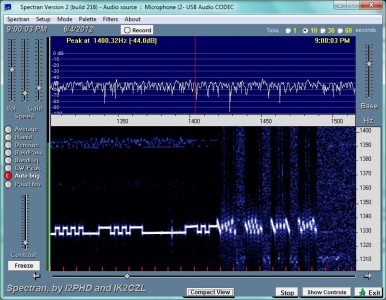
Here are a couple of screen grabs that I made using Spectran while testing the beacon. The first shows it’s default DFCW3 signal, the second, the somewhat less effective but still cooler looking Hellschrieber.
I also recorded part of me assembling it in time lapse mode on my iPhone. Not informative, but fun to watch. Sadly, my batteries died before finishing it, next time I’ll use an A/C adapter on the phone. The utility I used OSnap! is nice, but very slow in constructing the video and uploading the results to YouTube.
I’ll try to follow up with more information about this project in the near future.

