So, I’m trying to get a little more adept at wood working, and one of the things that I’m doing as a “skills building” exercise is to design and fabricate some new jigs and accessories for my table and miter saw. One of the things that I thought would be cool would be to design and 3D print some plastic knobs that I could use.
I had some idea as to what the kind of knob I wanted to make would look like, and from time to time I’ve been trying to gain some experience designing objects using Fusion 360. The basic ideas that I had was to make a knob a little under 2″ in diameter, with a sort of six lobed shape, an inch thick and threaded with a 1/4×20 thread.
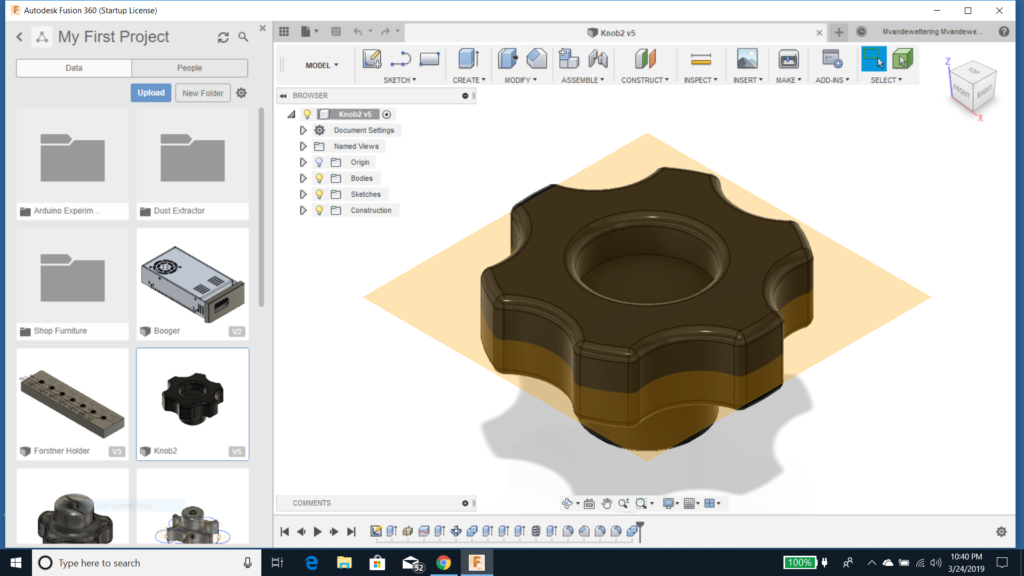
So here’s what I came up with…
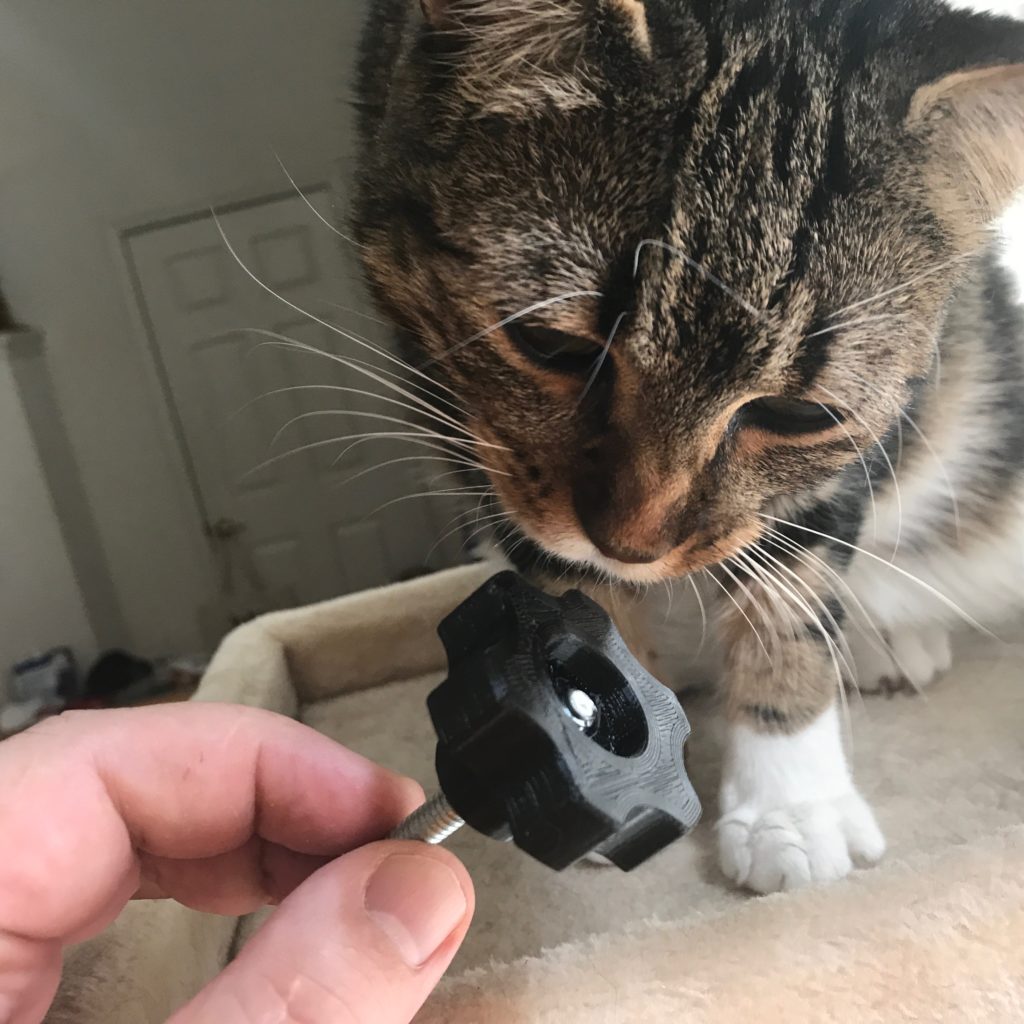
I am still pretty new to Fusion 360, but I was able to model it in an hour or so after a couple of false starts. And I printed one, which I then threaded onto a 1/4×20 bolt that I had lying on my workbench.
A couple of issues made it less than 100% successful.
First of all, the threads are quite tight. I could not screw the bolt into the knob by hand, I needed to use a screw driver. I thought I had a 1/4×20 tap lying around somewhere, but I haven’t been able to find it. I suspect that if I ran the tap through the threads, it would loosen it up significantly. Being tight can either be a flaw or feature. For a jig that you tighten by hand where the knob acts as a nut for a carriage bolt that you loosen and tighten often, you might want it to be a little bit looser. But if you use this to hold a machine bolt that you thread into a threaded insert, the tightness is probably a feature. I’ll have to print a few once I refine the model and do some testing in different modes.
The second is that I was trying to figure out a way to print an attractive knob without using supports. If I printed it with the small end against the bed (as conceived above) then the flange would need a support. I could slowly increase the size so that the overhang could be printed in one pass, but that seemed kind of odd.
The other way is to print it the other way around, with the big face against the bed. The problem here is that I wanted a recess to hide a washer and the head of a bolt if I decided to use the knob as a big thumbscrew. That recess would seem to require a support, but I thought it might be fun to try a technique I had seen before, which was to create a sacrificial “bridge” to hold the inner hole, which I could then remove with a quick bit of Xacto work.
So that’s what I did. I created a 0.25mm thick disk that covered the tapped hole. Since I was printing with a 0.2mm layer height, that layer should just be a single layer thick.
It worked! Well, not perfectly. I haven’t got the best settings for bridging using PETG in my slicer, so that layer was a little droopy and didn’t stick together very well. I’m thinking that I should increase speed and fan while bridging, and I might get a better result.
I could have just cut this stuff off with an Xacto, but I decided to just hit it with a 1/4″ drill in my drill press. This was actually a bit of a mistake because I didn’t hold the knob in a vice. Once the bit hit the plastic, it dug in quickly and tore it out of my hand. I probably should have used a small conical countersink instead.
I was also thinking that if I wanted make a looser version of the knob, one simple way might be to scale just the X and Y in the slicer by a small amount, say 3% or so. I’ll try that when I get an hour or so to try, and that probably won’t happen until I experiment to get better bridging settings.
I noticed a couple of other tiny issues with the model which I will probably refine. Perhaps another round tonight, but I have other projects to work on, so it might not happen until later in the week.
If you are exceptionally bold you can try downloading the STL file and printing one of your own. Drop me a comment if you like it.