Hey gang, I know it’s been quite some time (since last May apparently) since I posted anything new on the blog. It is not that I haven’t been doing projects. The continuation of the COVID-19 pandemic generally means that I’ve had a lot of extra time, and have been tinkering with a bunch of different projects and learning new skills. I just haven’t felt much like writing them up.
But I realize that I miss some of the interactions that writing a blog brought about, so maybe it would be good to write up a detail or two of some of the projects. We’ll see how successful I am.
Today’s projects will center around microcontrollers based around the ESP8266 (notably the WEMOS D1 Mini are some of my favorites) and the Tasmota firmware.
The WEMOS D1 Mini
If you haven’t encountered the ESP8266 microprocessor before, you can use google, but the basic idea is that it’s a small controller which is both very cheap and allows access to WiFi. They come on various boards, but one of the most popular is a small board which is called the Wemos D1 Mini. I’ve used them in a few of my own projects before, including an internet enabled clock and my old half life clock that I built a while ago. Did I mention they were cheap? You can get five of them for $17 or so from Amazon. That’s even cheaper than clone Arduino Nanos, and did I mention they have Wifi? They have Wifi.
Programming with platformio
The Arduino has been popular in part because it has a friendly set of libraries and an IDE that can be used to program them. It turns out that with a little work, you can pretend that the ESP8266 is just a different type of Arduino, and all your skills could transfer into programming these things.
But I prefer to http://platformio.org which is a more command line driven approach. You still program the same way, but you can use your favorite editor (vi for me) to create the source code, and can compile and install using simple command line tools. It also provides convenient access to a lot of different libraries.
Using platformio I had created a bunch of different projects over the years. For instance, I created this clock to download ISS data from the Internet and provide a small display with the location of the ISS.
I’d also made clocks, and a variety of adhoc sensors like https://brainwagon.org/2018/12/09/how-not-to-code-an-simple-iot-sensor-and-a-new-task-list/comment-page-1/. But each time I wanted to do a fairly simple sensor project, it kind of meant an afternoon of programming. Granted, not particularly difficult programming, but neither was it trivial. I kind of wish there would be a simpler way I could attach a simple sensor to the esp8266, and get it routed to a server for logging, graphing or data analysis.
Tasmota Firmware
A couple of weeks ago, I was doing my usual browsing/tinkering, and encountered something which I hadn’t considered before. https://github.com/arendst/Tasmota is a firmware that can be downloaded to ESP8266 (and more modern ESP32 boards) that are often used for IOT peripherals. I had used it before when I experimented with SONOFF switches. Here’s the product page. These are cool because using them you can create a switch which doesn’t rely on any cloud architecture to run: you can control it with simple MQTT or HTTP messages. But I had missed a couple of things that I hadn’t realized before.
First of all, you can install the Tasmota firmware very easily on the WEMOS D1 Mini. The easiest way is to bring up the Tasmota Web Installer on chrome, and select any one of a bunch of precompiled versions of the Tasmota firmware, each with different sets of potential sensors or capabilities. You then simply add your sensors to the board, fire it up and configure it’s wifi and MQTT settings, and you have a capable little sensor.
The first of the many applications that I saw was actually something I was interested in. Ikea sells an air particle sensor box which costs just $13.00. This is considerably cheaper than some of the other sensors I’d experimented with before. But out of the box, it just lights an LED bar to indicate the air quality (green for low, yellow and red for higher levels). By itself, that sensor is not particularly useful. I want to have quantitative data, and to be able to log the data to an MQTT server.
Luckily, someone had done the heavy lifting before me.
A quick trip to Ikea purchased a pair of these little guys. This afternoon, I opened one of them up and did the necessary modifications to add a WEMOS D1 Mini with the appropriate firmware.
I could have added another sensor directly in case (there is plenty of space) but I chose to simply create a second WEMOS that used a SHT30 temperature/humidity sensor that I had a little carrier board for. Both send their data to an MQTT server.
Node Red front end
I could have written a little Python script to slurp up data from the MQTT server and produce graphs and the like, but there is an interesting alternative: Node Red. It’s a sort of graphical programming system that allows you to wire up data sources (like MQTT inputs), process them in various ways, and send them to various other outputs. It is also a convenient front end for creating UI elements that respond. After an hour or so of tinkering, I had the following:
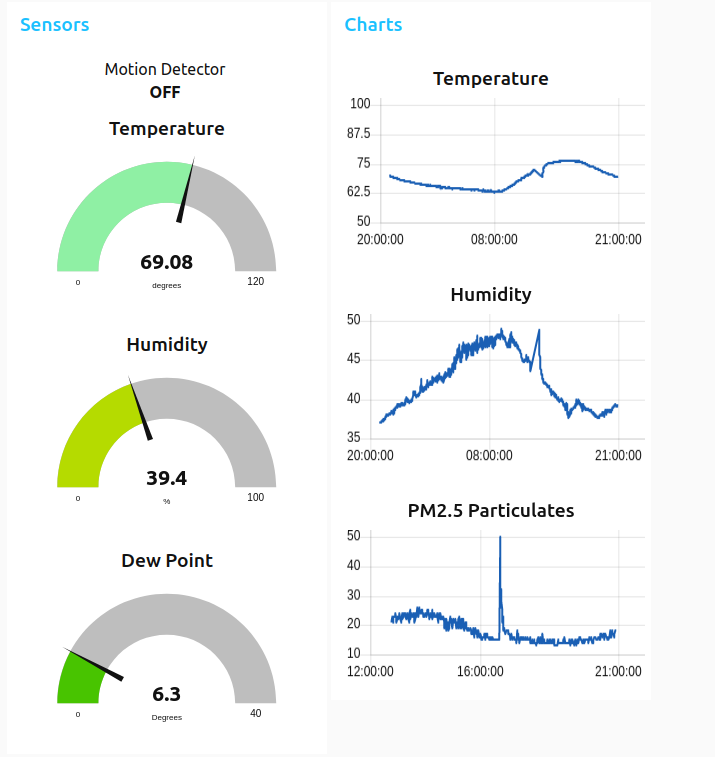
Not too shabby. I experimented with similar things before, and also had the data injected into an InfluxDB database, which provides for linger term storage. I’ll probably work that up again.
A couple of years ago, I also did similar data logging using the INA219 voltage/current sensors on a small solar power setup that I created. At that time, I used custom firmware but I now believe that I could do the entire project without any of that programming. I could simply make a couple of small modules that run Tasmota, and do all the data logging with MQTT and Node Red.
I also discovered that the Tasmota firmware also can serve as a controller for a display device. I had an 8 digit 7 segment display controlled by a MAX7219 chip, which is one of the potential displays that the Tasmota firmware knows about (it also nows about a variety of E-ink and TFT displays). You can send commands to the board using HTTP or MQTT to tell it to send information to the display. In a few minutes, I had it displaying the time, essentially making a small internet clock. That seems pretty cool. I ordered some small OLED displays that I can do more experiments with. I’ll probably need to compile a custom version of firmware to use both the sensors I want and the displays, but it seems like an interesting thing to play around with.
Future tinkering
It’s a fun thing to play with. Inexpensive sensors and displays, wired into your own servers, with little-to-no programming. I like it, and will be looking for other possible projects to make use of my new knowledge.
Hope some of you found this interesting.
Glad to see an update. Tasmota is a great system, and does indeed greatly simplify many things. Of course best known it seems for replacing the firmware of the various ‘smart’ switches and widgets. Personally not big fan of Node Red/Node.js as I tend to run *very* limited resource home automation systems and (last time I installed it) it takes a bunch of storage – and I’m also not a big fan of JavaScript. But that’s just me – it works well for a lot of people. Please keep posting – I’m always interested to see what you’ve been up to. Cheers!
Thanks for reading. Yes, Node Red can be a bit of a resource hog, but it can be run on things as trivial as a Raspberry Pi. What I find attractive about it is that it’s flexible: you can easily wire services and sensors together that may not have been conceived of before. I was thinking of wiring my dust sensor to a fan that is controlled by a SONOFF switch, so it would automatically come on after I do sanding/woodworking in my shop, and shut off automatically when the air quality dropped to sane levels. I could make that happen in just a few minutes of work with Node Red.