Dorodango: Having (or rather making) a ball with just mud
 On Sunday, I started a new project which on the face of it, seems like an enormous waste of time, but if you’ve been reading my blog for any period of time, you know that wasting time is pretty much the bread and butter of my online presence, so here we go.
I’ve started work on a dorodango (????).
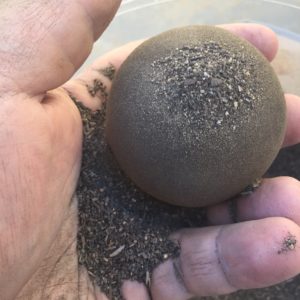
A dorodango is essentially a ball of mud, carefully formed into a sphere, and then covered with layers of dried dirt until it becomes a smooth, solid sphere, and then polished to a high shine.
I’m sure that some of your are blinking your eyes and wondering if I’ve gone stark raving mad. Wonder no further. It is kind of a lunatic thing to do. On the other hand, it’s also relaxing, and gives me time to think about interesting things, or just clear my mind and think of nothing at all. And, of course, the materials you need are quite literally just some dry dirt and a little water.
If you want to see some excellent examples, you can surf over to Bruce Gardner’s excellent dorodango.com website and have a peek. My example will no doubt be less beautiful, but still pretty interesting.
I began by going out to my back yard with a small shovel and a strainer I bought just for this purpose for $1 at the Dollar Tree. I went to the portion of my garden which doesn’t get regular watering, and where the ground is very dry, and scooped up a bunch of dirt, and ran it through the sieve to remove the large pieces of gravel and other organic matter, which I dumped into a cheap $1 food container. Once I had a layer a few inches thick of relatively fine material, I strained some more into a smaller container. When I felt that I had enough material to form the initial core, I added some water (probably too much) and worked it into a paste. I then formed a rough ball, squeezing out some of the (again, too much) water, and then forming it roughly into a ball, shaking it back and forth between my two hands until a relatively good sphere was formed.
I then held it over my container of dry dirt, and sprinkled the surface with this, adding some, and then brushing it off with the base of my thumb. At this stage, the core is still pretty easy to squish, and several times, cracks would form across the ball. I then added a little bit more of the dirt and wiped across the crack, and they would go away. For a half an hour, I fought the appearance of new cracks, and then they seem to stop. The surface became quite smooth, and the ball was no longer easy to compress out of shape, although I was handling it pretty gingerly. I kept adding dry dirt to it, and rubbing it gently off with the base of my thumb until the surface appeared quite dry, and dirt would no longer stick to it. Then, I put it in a ziplock bag and set it aside in my garage on top of a piece of foam so it wouldn’t create a dent. After a few hours, water will condense out on the bag and on the surface, and you extract the ball and add more fine dirt. I’m currently in the process of repeating this process until the core is completely dried out. Then, there will be more polishing to bring up the surface sheen.
Here’s a brief iPhone video I made of the ball in progress (apologies for the vertically oriented video). The texture of the ball is already quite smooth and leathery. I estimate it will take a few more days of intermittent work before I’ll begin to work on polishing it.
I’ll hopefully post a picture of the beautiful finished sphere in a week or so. If this sounded boring, consider that I did most of the work while sitting outside, watching hummingbirds and generally relaxing. I found it a great stress relief.
If you’d like to give it a try, check out these instructions on the Make Magazine website.
I recall burning three or four weeks of a sabbatical getting Saccade.com on the air with Wordpress. So much tweaking…