Category Archives: Microcontrollers

On calculators, Space Invaders and Binary Coded Decimal Arithmetic…

A couple days ago, one of my Twitter or Facebook friends (sadly, I forgot who, comment if it was you, and I’ll give you credit) pointed out this awesome page:

Reversing Sinclair’s amazing 1974 calculator hack – half the ROM of the HP-35

It documented an interesting calculator made by Sinclair in the 1970s. It is an awesome hack that was used to create a full scientific calculator with logarithms and trigonometric functions out of an inexpensive chip from TI which could (only barely) do add, subtract, multiply and divide. The page’s author, Ken Shirriff, wrote a nifty little simulator for the calculator that runs in the browser. Very cute. It got me thinking about the bizarre little chip that was at the center of this device.

I’m kind of back in an emulator kick. I recently had dusted off my code that I had started for emulating the 8080 processor. I had originally wanted to implement a version of CP/M, but I remembered that the 1978 game Space Invaders was also based upon the 8080. It wasn’t hard to find a ROM file for it, and with a little bit of hacking, research and debugging, I had my own version of Space Invaders written in C and using SDL2, running on my Mac laptop.

Screen Shot 2015-09-16 at 12.46.01 PM

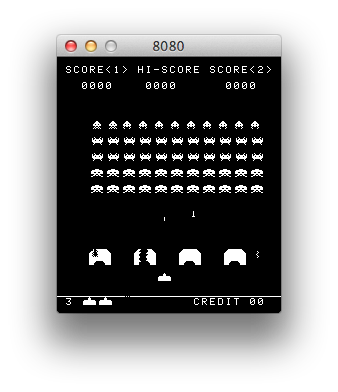
Fun stuff.  The sound is a little crude: most of the sound in the original game was generated by a series of discrete circuits which you can find on this page archived via the Wayback Machine. I briefly played around with simulating some of the sounds using LTSpice based upon these circuits (it appears to work fairly well), but I haven’t got that fully integrated into my simulator yet. For now, it just queues up some recorded sounds and plays them at the appropriate time. Everything is currently working except for the classic “thump… thump…” of their marching. I’ll get that working sometime soon.

Anyway, back to calculators. One thing on Ken’s page kind of made me think: he mentioned that the HP-35 had taken two years, twenty engineers, and a million dollars to develop. Mind you, the HP-35 was pretty revolutionary for its time. But I thought to myself “isn’t a calculator an easy hobby project now?”

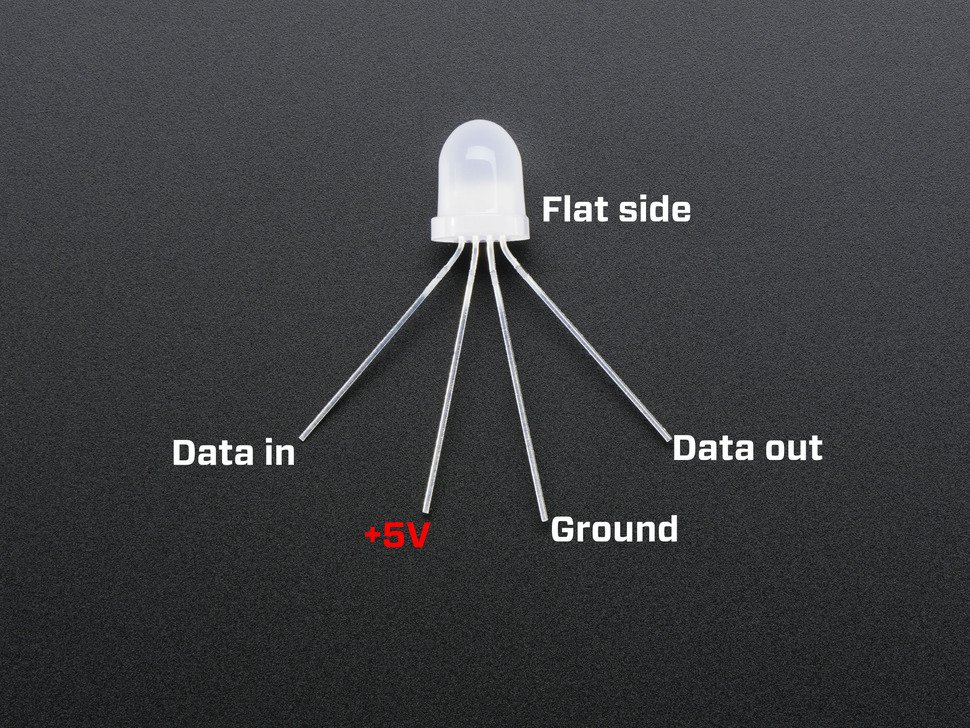
After all, I had assembled a KIM-Uno, Oscar’s awesome little $10 board that emulates the KIM-1 microcomputer:

In fact, the KIM-Uno implements a floating point calculator as well. It’s brains are just an ordinary Arduino Pro Mini wired on the back. Arduino Pro Minis can be had for less than $3 from China. Could I make a fun little calculator using that as the basis?

My mind is obviously skipping around a lot at this point.

Of course, a bit more googling revealed that someone had done something very similar using the MSP430 chips from (appropriately enough, also manufactured by Texas Instruments). Check out the build thread here.. It’s pretty nifty, and uses a coin cell to drive it, as well as some very classic looking “bubble LED displays”, which you can get from Sparkfun. Pretty cool.

Anyway…

For fun, I thought it might be fun to write some routines to do binary coded decimal arithmetic. My last real experience with it was on the 6502 decades ago, and I had never done anything very sophisticated with it. I understood the basic ideas, but I needed some refresher, and was wondering what kind of bit twiddling hacks could be used to implement the basic operations. Luckily, I stumbled onto Douglas Jones’ page on implementing BCD arithmetic, which is just what the doctor ordered. He pointed out some cool tricks and wrinkles associated with various bits of padding and the like. I thought I’d code up a simple set of routines that stored 8 BCD digits in a standard 32 bit integer. His page didn’t include multiplication or division. Multiplication was simple enough to do (at least in this slightly crazy “repeated addition” way) but I’ll have to work a bit harder to make division work. I’m not sure I really know the proper way to handle overflow and the sign bits (my multiplication currently multiplies two 8 digit numbers, and only returns the low 8 digits of the result). But.. it seems to work.

And since I haven’t been posting stuff to my blog lately, this is an attempt to get back to it.

Without further ado, here is some code:

[sourcecode lang=”C”]
/*
* A simple implementation of the ideas/algorithms in
* http://homepage.cs.uiowa.edu/~jones/bcd/bcd.html
*
* Written with the idea of potentially doing a simple calculator that
* uses BCD arithmetic.
*/

#include <stdio.h>
#include <stdint.h>
#include <inttypes.h>

typedef uint32_t bcd8 ; /* 8 digits packed bcd */

int
valid(bcd8 a)
{
bcd8 t1, t2, t3, t4 ;
t1 = a + 0x06666666 ;
t2 = a ^ 0x06666666 ;
t3 = t1 ^ t2 ;
t4 = t3 & 0x111111110 ;
return t4 ? 0 : 1 ;
}

bcd8
add(bcd8 a, bcd8 b)
{
bcd8 t1, t2, t3, t4, t5, t6 ;

t1 = a + 0x06666666 ;
t2 = t1 + b ;
t3 = t1 ^ b ;
t4 = t2 ^ t3 ;
t5 = ~t4 & 0x11111110 ;
t6 = (t5 >> 2) | (t5 >> 3) ;
return t2 – t6 ;
}

bcd8
tencomp(bcd8 a)
{
bcd8 t1 ;

t1 = 0xF9999999 – a ;
return add(t1, 0x00000001) ;
}

bcd8
sub(bcd8 a, bcd8 b)
{
return add(a, tencomp(b)) ;
}

bcd8
mult(bcd8 a, bcd8 b)
{
bcd8 result = 0 ;
bcd8 tmp = a ;
bcd8 digit ;
int i, j ;

for (i=0; i<8; i++) {

digit = b & 0xF ;
b >>= 4 ;

for (j=0; j<digit; j++)
result = add(result, tmp) ;

tmp <<= 4 ;
}
return result ;
}

int
main(int argc, char *argv[])
{
bcd8 t = 0x00009134 ;
bcd8 u = 0x00005147 ;
bcd8 r ;

r = mult(t, u) ;
printf("%X * %X = %X\n", t, u, r) ;
}
[/sourcecode]

I’ll have to play around with this some more. It shouldn’t be hard to move code like this to run on the Arduino Pro Mini, and drive 3 bubble displays (yielding 11 digits plus a sign bit) of precision. And I may not use this 8 digits packed into 32 bit format: since I want 12 digits, maybe packing only 4 digits into a 32 bit word would work out better.

Anyway, it’s all kind of fun to think about the clanking clockwork that lived inside these primitive machines.

I’ll try to post more often soon.

Tinkering with individually addressable LEDs…

Blinking LEDS...While digging around looking for an LCD module I thought I had stashed somewhere, I encountered a bag with some of 8mm individually addressable RGB LEDs that I had never done anything with. For fun, I thought I’d wire a few of them up on my breadboard and see if I could get them to do something.

These things are cool. Most RGB LEDs have four leads, with one common annode (or cathode) and three other pins, each of which connects to the different color LED. To dim them and generate arbitrary colors, you need to have three pins which are attached to a pulse width modulated pin. To address a bunch of them individually would require a bunch of pins.

But these LEDs are different. It’s true, they have only four pins. But they are constructed to act independently. The four pins are a 5v power pin, a ground, and a data-in and data-out. You can chain arbitrary numbers of them together by hooking the data-out from one LED into the data-in of the next.

To demonstrate this, I thought I’d hook hook three of them together, and see what I could do. It wasn’t obvious to me from the datasheet that I found how the pins were label. Luckily, AdaFruit had a nice diagram that showed how the pins were ordered. I positioned the flat side of each led to the right, hooked all the +5V and ground connections up, and then wired the data-out of each stage to the data-in of the next stage. I then looked up the Arduino, which is dead simple: one output pin to the first LED data-in, and hook up the common ground.

led

To drive this requires a bit of code. The library that everyone seems to use is the Adafruit NeoPixel library. Oh, did I mention? The same LEDs are found in preformed strips like this one. If you need a lot of LEDs in a strip, this is a good way to go. But for just a few LEDs, these through hole parts can be fun.

I downloaded the Adafruit library, and wrote up this chunk of code.

[sourcecode lang=”cpp”]
#include <Adafruit_NeoPixel.h>

const int led_pin = 6 ;

Adafruit_NeoPixel strip(3, led_pin, NEO_RGB + NEO_KHZ800);

void
setup()
{
strip.begin();
}

int cnt = 0 ;

int col[3][3] = {
{255, 0, 0},
{0, 255, 0},
{0, 0, 255}
} ;

void
loop()
{
int i, idx ;
for (i=0; i<3; i++) {
idx = (cnt + i) % 3 ;
strip.setPixelColor(i, strip.Color(col[idx][0], col[idx][1], col[idx][2]));
}
strip.show() ;
cnt++ ;
cnt %= 3 ;
delay(500) ;
}
[/sourcecode]

Nothing too exciting, but it’s been a fun little thing to tinker with. It’s nifty to drive a large number of LEDs using only a single digital pin from a microcontroller. I’ll have to come up with a project to use them sometime.

Discovered a new tool for embedded development: platformio

I’m pretty old school when it comes to development. To me, writing code is something I like to do with vi (the editor that I learned three decades ago) and compile with Makefiles, especially for code that I do myself. In general, I prefer to do my development on either Linux or Mac OS too, so portable tools are my favorite. Increasingly, people have come to rely on complex development environments, many of which include code wizards that generate lots of the boiler plate needed to create applications, complex syntax coloring, and engines to refactor code. These environments are often significantly different from one another, are closed source, or rely on older versions of open source tools (like plugins for eclipse).

This seemed doubly true for this little Freescale development board that has been sitting unused since I purchased it at the last (or was it the one before that) Maker Faire. It is supposedly part of the “mbed” family of dev boards, which is supposed to make development across a variety of similar boards simple. But the reality is a dizzying array of odd products, including a web based IDE that just annoyed and confounded me. So, the board mostly sat unused. I did mention it in my “bucket o’ dev boards” video a couple weeks ago, and I thought “there must be a better way”.

Rather than toil away on my own, I tossed the question to my twitter followers:


Within minutes, @ukscone responded with this suggestion:


I had never heard of platformio, but I quickly read over the quickstart, and was impressed. Basically it’s a fairly simple utility called (appropriately enough) platformio, written in Python, and portable to Windows, Mac OS X and Linux. Compiled within it is knowledge of a large number of supported boards. You can get a list of supported boards by typing “platformio boards”, and you’ll get the output.

Platform: atmelavr
---------------------------------------------------------------------------
Type                  MCU            Frequency  Flash   RAM    Name
---------------------------------------------------------------------------
flora8                atmega32u4     8Mhz      28Kb    2Kb    Adafruit Flora
trinket3              attiny85       8Mhz      8Kb     512B   Adafruit Trinket 3V/8MHz
trinket5              attiny85       16Mhz     8Kb     512B   Adafruit Trinket 5V/16MHz
btatmega168           atmega168      16Mhz     14Kb    1Kb    Arduino BT ATmega168
btatmega328           atmega328p     16Mhz     28Kb    2Kb    Arduino BT ATmega328
diecimilaatmega168    atmega168      16Mhz     14Kb    1Kb    Arduino Duemilanove or Diecimila ATmega168
diecimilaatmega328    atmega328p     16Mhz     30Kb    2Kb    Arduino Duemilanove or Diecimila ATmega328
esplora               atmega32u4     16Mhz     28Kb    2Kb    Arduino Esplora
ethernet              atmega328p     16Mhz     31Kb    2Kb    Arduino Ethernet
fio                   atmega328p     8Mhz      30Kb    2Kb    Arduino Fio
leonardo              atmega32u4     16Mhz     28Kb    2Kb    Arduino Leonardo
megaADK               atmega2560     16Mhz     248Kb   8Kb    Arduino Mega ADK
megaatmega1280        atmega1280     16Mhz     124Kb   8Kb    Arduino Mega or Mega 2560 ATmega1280
megaatmega2560        atmega2560     16Mhz     248Kb   8Kb    Arduino Mega or Mega 2560 ATmega2560 (Mega 2560)
micro                 atmega32u4     16Mhz     28Kb    2Kb    Arduino Micro
miniatmega168         atmega168      16Mhz     14Kb    1Kb    Arduino Mini ATmega168
miniatmega328         atmega328p     16Mhz     28Kb    2Kb    Arduino Mini ATmega328
atmegangatmega168     atmega168      16Mhz     14Kb    1Kb    Arduino NG or older ATmega168
atmegangatmega8       atmega8        16Mhz     7Kb     1Kb    Arduino NG or older ATmega8
nanoatmega168         atmega168      16Mhz     14Kb    1Kb    Arduino Nano ATmega168
nanoatmega328         atmega328p     16Mhz     30Kb    2Kb    Arduino Nano ATmega328
pro8MHzatmega168      atmega168      8Mhz      14Kb    1Kb    Arduino Pro or Pro Mini ATmega168 (3.3V, 8 MHz)
pro16MHzatmega168     atmega168      16Mhz     14Kb    1Kb    Arduino Pro or Pro Mini ATmega168 (5V, 16 MHz)
pro8MHzatmega328      atmega328p     8Mhz      30Kb    2Kb    Arduino Pro or Pro Mini ATmega328 (3.3V, 8 MHz)
pro16MHzatmega328     atmega328p     16Mhz     30Kb    2Kb    Arduino Pro or Pro Mini ATmega328 (5V, 16 MHz)
robotControl          atmega32u4     16Mhz     28Kb    2Kb    Arduino Robot Control
robotMotor            atmega32u4     16Mhz     28Kb    2Kb    Arduino Robot Motor
uno                   atmega328p     16Mhz     31Kb    2Kb    Arduino Uno
yun                   atmega32u4     16Mhz     28Kb    2Kb    Arduino Yun
digispark-tiny        attiny85       16Mhz     5Kb     512B   Digispark (Default - 16 MHz)
digispark-pro32       attiny167      16Mhz     14Kb    512B   Digispark Pro (16 MHz) (32 byte buffer)
digispark-pro64       attiny167      16Mhz     14Kb    512B   Digispark Pro (16 MHz) (64 byte buffer)
digispark-pro         attiny167      16Mhz     14Kb    512B   Digispark Pro (Default 16 MHz)
engduinov1            atmega32u4     8Mhz      28Kb    2Kb    Engduino 1
engduinov2            atmega32u4     8Mhz      28Kb    2Kb    Engduino 2
engduinov3            atmega32u4     8Mhz      28Kb    2Kb    Engduino 3
lilypadatmega168      atmega168      8Mhz      14Kb    1Kb    LilyPad Arduino ATmega168
lilypadatmega328      atmega328p     8Mhz      30Kb    2Kb    LilyPad Arduino ATmega328
LilyPadUSB            atmega32u4     8Mhz      28Kb    2Kb    LilyPad Arduino USB
168pa16m              atmega168p     16Mhz     15Kb    1Kb    Microduino Core (Atmega168PA@16M,5V)
168pa8m               atmega168p     8Mhz      15Kb    1Kb    Microduino Core (Atmega168PA@8M,3.3V)
328p16m               atmega328p     16Mhz     31Kb    2Kb    Microduino Core (Atmega328P@16M,5V)
328p8m                atmega328p     8Mhz      31Kb    2Kb    Microduino Core (Atmega328P@8M,3.3V)
32u416m               atmega32u4     16Mhz     28Kb    2Kb    Microduino Core USB (ATmega32U4@16M,5V)
1284p16m              atmega1284p    16Mhz     127Kb   16Kb   Microduino Core+ (ATmega1284P@16M,5V)
1284p8m               atmega1284p    8Mhz      127Kb   16Kb   Microduino Core+ (ATmega1284P@8M,3.3V)
644pa16m              atmega644p     16Mhz     63Kb    4Kb    Microduino Core+ (Atmega644PA@16M,5V)
644pa8m               atmega644p     8Mhz      63Kb    4Kb    Microduino Core+ (Atmega644PA@8M,3.3V)
panStampAVR           atmega328p     8Mhz      31Kb    2Kb    PanStamp AVR
protrinket3ftdi       atmega328p     16Mhz     28Kb    2Kb    Pro Trinket 3V/12MHz (FTDI)
protrinket3           atmega328p     12Mhz     28Kb    2Kb    Pro Trinket 3V/12MHz (USB)
protrinket5ftdi       atmega328p     16Mhz     28Kb    2Kb    Pro Trinket 5V/16MHz (USB)
protrinket5           atmega328p     16Mhz     28Kb    2Kb    Pro Trinket 5V/16MHz (USB)
raspduino             atmega328p     16Mhz     30Kb    2Kb    Raspduino

Platform: atmelsam
---------------------------------------------------------------------------
Type                  MCU            Frequency  Flash   RAM    Name
---------------------------------------------------------------------------
due                   at91sam3x8e    84Mhz     512Kb   32Kb   Arduino Due (Programming Port)
dueUSB                at91sam3x8e    84Mhz     512Kb   32Kb   Arduino Due (USB Native Port)
digix                 at91sam3x8e    84Mhz     512Kb   28Kb   Digistump DigiX
sainSmartDue          at91sam3x8e    84Mhz     512Kb   32Kb   SainSmart Due (Programming Port)
sainSmartDueUSB       at91sam3x8e    84Mhz     512Kb   32Kb   SainSmart Due (USB Native Port)

Platform: freescalekinetis
---------------------------------------------------------------------------
Type                  MCU            Frequency  Flash   RAM    Name
---------------------------------------------------------------------------
IBMEthernetKit        mk64fn1m0vll12 120Mhz    1024Kb  256Kb  Ethernet IoT Starter Kit
frdm_k20d50m          mk20dx128vlh5  48Mhz     128Kb   16Kb   Freescale Kinetis FRDM-K20D50M
frdm_k22f             mk22fn512vlh12 120Mhz    512Kb   128Kb  Freescale Kinetis FRDM-K22F
frdm_k64f             mk64fn1m0vll12 120Mhz    1024Kb  256Kb  Freescale Kinetis FRDM-K64F
frdm_kl05z            mkl05z32vfm4   48Mhz     32Kb    4Kb    Freescale Kinetis FRDM-KL05Z
frdm_kl25z            mkl25z128vlk4  48Mhz     128Kb   16Kb   Freescale Kinetis FRDM-KL25Z
frdm_kl46z            mkl46z256vll4  48Mhz     256Kb   32Kb   Freescale Kinetis FRDM-KL46Z

Platform: nordicnrf51
---------------------------------------------------------------------------
Type                  MCU            Frequency  Flash   RAM    Name
---------------------------------------------------------------------------
wallBotBLE            nrf51822       16Mhz     128Kb   16Kb   JKSoft Wallbot BLE
nrf51_dk              nrf51822       32Mhz     256Kb   32Kb   Nordic nRF51-DK
nrf51_dongle          nrf51822       32Mhz     256Kb   32Kb   Nordic nRF51-Dongle
nrf51_mkit            nrf51822       16Mhz     128Kb   16Kb   Nordic nRF51822-mKIT
redBearLabBLENano     nrf51822       16Mhz     256Kb   16Kb   RedBearLab BLE Nano
redBearLab            nrf51822       16Mhz     256Kb   16Kb   RedBearLab nRF51822
seeedTinyBLE          nrf51822       16Mhz     256Kb   16Kb   Seeed Tiny BLE
hrm1017               nrf51822       16Mhz     256Kb   16Kb   Switch Science mbed HRM1017

Platform: nxplpc
---------------------------------------------------------------------------
Type                  MCU            Frequency  Flash   RAM    Name
---------------------------------------------------------------------------
blueboard_lpc11u24    lpc11u24       48Mhz     32Kb    8Kb    BlueBoard-LPC11U24
dipcortexm0           lpc11u24       50Mhz     32Kb    8Kb    DipCortex M0
lpc11u35              lpc11u35       48Mhz     64Kb    10Kb   EA LPC11U35 QuickStart Board
lpc4088_dm            lpc4088        120Mhz    512Kb   96Kb   EA LPC4088 Display Module
lpc4088               lpc4088        120Mhz    512Kb   96Kb   EA LPC4088 QuickStart Board
lpc1549               lpc1549        72Mhz     256Kb   36Kb   LPCXpresso1549
mbuino                lpc11u24       48Mhz     32Kb    8Kb    Outrageous Circuits mBuino
seeeduinoArchPro      lpc1768        96Mhz     512Kb   32Kb   Seeeduino-Arch-Pro
lpc11u35_501          lpc11u35       48Mhz     64Kb    10Kb   TG-LPC11U35-501
lpc1114fn28           lpc1114fn28    48Mhz     32Kb    4Kb    mbed LPC1114FN28
lpc11u24              lpc11u24       48Mhz     32Kb    8Kb    mbed LPC11U24
lpc1768               lpc1768        96Mhz     512Kb   32Kb   mbed LPC1768
ubloxc027             lpc1768        96Mhz     512Kb   32Kb   u-blox C027

Platform: ststm32
---------------------------------------------------------------------------
Type                  MCU            Frequency  Flash   RAM    Name
---------------------------------------------------------------------------
disco_f334c8          stm32f334c8t6  72Mhz     64Kb    16Kb   32F3348DISCOVERY
disco_f401vc          stm32f401vct6  84Mhz     256Kb   64Kb   32F401CDISCOVERY
disco_f429zi          stm32f429zit6  180Mhz    2048Kb  256Kb  32F429IDISCOVERY
nucleo_f030r8         stm32f030r8t6  48Mhz     64Kb    8Kb    ST Nucleo F030R8
nucleo_f070rb         stm32f070rbt6  48Mhz     128Kb   16Kb   ST Nucleo F070RB
nucleo_f072rb         stm32f072rbt6  48Mhz     128Kb   16Kb   ST Nucleo F072RB
nucleo_f091rc         stm32f091rct6  48Mhz     256Kb   32Kb   ST Nucleo F091RC
nucleo_f103rb         stm32f103rbt6  72Mhz     128Kb   20Kb   ST Nucleo F103RB
nucleo_f302r8         stm32f302r8t6  72Mhz     64Kb    16Kb   ST Nucleo F302R8
nucleo_f303re         stm32f303ret6  72Mhz     512Kb   64Kb   ST Nucleo F303RE
nucleo_f334r8         stm32f334r8t6  72Mhz     64Kb    16Kb   ST Nucleo F334R8
nucleo_f401re         stm32f401ret6  84Mhz     512Kb   96Kb   ST Nucleo F401RE
nucleo_f411re         stm32f411ret6  100Mhz    512Kb   128Kb  ST Nucleo F411RE
nucleo_l053r8         stm32l053r8t6  48Mhz     64Kb    8Kb    ST Nucleo L053R8
nucleo_l152re         stm32l152ret6  32Mhz     512Kb   80Kb   ST Nucleo L152RE
disco_f051r8          stm32f051r8t6  48Mhz     64Kb    8Kb    STM32F0DISCOVERY
disco_f303vc          stm32f303vct6  72Mhz     256Kb   48Kb   STM32F3DISCOVERY
disco_f407vg          stm32f407vgt6  168Mhz    1024Kb  128Kb  STM32F4DISCOVERY
disco_l152rb          stm32l152rbt6  32Mhz     128Kb   16Kb   STM32LDISCOVERY
disco_f100rb          stm32f100rbt6  24Mhz     128Kb   8Kb    STM32VLDISCOVERY

Platform: teensy
---------------------------------------------------------------------------
Type                  MCU            Frequency  Flash   RAM    Name
---------------------------------------------------------------------------
teensy20              atmega32u4     16Mhz     31Kb    2Kb    Teensy 2.0
teensy30              mk20dx128      48Mhz     128Kb   16Kb   Teensy 3.0
teensy31              mk20dx256      72Mhz     256Kb   64Kb   Teensy 3.1
teensy20pp            at90usb1286    16Mhz     127Kb   8Kb    Teensy++ 2.0

Platform: timsp430
---------------------------------------------------------------------------
Type                  MCU            Frequency  Flash   RAM    Name
---------------------------------------------------------------------------
lpmsp430fr5739        msp430fr5739   16Mhz     15Kb    1Kb    FraunchPad w/ msp430fr5739
lpmsp430f5529         msp430f5529    16Mhz     128Kb   1Kb    LaunchPad w/ msp430f5529 (16MHz)
lpmsp430f5529_25      msp430f5529    25Mhz     128Kb   1Kb    LaunchPad w/ msp430f5529 (25MHz)
lpmsp430fr5969        msp430fr5969   8Mhz      64Kb    1Kb    LaunchPad w/ msp430fr5969
lpmsp430g2231         msp430g2231    1Mhz      2Kb     128B   LaunchPad w/ msp430g2231 (1 MHz)
lpmsp430g2452         msp430g2452    16Mhz     8Kb     256B   LaunchPad w/ msp430g2452 (16MHz)
lpmsp430g2553         msp430g2553    16Mhz     16Kb    512B   LaunchPad w/ msp430g2553 (16MHz)
panStampNRG           cc430f5137     12Mhz     31Kb    4Kb    PanStamp NRG 1.1

Platform: titiva
---------------------------------------------------------------------------
Type                  MCU            Frequency  Flash   RAM    Name
---------------------------------------------------------------------------
lplm4f120h5qr         lplm4f120h5qr  80Mhz     256Kb   32Kb   LaunchPad (Stellaris) w/ lm4f120 (80MHz)
lptm4c1230c3pm        lptm4c1230c3pm 80Mhz     256Kb   32Kb   LaunchPad (Tiva C) w/ tm4c123 (80MHz)
lptm4c1294ncpdt       lptm4c1294ncpdt 120Mhz    1024Kb  256Kb  LaunchPad (Tiva C) w/ tm4c129 (120MHz)

That’s a LOT of different boards, including a large number of the ones I have. I was particularly interested in creating applications for the Freedom K64F board, which is supported. I typed “platformio install freescalekinetis”, and the script went out and found what version of tools it needed (gcc) and what support framework/libraries it needed, and installed them automatically (on Mac OSX/Linux, they end up hidden in the .platformio library in your home directory). You don’t need to go hunting around and find the right version, platformio takes care all of that (and can handle upgrades as new versions are created). In this way, platformio acts rather like a package manager such as apt-get on Linux.

To use platformio to build a new project, you create a directory, cd into it, and then run “platformio init –board=frdm_k64f”. This creates a src and lib directory, and a file called platformio.ini which describes which boards the project can support. It’s possible to create a single project which supports multiple boards (say, many different types of arduino) and build them all simultaneously, but in my case, I just used the one board. I then created this simple little program inside the src directory:

#include "mbed.h"

Serial pc(USBTX, USBRX);

Ticker timer;
DigitalOut led1(LED1);
DigitalOut led2(LED2);
DigitalOut led3(LED3);

int flip = 0 ;

int r=0, g=1, b=1 ;

void
attime()
{
    int t = led1 ;
    led1 = led2 ;
    led2 = led3 ;
    led3 = t ;
}

int
main()
{
        pc.printf("\nHello world.\n") ;
        led1 = r ;
        led2 = g ;
        led3 = b ;

        timer.attach(&attime, 1);
        
        for (;;) {

        }
        
        return 0 ;
}

This is a simple little program that prints “Hello world” back on the USB port, and then blinks the RGB LED in different colors. I didn’t really know much about the library support for these mbed based chips, but I’m old school. Snooping around in the .platformio directory, I found a bunch of header files that hinted at what is possible. I guessed on how this stuff worked, and coded the program up. You can then compile it with “platformio run”, or compile and upload it with “platformio run -t upload”. (There is a way to set it to automatically upload it if it compiles successfully too).

So, within one hour, I had this:


Awesome!

I’m looking forward to doing more experimentation with platformio, and now have it installed on both my Mac and Linux laptops. In addition to some of the odder platforms I have (like the FreeScale or STM32 boards) it also supports the Arduinos. I like the idea of being able to develop code for the Arduino without having to go through their IDE. I did a bit more experimentation with it last night, and got it to generate some display programs for the little OLED display that I wrote about earlier. Platformio also has a library manager which knows about a lot of the popular Arduino libraries, and can automatically download and update those. As I learn more, I’ll try to post more.

Thanks again to @ukscone! Best new thing I’ve discovered in weeks.

A day at the Official Propeller Conference

Even casual readers of this blog know that I’ve enjoyed playing around with the Arduino and the Atmel AVR chips. I really like them, and have used them for a variety of personal projects, as well as using them for a variety of educational projects for a local high school where I mentor students. But I also have a variety of other boards, from MSP430s to the BeagleBone, from the Raspberry Pi to the Parallax Propeller.

The truth is, I haven’t done a lot with the Propeller board. I must admit that a lot of it is simply inertia: if something you already know fairly well serves your needs, then learning something new is often a distraction from your task at hand. But there are things about the Propeller that I do find interesting and compelling.

It’s fast. The chip can be clocked up to 80Mhz, and has 8 cogs, each a 32 bit core with 2KB of local storage for instructions and data.

It has a built in byte code interpreter for SPIN, a high level language. Each cog can execute about 80,000 of these high level byte codes per second, or about 640,000 max if all cogs are funning. I have mixed feelings about Spin, but it’s a cool idea nonetheless.

It avoids interrupts, preferring to use cogs to process events. Interrupt processing is challenging for new programmers (and in some cases, even experienced ones) and the cog model might be easier and more flexible for many real time tasks.

It avoids dedicated hardware peripherals, instead providing “virtual” peripherals as software. Because the chip is fast, and there are many cogs, it’s possible to implement many devices such as UARTS, PWM, servo drivers and even video as code which runs on a particular cog in parallel with the user program. This gives the programmer a great deal of flexibility. SPIN supports a library of user-contributed objects which can really lend to the flexibility of the Propeller.

So, there is lots to like! So, for the second year in a row, I’ve shuffled off to meet some of my friends from tymkrs.com at the Official Propeller Conference. It’s a fairly small get together of Propeller enthusiasts, hosted by Parallax and featuring short presentations on Propeller hardware and software techniques. I had a lot of fun. Parallax is a remarkably small company, run by Ken and Chip Gracey, and having maybe forty employees. Besides the Propeller, they manufacture a bunch of other items, including sensors and robotics items. The highlight of the day was a talk by Chip about the upcoming Propeller 2. Chip’s talk was remarkably informative, and so devoid of normal marketing bull that I actually blinked several times at his honesty.

Propeller 2 looks very cool. To me, the most exciting thing is that it one ups the flexibility of the Prop 1 in allowing any pin to be configured as digital or analog, and an input or output. The Prop 1 has been used by hams to directly generate beacon signals but the new capabilities would seem to open a variety of demodulation as well as modulation techniques. Chip said that the first actual silicon for the Prop 2 will be arriving at Parallax this Monday, and that he’ll let us know via the Parallax forums how that goes. I’ll be paying attention.

I had a great time, culminating with a BBQ dinner with Atdiy, Whisker, Roy, Joe, and some of the Parallax crew. It’s inspired me to actually dig in and start learning Spin. I’m staring over at my Parallax board, happily blinking LEDS. It’s a start.

More details on the Propeller as I goof around.

A Tale of Two Gadgets: the TonidoPlug 2 and a Bus Pirate…

A few days ago, I mentioned that one of my servers had died. I spent some time thinking about how I would replace it. I like having a 24/7 hooked up to the Internet to serve as a file drop and a place where I can use SSH to connect to other devices on my home network, but the machine need not be hugely fast, and it would probably be better if it were fairly low power. My previous server drew about 30 watts, and I suspected that I could get something more compact and lower power to replace it.

So, I ordered a TonidoPlug 2. It’s a cute little server based upon the Sheeva Plug computer concept, but includes space to insert a 2.5″ SATA laptop drive. It has all sorts of “personal cloud” applications running on it, which I had no interest in, but doing a bit more research, I found that I could install ArchLinux on the internal hard drive, and it would boot to that automatically. Cool, think I. I ordered mine off Amazon.

It arrived yesterday. I powered it up, verified that it worked in its default configuration, then proceeded to follow the directions on the ArchLinux ARM page. Upon reboot… not good. I ended up with a flashing red LED, and the network never comes back up. So, I pulled the internal drive, and it reboots back to its default configuration.

I then start tracking through various support and Wiki links. I find that some people have had difficulty booting from the internal drives, and the Tonido support guys have been very coy, claiming that “we don’t support that”. Frown. Not good.

But in doing this research, I found that it was possible to access the boot loader and serial console. On the bottom side of the tonido is a nice little rubber cover, concealing 4 pins. Most people seem to make a small adapter to use an FTDI-serial adapter cable with it (the six pin ones like you would use for the Arduino), but I had a Bus Pirate sitting around, and I thought that it might work. And… it did!

In case anyone else (or me in the future) wants to know how to do this:

  • The four pins are Vcc, Rx, Tx, and GND, starting from the power supply side and working toward the USB/Ethernet cable side.
  • I just hooked up MOSI to RX, MISO to TX, and GND to GND
  • To use the Bus Pirate with my Mac laptop, I like to use GNU screen. If you run “screen /dev/tty.usbserial-AH00MPIK 115200” (your tty device will likely be different), it makes a convenient terminal emulator. From there, you can access the Bus Pirate, configure it in UART mode with a baud rate of 115200 and sensible other defaults.
  • You can then use the Bus Pirate as a UART bridge by invoking the “(1)” macro. You’ll then essentially be talking directly to the Tonido via the BusPirate.
  • Using screen’s C-a H command, you can start a log file, which will record all the output from the serial port. Doing the command again will stop logging.

Hooking it up, I got lots of cool info from the Tonido:

         __  __                      _ _
        |  \/  | __ _ _ ____   _____| | |
        | |\/| |/ _` | '__\ \ / / _ \ | |
        | |  | | (_| | |   \ V /  __/ | |
        |_|  |_|\__,_|_|    \_/ \___|_|_|
 _   _     ____              _
| | | |   | __ )  ___   ___ | |_ 
| | | |___|  _ \ / _ \ / _ \| __| 
| |_| |___| |_) | (_) | (_) | |_ 
 \___/    |____/ \___/ \___/ \__| 
 ** MARVELL BOARD: DB-88F6282A-BP LE 

U-Boot 1.1.4 (Sep 13 2011 - 13:25:05) Marvell version: 3.4.27
USISH-SMB Ver: topkick1281p2-001-008-20110913-codelathe

U-Boot code: 00600000 -> 0067FFF0  BSS: -> 006D0120

Soc: MV88F1155 Rev 1 (DDR2)
CPU running @ 800Mhz L2 running @ 400Mhz
SysClock = 400Mhz , TClock = 200Mhz 

DRAM unknown CAL  tRP = 8 tRAS = 20 tRCD=8
DRAM CS[0] base 0x00000000   size 512MB 
DRAM Total size 512MB  16bit width
Addresses 8M - 0M are saved for the U-Boot usage.
Mem malloc Initialization (8M - 7M): Done
NAND:512 MB
Flash:  0 kB

CPU : Marvell Feroceon (Rev 1)

Streaming disabled 
Write allocate disabled


USB 0: host mode
PEX 0: interface detected no Link.
Net:   egiga0 [PRIME]
Hit any key to stop autoboot:  0 
(Re)start USB...
USB:   scanning bus for devices... 1 USB Device(s) found
Waiting for storage device(s) to settle before scanning...
0 Storage Device(s) found
** Bad partition 1 **
## Booting image at 00800000 ...
Bad Magic Number
Saving Environment to NAND...
Erasing Nand...Writing to Nand... done

Reset IDE: 
Marvell Serial ATA Adapter
Integrated Sata device found
[0 0 0]: Enable DMA mode (5)
  Device 0 @ 0 0:
Model: TOSHIBA MK6465GSX                        Firm: GJ003M   Ser#:            50OAC319T
            Type: Hard Disk
            Supports 48-bit addressing
            Capacity: 610480.3 MB = 596.1 GB (1250263728 x 512)


** Unable to read "/boot/uImage" from ide 0:1 **
## Booting image at 00800000 ...
Bad Magic Number
Saving Environment to NAND...
Erasing Nand...Writing to Nand... done

NAND read: device 0 offset 0x200000, size 0x600000

6291456 bytes read: OK

## Booting image at 01200000 ...
   Image Name:   Linux-2.6.31.8-topkick1281p2-001
   Created:      2011-11-10   3:58:11 UTC
   Image Type:   ARM Linux Kernel Image (uncompressed)
   Data Size:    3121408 Bytes =  3 MB
   Load Address: 00008000
   Entry Point:  00008000
   Verifying Checksum ... OK
OK

Starting kernel ...

Uncompressing Linux................................................................................................................................................................................................... done, booting the kernel.
Linux version 2.6.31.8-topkick1281p2-001-004-20101214 (andrew@localhost.localdomain) (gcc version 3.4.4 (release) (CodeSourcery ARM 2005q3-2)) #2 Thu Nov 10 11:58:07 CST 2011
CPU: Feroceon 88FR131 [56251311] revision 1 (ARMv5TE), cr=00053977
CPU: VIVT data cache, VIVT instruction cache
Machine: Feroceon-KW
Using UBoot passing parameters structure
Memory policy: ECC disabled, Data cache writeback
Built 1 zonelists in Zone order, mobility grouping on.  Total pages: 130048
Kernel command line: console=ttyS0,115200;version=topkick1281p2-001-006-20101103 mtdparts=nand_mtd:0x180000@0(u-boot),0x20000@0x180000(u-boot-env),0x600000@0x200000(uImage),0x1f800000@0x800000(rootfs) ubi.mtd=3 root=ubi0:rootfs rootfstype=ubifs rootdelay=10
PID hash table entries: 2048 (order: 11, 8192 bytes)
Dentry cache hash table entries: 65536 (order: 6, 262144 bytes)
Inode-cache hash table entries: 32768 (order: 5, 131072 bytes)
Memory: 512MB = 512MB total
Memory: 513280KB available (5612K code, 319K data, 148K init, 0K highmem)
NR_IRQS:128
Console: colour dummy device 80x30
Calibrating delay loop... 794.62 BogoMIPS (lpj=3973120)
Mount-cache hash table entries: 512
CPU: Testing write buffer coherency: ok
xor: measuring software checksum speed
   arm4regs  :   723.200 MB/sec
   8regs     :   433.600 MB/sec
   32regs    :   600.800 MB/sec
xor: using function: arm4regs (723.200 MB/sec)
NET: Registered protocol family 16
Feroceon L2: Enabling L2
Feroceon L2: Cache support initialised.

CPU Interface
-------------
SDRAM_CS0 ....base 00000000, size 512MB 
SDRAM_CS1 ....disable
SDRAM_CS2 ....disable
SDRAM_CS3 ....disable
PEX0_MEM ....base e8000000, size 128MB 
PEX0_IO ....base f2000000, size   1MB 
INTER_REGS ....base f1000000, size   1MB 
NFLASH_CS ....base fa000000, size   2MB 
SPI_CS ....base f4000000, size  16MB 
BOOT_ROM_CS ....no such
DEV_BOOTCS ....no such
CRYPT_ENG ....base f0000000, size   2MB 

  Marvell Development Board (LSP Version KW_LSP_5.0.3)-- DB-88F6282A-BP  Soc: MV88F1155 Rev 1 LE

 Detected Tclk 200000000 and SysClk 400000000 
MV Buttons Device Load
Marvell USB EHCI Host controller #0: df837740
PEX0 interface detected no Link.
PCI: bus0: Fast back to back transfers enabled
bio: create slab <bio-0> at 0
SCSI subsystem initialized
usbcore: registered new interface driver usbfs
usbcore: registered new interface driver hub
usbcore: registered new device driver usb
raid6: int32x1     72 MB/s
raid6: int32x2    101 MB/s
raid6: int32x4     88 MB/s
raid6: int32x8     80 MB/s
raid6: using algorithm int32x2 (101 MB/s)
cfg80211: Calling CRDA to update world regulatory domain
NET: Registered protocol family 2
IP route cache hash table entries: 16384 (order: 4, 65536 bytes)
TCP established hash table entries: 65536 (order: 7, 524288 bytes)
TCP bind hash table entries: 65536 (order: 6, 262144 bytes)
TCP: Hash tables configured (established 65536 bind 65536)
TCP reno registered
NET: Registered protocol family 1
rtc mv_rtc: rtc core: registered kw-rtc as rtc0
RTC registered
cpufreq: Init kirkwood cpufreq driver
XOR registered 4 channels
XOR 2nd invalidate WA enabled
mvCesaInit: sessions=640, queue=64, pSram=f0000000
Warning: TS unit is powered off.
MV Buttons Driver Load
JFFS2 version 2.2. (NAND) © 2001-2006 Red Hat, Inc.
SGI XFS with security attributes, large block/inode numbers, no debug enabled
msgmni has been set to 1002
alg: No test for cipher_null (cipher_null-generic)
alg: No test for ecb(cipher_null) (ecb-cipher_null)
alg: No test for digest_null (digest_null-generic)
alg: No test for compress_null (compress_null-generic)
alg: No test for stdrng (krng)
alg: No test for hmac(digest_null) (hmac(digest_null-generic))
async_tx: api initialized (sync-only)
io scheduler noop registered
io scheduler anticipatory registered (default)
Serial: 8250/16550 driver, 4 ports, IRQ sharing disabled
serial8250.0: ttyS0 at MMIO 0xf1012000 (irq = 33) is a 16550A
console [ttyS0] enabled
Integrated Sata device found
IRQ 21/mvSata: IRQF_DISABLED is not guaranteed on shared IRQs
scsi0 : Marvell SCSI to SATA adapter
scsi1 : Marvell SCSI to SATA adapter
scsi 0:0:0:0: Direct-Access     TOSHIBA  MK6465GSX        GJ00 PQ: 0 ANSI: 5
sd 0:0:0:0: [sda] Sector size 0 reported, assuming 512.
sd 0:0:0:0: [sda] 1250263728 512-byte logical blocks: (640 GB/596 GiB)
sd 0:0:0:0: [sda] 0-byte physical blocks
sd 0:0:0:0: [sda] Write Protect is off
sd 0:0:0:0: Attached scsi generic sg0 type 0
Loading Marvell Ethernet Driver:
  o Cached descriptors in DRAM
  o DRAM SW cache-coherency
  o 2 Giga ports supported
  o Multi RX Queue support - 4 RX queues
  o Multi TX Queue support - 2 TX Queues
  o TCP segmentation offload (TSO) supported
  o Large Receive offload (LRO) supported
  o Receive checksum offload supported
  o Transmit checksum offload supported
  o Network Fast Processing (Routing) supported - (Disabled)
  o Network Fast Processing (NAT) supported
  o Driver ERROR statistics enabled
  o Driver INFO statistics enabled
  o Proc tool API enabled
  o SKB Reuse supported - (Disabled)
  o SKB Recycle supported - (Disabled)
  o Gateway support enabled
     o Using Marvell Header Mode
     o L2 IGMP support
  o Rx descripors: q0=128 q1=128 q2=128 q3=128
  o Tx descripors: q0=532 q1=532
  o Loading network interface(s):
    o  register under mv88fx_eth platform
sd 0:0:0:0: [sda] Write cache: enabled, read cache: enabled, supports DPO and FUA
sd 0:0:0:0: [sda] Sector size 0 reported, assuming 512.
    o eth0, ifindex = 2, GbE port = 0

Warning: Giga 1 is Powered Off

Warning: Giga 1 is Powered Off

mvFpRuleDb (df280000): 16384 entries, 65536 bytes
Intel(R) PRO/1000 Network Driver - version 7.3.21-k3-NAPI
Copyright (c) 1999-2006 Intel Corporation.
e1000e: Intel(R) PRO/1000 Network Driver - 1.0.2-k2
e1000e: Copyright (c) 1999-2008 Intel Corporation.
e100: Intel(R) PRO/100 Network Driver, 3.5.24-k2-NAPI
e100: Copyright(c) 1999-2006 Intel Corporation
 sda:
PPP generic driver version 2.4.2
PPP Deflate Compression module registered
PPP BSD Compression module registered
PPP MPPE Compression module registered
NET: Registered protocol family 24
PPPoL2TP kernel driver, V1.0
Using Hamming 1-bit ECC for NAND device
NAND device: Manufacturer ID: 0xad, Chip ID: 0xdc (Hynix NAND 512MiB 3,3V 8-bit)
Scanning device for bad blocks
Bad eraseblock 1064 at 0x000008500000
Bad eraseblock 1065 at 0x000008520000
Bad eraseblock 1884 at 0x00000eb80000
Bad eraseblock 1885 at 0x00000eba0000
Bad eraseblock 2038 at 0x00000fec0000
Bad eraseblock 2039 at 0x00000fee0000
Bad eraseblock 2580 at 0x000014280000
Bad eraseblock 2581 at 0x0000142a0000
Bad eraseblock 2606 at 0x0000145c0000
Bad eraseblock 2844 at 0x000016380000
Bad eraseblock 3269 at 0x0000198a0000
Bad eraseblock 3547 at 0x00001bb60000
4 cmdlinepart partitions found on MTD device nand_mtd
Using command line partition definition
Creating 4 MTD partitions on "nand_mtd":
0x000000000000-0x000000180000 : "u-boot"
 sda1
sd 0:0:0:0: [sda] Sector size 0 reported, assuming 512.
0x000000180000-0x0000001a0000 : "u-boot-env"
sd 0:0:0:0: [sda] Attached SCSI disk
0x000000200000-0x000000800000 : "uImage"
0x000000800000-0x000020000000 : "rootfs"
UBI: attaching mtd3 to ubi0
UBI: physical eraseblock size:   131072 bytes (128 KiB)
UBI: logical eraseblock size:    129024 bytes
UBI: smallest flash I/O unit:    2048
UBI: sub-page size:              512
UBI: VID header offset:          512 (aligned 512)
UBI: data offset:                2048
UBI: attached mtd3 to ubi0
UBI: MTD device name:            "rootfs"
UBI: MTD device size:            504 MiB
UBI: number of good PEBs:        4020
UBI: number of bad PEBs:         12
UBI: max. allowed volumes:       128
UBI: wear-leveling threshold:    4096
UBI: number of internal volumes: 1
UBI: number of user volumes:     1
UBI: available PEBs:             75
UBI: total number of reserved PEBs: 3945
UBI: number of PEBs reserved for bad PEB handling: 40
UBI: max/mean erase counter: 3/1
UBI: image sequence number: 0
ehci_hcd: USB 2.0 'Enhanced' Host Controller (EHCI) Driver
ehci_marvell ehci_marvell.70059: Marvell Orion EHCI
ehci_marvell ehci_marvell.70059: new USB bus registered, assigned bus number 1
UBI: background thread "ubi_bgt0d" started, PID 480
ehci_marvell ehci_marvell.70059: irq 19, io base 0xf1050100
ehci_marvell ehci_marvell.70059: USB 2.0 started, EHCI 1.00
usb usb1: configuration #1 chosen from 1 choice
hub 1-0:1.0: USB hub found
hub 1-0:1.0: 1 port detected
ohci_hcd: USB 1.1 'Open' Host Controller (OHCI) Driver
uhci_hcd: USB Universal Host Controller Interface driver
usbcore: registered new interface driver usblp
Initializing USB Mass Storage driver...
usbcore: registered new interface driver usb-storage
USB Mass Storage support registered.
usbcore: registered new interface driver ums-datafab
usbcore: registered new interface driver ums-freecom
usbcore: registered new interface driver ums-jumpshot
usbcore: registered new interface driver ums-sddr09
usbcore: registered new interface driver ums-sddr55
usbcore: registered new interface driver ums-usbat
pwrctl: dev_t_NO. = 0xdd00000, major = 221
pwrctl: request the irq power off registered. 
mice: PS/2 mouse device common for all mice
i2c /dev entries driver
Linux telephony interface: v1.00
md: linear personality registered for level -1
md: raid0 personality registered for level 0
md: raid1 personality registered for level 1
md: raid6 personality registered for level 6
md: raid5 personality registered for level 5
md: raid4 personality registered for level 4
device-mapper: ioctl: 4.15.0-ioctl (2009-04-01) initialised: dm-devel@redhat.com
sdhci: Secure Digital Host Controller Interface driver
sdhci: Copyright(c) Pierre Ossman
mmc0: mvsdio driver initialized, lacking card detect (fall back to polling)
Advanced Linux Sound Architecture Driver Version 1.0.20.
No device for DAI CS42L51
ALSA device list:
  No soundcards found.
nf_conntrack version 0.5.0 (8192 buckets, 32768 max)
mvFpNatDb (df360000): 16384 entries, 65536 bytes
ip_tables: (C) 2000-2006 Netfilter Core Team
TCP cubic registered
NET: Registered protocol family 17
NFP (fdb) init 256 entries, 1024 bytes
RPC: Registered udp transport module.
RPC: Registered tcp transport module.
802.1Q VLAN Support v1.8 Ben Greear <greearb@candelatech.com>
All bugs added by David S. Miller <davem@redhat.com>
rtc mv_rtc: setting system clock to 2012-03-31 01:20:22 UTC (1333156822)
Waiting 10sec before mounting root device...
mmc0: new high speed SDIO card at address 0001
md: Waiting for all devices to be available before autodetect
md: If you don't use raid, use raid=noautodetect
md: Autodetecting RAID arrays.
md: Scanned 0 and added 0 devices.
md: autorun ...
md: ... autorun DONE.
UBIFS: mounted UBI device 0, volume 0, name "rootfs"
UBIFS: file system size:   501387264 bytes (489636 KiB, 478 MiB, 3886 LEBs)
UBIFS: journal size:       25159680 bytes (24570 KiB, 23 MiB, 195 LEBs)
UBIFS: media format:       w4/r0 (latest is w4/r0)
UBIFS: default compressor: lzo
UBIFS: reserved for root:  4952683 bytes (4836 KiB)
VFS: Mounted root (ubifs filesystem) on device 0:11.
Freeing init memory: 148K
Using makefile-style concurrent boot in runlevel S.
Starting the hotplug events dispatcher: udevd.
Synthesizing the initial hotplug events...done.
Waiting for /dev to be fully populated...done.
Setting parameters of disc: (none).
Activating swap...done.
Starting early crypto disks...done.
Starting remaining crypto disks...done.
Loading kernel modules...done.
Cleaning up ifupdown....
Setting up networking....
Activating lvm and md swap...done.
Checking file systems...fsck from util-linux-ng 2.17.2
done.
Mounting local filesystems...done.
Activating swapfile swap...done.
Cleaning up temporary files....
Setting kernel variables ...done.
Configuring network interfaces...Internet Systems Consortium DHCP Client 4.1.1-P1
Copyright 2004-2010 Internet Systems Consortium.
All rights reserved.
For info, please visit https://www.isc.org/software/dhcp/

eth0: started
Listening on LPF/eth0/40:2c:f4:bc:8b:c9
Sending on   LPF/eth0/40:2c:f4:bc:8b:c9
Sending on   Socket/fallback
DHCPDISCOVER on eth0 to 255.255.255.255 port 67 interval 4
DHCPDISCOVER on eth0 to 255.255.255.255 port 67 interval 5
DHCPDISCOVER on eth0 to 255.255.255.255 port 67 interval 13
DHCPDISCOVER on eth0 to 255.255.255.255 port 67 interval 10
DHCPDISCOVER on eth0 to 255.255.255.255 port 67 interval 14
DHCPDISCOVER on eth0 to 255.255.255.255 port 67 interval 8
DHCPDISCOVER on eth0 to 255.255.255.255 port 67 interval 7
No DHCPOFFERS received.
No working leases in persistent database - sleeping.
done.
Cleaning up temporary files....
fuse init (API version 7.12)
Using makefile-style concurrent boot in runlevel 2.
Network Interface Plugging Daemon...start eth0...done.
Starting enhanced syslogd: rsyslogd.
Starting Samba daemons: nmbd smbdStarting periodic command scheduler: cron.
.
Starting system message bus: dbus.
Starting OpenBSD Secure Shell server: sshd.
EXT2-fs warning: mounting unchecked fs, running e2fsck is recommended

Debian GNU/Linux 6.0 TonidoPlug2 ttyS0

TonidoPlug2 login: --2012-03-30 18:21:50--  http://patch.codelathe.com/firmware/tonidoplug2/updates.list
Resolving patch.codelathe.com... failed: Name or service not known.
wget: unable to resolve host address “patch.codelathe.com”

Debian GNU/Linux 6.0 TonidoPlug2 ttyS0

TonidoPlug2 login: root
Password: 
Last login: Fri Mar 30 18:16:16 PDT 2012 on ttyS0
Linux TonidoPlug2 2.6.31.8-topkick1281p2-001-004-20101214 #2 Thu Nov 10 11:58:07 CST 2011 armv5tel

The programs included with the Debian GNU/Linux system are free software;
the exact distribution terms for each program are described in the
individual files in /usr/share/doc/*/copyright.

Debian GNU/Linux comes with ABSOLUTELY NO WARRANTY, to the extent
permitted by applicable law.
root@TonidoPlug2:~# 

I suspect I’ll be able to debug it a lot better tomorrow.

The first Internet of Things Bay Area Meetup and the Air Quality Egg…

Last night, I met with Nanode creator Ken Boak and Chris Jefferies from tinajalabs.com at Cafe Actual in Berkeley for the inaugural IoTBayArea meetup. IoT groups are already going strong in many cities like London, Amsterdam, and NYC, but now that Ken is operating here in the SF Bay Area, he wanted to get a group going here.

The current big project being developed by these groups is the Air Quality Egg: a crowd sourced air quality sensor network based upon open source technology. It’s a new Kickstarter based project too (which I have decided to back)!

Air Quality Egg


Beyond the fact that it uses some cool technology, I like this project mostly because the data it gathers will enable people to understand something about the world that they live in day to day. In the Bay Area, we have the Bay Area Air Quality Management District, a government group established in 1955 by the California legislature to monitor air quality in the nine SF Bay counties. This is the government agency that is responsible for (among other things) the Spare the Air day program, which warns citizens of days with particularly unhealthy air pollution, and urges them to take personal action to reduce the problem. It’s a great program, and they produce some interesting real time data on air quality in different areas, as well as forecasts. The air quality index (AQI) that they report measures ground-level ozone, airborne particles, carbon monoxide, sulfur dioxide and nitrogen dioxide.

So, if the government is doing such a good job, why do we need a citizen network to monitor the same things?

First of all, this data may not be accurate for your neighborhood. If your home or business is located near sources of pollution (such as busy streets or some industrial polluters) in spite of the fact that the overall air pollution in your city is reasonable, you might be experiencing high levels of these pollutants. Or it could simply be a matter of geography: I live in a fairly smallish valley, which might be more isolated from the offshore winds that might blow pollutants away. It would be interesting to understand how the pollution in my relatively suburban environment compared with other locations.

Secondly, an open source archive of raw sensor data opens up opportunities for research. Instead of just getting a single AQI number, we’ll end up with a bunch of spatially distributed raw readings for individual pollutants. Perhaps ozone is the dominant pollutant in your area. Or perhaps burning of yard waste causes particulates to spike in certain areas at certain times of the year. Perhaps we can see the daily variation in carbon monoxide as traffic peaks and ebbs in certain locations.

Third, it encourages citizen participation in thinking about air pollution. Just as “Spare the Air” days challenge us to consider ways to change our behavior to improve air quality, participation in an air quality monitoring network turns something that is easy to take for granted into something that we can understand and improve.

Oh, and it involves cool software and hardware too. 🙂

If any of this interests you, you might try following Ken (@monsonite) on Twitter. The IoTBayArea is just beginning, but I suspect we’ll see some rapid growth. We are shooting for regular meetings, with the next one tentatively set for the last weekend in April (but subject to change, stay tuned). Even if the Air Quality Egg project doesn’t thrill you, if you are still interested in the world of Internet connected devices, I urge you to try to come to the next one, you’ll find like minded people and good conversation.

Thanks to Ken and Chris.

Interesting “feature” re: _delay_ms in avr-libc

A couple of my projects have used the tiniest of the Atmel ATtiny chips: the ATtiny13. I have written one or two programs in assembler for these chips, but I prefer to work with avr-gcc whenever possible. What’s amazing is that you actually can use a sophisticated C compiler to generate code for such a tiny chip (only room for 512 instructions).

Yesterday’s project was to implement a small QRSS beacon controller, similar to one’s sold by Hans Summer as part of his QRSS kits. He actually published his code, so I could just use that, but I found it a little bit obscure, and thought I could do something, well, if not better, at least less obscure to me. I wanted to retain the basic interface (Hans’ chip provides a sidetone on one pin, a key on another, and uses three pins as an input to select one of eight speeds). The basic loop fetches a pattern of dots and dashes, looks up the speed from the input switches, and then sends the pattern of dots and dashes. Easy peasy. I’ve written similar Arduino code before. Toggle pin high, delay, toggle pin low, delay, out goes a dot or dash.

But when I tried to use the _delay_ms() macro, I found that the codesize I had used grew enormously. It appeared to be dragging in a bunch of floating point arithmetic routines. I had used this function on my Christmas tree hat project without incident: what was going on?

Well, first of all, it appears that _delay_ms takes a floating point value as an argument. The compiler is smart enough that if the value passed to the function is a constant, it unfolds the code into a simple integer only loop. But if you use a variable as the argument (as I do, since the dit times are varying in length) you end up dragging all the floating point baggage into your code. It seems ridiculous to use floating point in this situation.

I got around this by noting that in my case, all my delays were multiples of 100ms. So, instead of just calling _delay_ms(n*100), I implemented the delays as a simple loop which executes _delay_ms(100) multiple times. Code is small, all is well.

You would think that a small, integer only delay would be possible. Oh well.

AVR-based FM-transmitter

This is a very cute hack that does something which I thought was impossible: an implementation of an FM transmitter that has exactly two components: a battery and an ATtiny45 microcontroller. It’s brilliantly obtuse and cool:


Sprites mods – AVR-based FM-transmitter – Intro, theory

The basic idea is to trick the internal oscillator of the Atmel to run at 24Mhz. An internal PLL will run at 4x that frequency, which is a 96 Mhz signal (right in the middle of the FM broadcast band). By varying the frequency up and down, you can generate an FM modulated signal. Beyond clever. Very cool.

Lunch with Ken Boak, the Nanode, and the evolution of the Arduino platform

Today, through a bit of serendipity involving twitter and the web, I managed to have lunch with Nanode designer Ken Boak, who happened to be on an unrelated visit to the Bay Area this week. We exchanged brief messages for the first time a couple of weeks ago, as I was intrigued with his idea of making a version of BASIC that ran on the Arduino/Nanode. He was kind enough to leave me with a couple of his latest version to experiment with. Compared to the v5 version that I got as a gift (purchased from wickeddevice.com) and assembled last week, these have a few cool new additions:

  • The screw terminals have been removed, and a small wireless module put in their place.
  • The board has a 32K static SRAM for storage.
  • It has a micro SD card slot on the bottom for long term storage.
  • It has a real time clock on the bottom.

Pretty darned cool! The new version seems better to me in every way., and I thank Ken for dropping some of them off for me (and also for a couple of coworkers who are interested in Arduino programming). I’ll be working to use them in a future project for sure, and if you are interested in having a highly interconnected Arduino compatible board to play with at a reasonable cost, I can recommend the Nanode (although I’d wait until Wicked Device starts carrying the new variety, the old V5 design lacks some of these cool features).

I see the Nanode as a cool evolution of the basic Arduino platform. The Arduino does a lot right, but there are a few things that bother me.

  • Cost.. Yeah, they are cheap. But let’s face it, they aren’t that cheap. The Uno (around $30) is just an ATmega328 (about $2 in quantity), an ATmega16u2 (again about $2) to provide USB, and then a handful of discrete components. You get a bunch of pins broken out, but no actual peripherals or connectors. No switches. No (or maybe one) LED. No additional memory or RTC. No SD card socket. My rather silly Arduino n’ Gameduino Satellite Tracker costs nearly $100 in parts, which makes the entire project less interesting, because it could be done as cheaply with more capable technology. The Nanode makes it a bit more tractable: it has a real time clock, and can even do NTP to set the time and fetch new elements over Ethernet. Thus, I think the nanode gives you some added value.
  • Flexibility in development environment. When I first started with the Arduino, it bothered me a little that I needed a sixty megabyte download of a programming environment to program this little controller with maybe just 16K of memory. Even if you just wanted to blink an LED, you had to compile and reflash code. Back in the days of my youth, we didn’t have the benefit of cool optimizing compilers, but we DID have the benefit of cool interactive programming environments. Ken’s idea of creating a Tiny BASIC programming environment brings some of that back. Sure, it’s not for everyone, but for simple experiments and education, the interactivity is useful. The technology that enables this for the Nanode is the inclusion of a 32K serial SRAM: we can store programs in this RAM and interpret code directly out of them.
  • Cheap, flexible peripherals. I have some Xbees to play with, but they are a bit spendy really. An Xbee costs about $22 or so last I checked, and to interface them with an Uno, you’ll need another shield which costs around $20 by itself. Tacking $45 onto a $30 board just to get wireless seems excessive. Ditto for Ethernet: the Ethernet Shield costs around $30-$40 (or even more) and basically doubles the cost of the Arduino. The Nanode includes Ethernet (using the rather inexpensive and easy to get ENC28J60 by Microchip) and uses some small and inexpensive RF modules. While these modules are perhaps not as capable as a full Xbee implementation, their cost and benefits are much lower, and their standard deployment on the Nanode board makes them convenient to use.
  • Compatibility with both shields and breadboards. Let’s face it: the Arduino Shield form factor is idiotic. Had the pins been laid out on a 0.1″ grid, you could have made shields with just ordinary 0.1″ proto board. Or, you could put pins on the bottom, and plug it directly into a standard solderless breadboard. The original design was a mistake. Let’s get over it, shall we? The Nanode does a good interim compromise: you can put headers in either position, which is awesome. But shields are already a bit of a compatibility nightmare: depending on what pins your shield uses and/or what voltages, it already may not work with a variety of seemingly compatible Arduino variants. The Nanode also wins on this case, because many of the most common shields that you would add are simply not necessary on the Nanode.

Don’t get me wrong: I don’t think that the Nanode will kill the market for other Arduino variants and form factors. In fact, I don’t think that it should: I like the fact that I can get Arduino Nanos, Arduino Pros, and Arduino Megas, but program them all from the same environment. But I think that peripheral additions that the Nanode provides gives added value, and if the Arduino is to compete in a world where things like the Raspberry Pi exist, I think we need to figure out how to add some additional value to the Arduino platform. I thank Ken and the other Nanode users for thinking about this stuff, and taking Arduino evolution in an interesting direction.

BeagleBone, a new ARM-powered embedded platform

I really like the Arduino, but even I must admit that performance-wise, it can be a little, well, disappointing. A 16Mhz 8 bit processor can do a lot, but there is also a lot of applications where having something a bit beefier makes a lot of sense. Something with support for a richer peripheral set, like USB, Ethernet, and video.

Thus, it is with some interest that I learned of the Beagle Bone:


The Beagle Bone

I haven’t got one, but there are a couple of features which I think make it attractive:

  • The price is $89. Yes, it’s more than an Arduino, but it’s not a lot more than an Arduino Mega, and it’s not any more than an Arduino Mega and an Ethernet shield.
  • Web based development environment. This is kind of a mixed bag, but one of the advantages of the Arduino environment is that it’s a one stop shopping trip to get setup: there isn’t a need to install a lot of different tools to get going. For hobbyists, letting people get right to work is a big plus.
  • Enough power to run OpenCV and the like. The Arduino is simply too underpowered to even think of doing anything like that, so the Bone represents a big increase in functionality.
    It runs Linux. Yes, it’s kind of fun to run on relatively naked hardware, but sometimes it’s more expedient to have some support for multitasking.

A couple of nits to pick though: I thought it should have included some kind of video interface on the base board. The $89 price point begins to look less and less attractive if you have to get a $20-$30 daughter board to provide the video interface.

I also think that it’s just a bit more expensive than I would like. If you compare it to the feature set of another microcontroller in the works, the Raspberry Pi, with a price of $35 dollars (for the Model B) with ethernet and video, but without the same level of expandability, the Raspberry Pi might be a good choice for education and hobbyist level hacking at a lower price (indeed, a price equal to an Arduino Uno).

To be fair, you can buy an Arduino Uno today, whereas the Beagle Bone and the Raspberry Pi are both still in the works.

It’s a great time for the hobby computer hacker though.