I recall burning three or four weeks of a sabbatical getting Saccade.com on the air with Wordpress. So much tweaking…
More Fuji Real 3D W1 experiments (and an anaglyph)
Well, I’ve tinkered around a bit more, and discovered a few things: the camera doesn’t actually do very much to align images. In fact, there is a fairly significant vertical misalignment between the two camera (I’m guessing around the order of a dozen pixels) which doesn’t really hurt things too bad, but which annoy me as the perfectionist stereo practitioner I’m being paid to be. 🙂
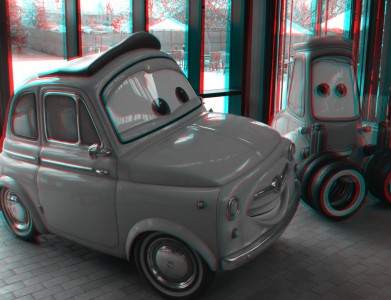
In yesterday’s article, I used exiftool to extract left and right images, which works just fine. I just composited the two images directly together, which resulted in a substantial amount of parallax over most of the image (the image was entirely behind the screen, and there was significant disparity). We can shift the images’ relative position by hand to reduce this overall disparity, and move the objects closer to the real screen, which makes the images easier to view and fuse. I decided to give this a try using GIMP, and basically constructed the anaglyph below using the following steps.
- Extract left images and right images from the MPO file as yesterday.
- run “gimp l.jpg r.jpg”
- I like the traditional anaglyphs, so I converted each image to BW, then back to color to produce gray scales of both images.
- I then added a new layer atop each image. For the left image, I filled that layer with a solid red. For the right image, I filled it with a cyan layer.
- Select the “Screen” layer mode for both of the new layers. This should let you see both a red colored and cyan colored image.
- Use “Merge down” to convert each layer into a single layer.
- I then copied the red layer, and used “Paste into” to put it on top of the blue layer.
- Change the new layer mode to “Multiply”. Voila! You have an anaglyph. You can use the shift tool (while wearing anaglyph glasses if you like) to adjust and align the layers as you see fit.
- Crop and export!
In the photo below, Luigi’s eyes should be roughly at screen depth, so his front bumper will appear modestly in front of screen. I probably could still be a bit better on the vertical alignment, but it’s not bad.


Comment from David Glover
Time 9/26/2010 at 3:34 pm
There’s an EXIF tag in the image specifying the parallax offset, which your method ignores. Here’s my (super ugly) bash script to read it and correct the anaglyph accordingly. (It needs images called left.jpg and right.jpg)
#!/bin/bash
parallax=$(exiftool -b -Parallax left.jpg)
parallax=$(echo “$parallax”*36+0.5 | bc | cut -d . -f 1)
convert left.jpg -crop -“$parallax”+0 left-cropped.jpg
convert right.jpg -crop +”$parallax”+0 right-cropped.jpg
composite -stereo 0 left-cropped.jpg right-cropped.jpg anaglyph.jpg
Note that “36” is a magic number that only works if you’re shooting in 4:3 or 3:2. If you’re shooting in 16:9, you’ll have to recalculate.