I’ve been on a bit of a woodworking binge lately, no doubt fueled by all the creative and talented woodworkers who have made a place on my YouTube subscription list. I’ve also been slowly acquiring used tools of various sorts, working on a variety of shop projects, and even taking a class.
The “class” is actually just a workshop held for five consecutive weekends held at the local high school where you are free to use their tools and avail yourself of the expertise of the instructor. I decided for my project that I’d like to make a laminated workbench top out of cheap dimensional lumber from the local Lowes. I’d never done such a project before, and as is typical for my projects, I dove in with more enthusiasm than pre-planning. But that being said, I also tend to be fairly thoughtful about such projects, and I learn all sorts of lessons in retrospect.
The workshop gave me access to a large jointer and planer, so I settled on a project that I’ve been meaning to do for quite some time: a heavy workbench top, made from laminated boards and designed to be flat. Like, not just sort of flat, but as flat as I could possibly make it. I didn’t “design” anything. I had a dimension in mind (roughly 2’x5′) and just kind of winged it.
I purchased 20 2x4s from Lowes, which were kiln dried Douglas Fir, for roughly $3 each. I spent a small premium (about $.50 each) to get their “premium” version, which did seem to be overall straighter and have fewer knots than their normal version which costs $2.50. Douglas Fir isn’t the obvious choice for a workbench top. It is fairly soft and fairly splintery, but it has a couple of major advantages: it’s available and it is cheap. I can certainly appreciate using a hardwood like maple for this, but my skills are certainly not adequate to justify spending $1000 on what will almost certainly be viewed as a learning attempt.
I cut all the 2x4s to 64″ and then set to work using the jointer. Here’s where I did things wrong.
The purpose of a jointer is to establish two flat, adjacent sides on a piece of work. In the ideal world, you’d then use the thickness planer to copy that flat surface from these “reference” faces to the opposite.
Here is what I think I should have done, and what I would likely do if I was going to make a second one of these:
- Stare at each 2×4, examining it for twist and bow.
- Joint the wide face, concave side down, until the piece is flat.
- Then carefully joint one (hopefully concave face) by holding the reference face against the jointer, to establish an adjacent 90 degree face.
- Now we have two flat faces. It is probably reasonable to use a table saw to rip the pieces to width, holding the jointed face down and the jointed edge to the rip fence on the saw.
- Then, finally thickness plane all the pieces with the reference face down in the planer.
Sadly, I did some mistakes. None are going to be fatal, but they definitely made some mistakes and are slowing my progress and decreasing the quality of the final result. In no particular order:
- I didn’t check the jointer’s fence for square until I was halfway through. Dumb, dumb, dumb. It wasn’t entirely my fault. Even if I had, the jointer in the shop has a fence which takes to periodic slipping, so it’s likely I would have screwed it up. I tried to do another pass to clean it up, which mostly worked (I missed a couple of outliers) but the jointing job was not perfect.
- My jointing technique wasn’t perfect. I suspect that when trying to establish the 90 degree reference face, I didn’t do a consistently great job of holding the reference face against the fence, so even when the fence was perfectly setup, I managed to get a couple of boards through which had some taper and twist.
- I suspect I planed some boards inadequately, and some convex bowing remained.
- Some of the boards sat in my car for a couple of nights, where the variations in heat may have caused them to warp again, even had I done the jointing and planing perfectly.
- I was in a hurry. We really only have 12 hours total workshop time, so I decided to forego planing each board separately, and instead went to glue up (with my imperfect stock) in three sections. Each would be small enough to thickness plane again, to establish the final surface.
This is where I was after class last week. I decided to proceed with the glue up as best I could, in three different sections: one of six boards and two of seven. I set them up on my assembly table at home. I took some care to use a set of primitive winding sticks to assure that both bar clamps at the ends were parallel, smeared in a ton of glue, and clamped them up.

The first section seemed like maybe I used a little less glue than I should have, and despite my best efforts, upon inspection when I was done, I saw that this section had a fair amount of twist (somewhere between 1/16″ and 1/8″) which was faintly annoying. But “once more into the breach”, and on subsequent nights I got the other two sections glued up. They were overalll much better. I did notice that there was still an issue with the first section when I tried to fit the first section to the second.
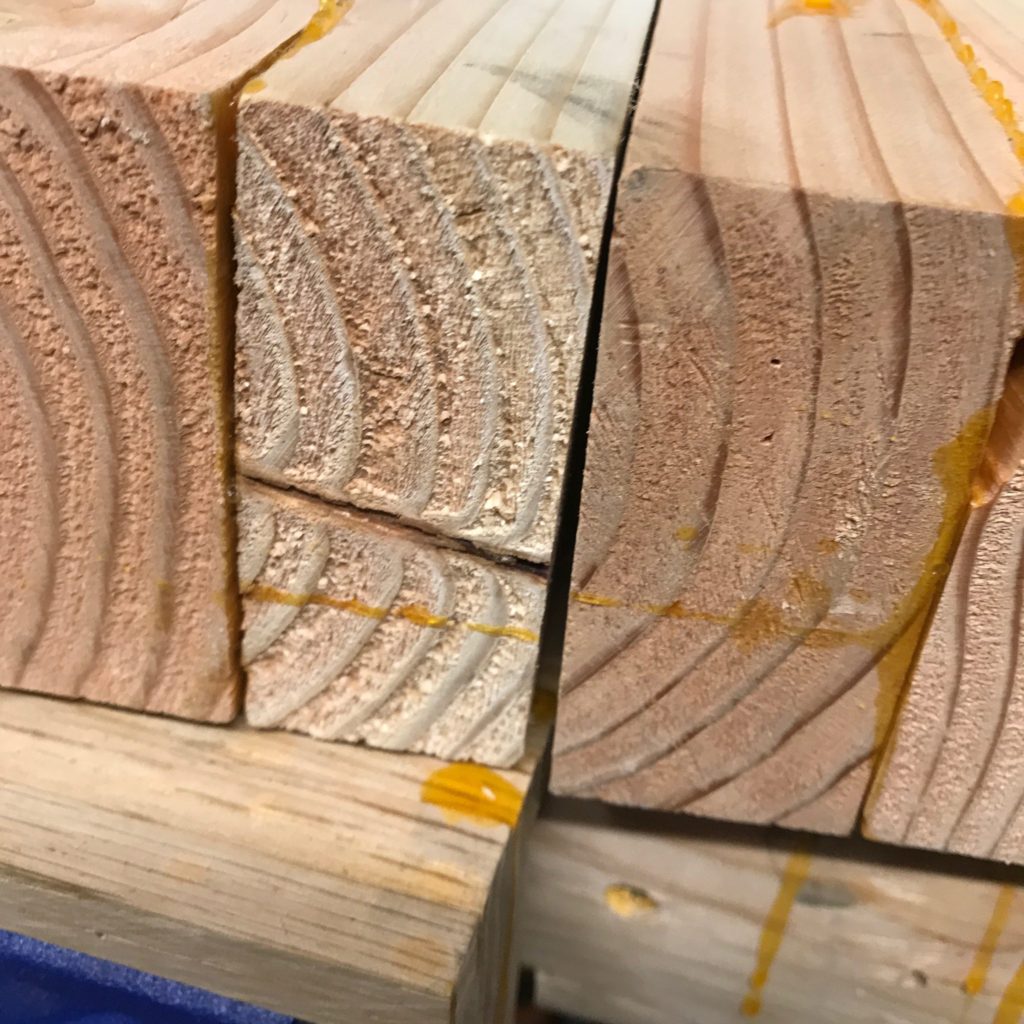
Yeah, the edge of my first board has one very poorly cut board which isn’t anywhere close to at right angles with the surface. The first section is pretty terrible.
But I have a plan for salvaging it. Ideally, I could rejoint the section on the wide face and the adjacent edge, but these sections are a little bit wide, certainly not within the capability of my jointer, and not even within the capacity of the workshop jointer, which I’ll only have access to for another week. But where there is a will, there is a way. You can use a thickness planer as a jointer by taking a flat “reference board” and screwing/gluing/taping/attaching somehow the board to that reference sled, and then planing the opposite side. The planer will copy that faux reference face (which is flat) onto the opposite side, and once that side is flat, you can joint the edge and then proceed as usual.
The problem was that was going to take a bunch of time, and I only had a few hours of planer time.
So, I have a new (inexpensive, but highly rated) planer arriving next week.
So, for the class I decided to try to simply stop work on my bench during the class, and we decided instead to put together a simple shop stool that Carmen found on the web using some of my left over scrap Douglas Fir.
It was designed to be made from dimensional lumber with only the simplest tools. We decided to avail ourselves of the jointer and at last clean up the faces. We didn’t do anything (either ripping or thickness planing) to ensure accurate dimensions, but tried to use some care. I made the top out of a glue up that I did as a test before doing my benchtop, which I did thickness plane to a consistent flat thickness.
And, two hours later, we had this:
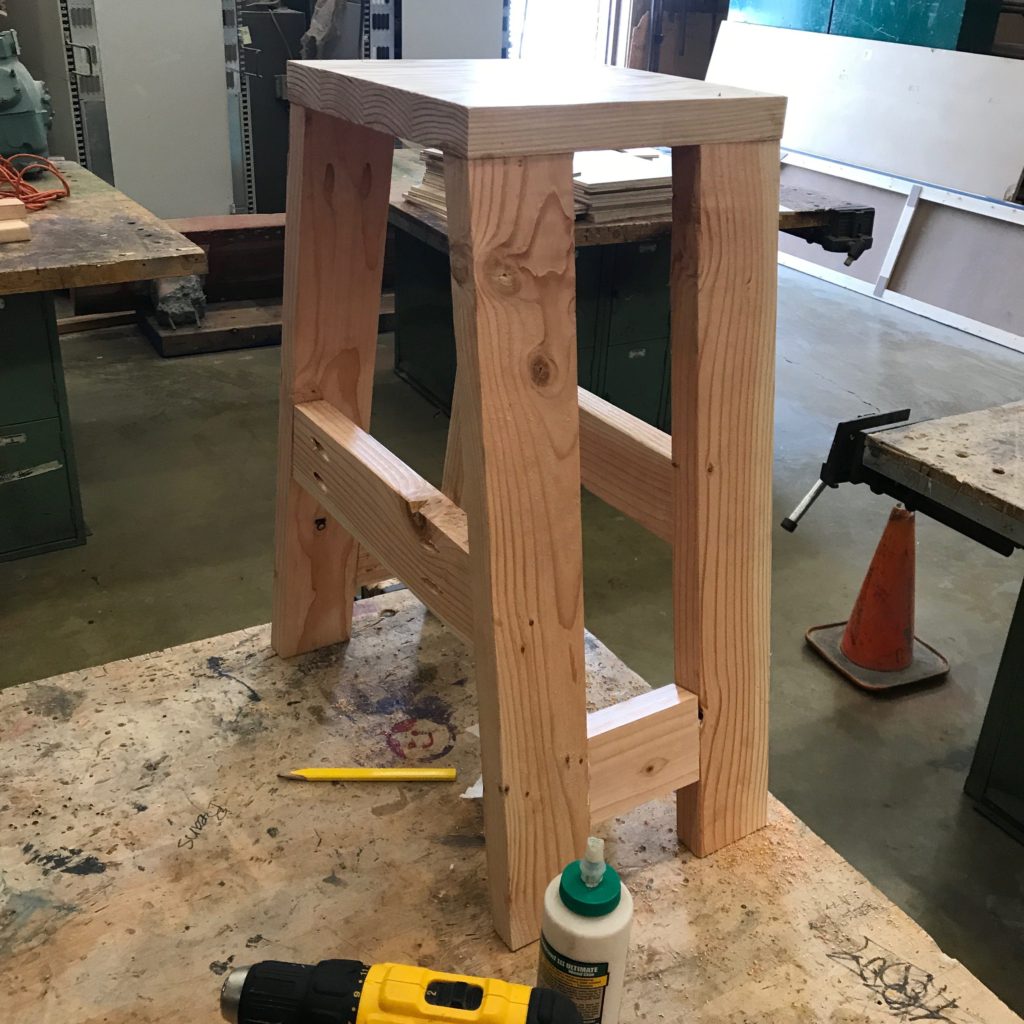
I am actually pretty pleased. We made a couple of minor mistakes. I misread the instructions for the dimensions for the spreader: instead of 14 1/4″ on the short side, I cut it 14 1/4″ on the long side, which means that the stretcher is actually a bit high. We also followed their direction, which had us screwing the legs directly into the seat first, followed by the addition of the cross bar. This actually seems like the hard way to go. It made it difficult (or impossible) to drive the Kreg screws into the side pieces.
The better technique would be to assemble the two side frames first, perhaps by adding a stretcher at the top as well, and then attaching the top last. I’ve also thought that perhaps I should use a half lap joint to attach the stretcher, and avoid the use of Kreg screws entirely.
Anyway, that’s what’s currently going on woodworking-wise in the shop. More projects are coming, as well as others such as the refurbishment of a used bandsaw I picked up at a garage sale a couple of weeks ago. Stay tuned.