For anyone reading this from some more distant point in the future, I’m in my fourth week of self-isolation to help halt the spread of the coronavirus. I’m exceptionally lucky: I’ve continued my job from home, working surprisingly effectively with a reasonably fast network connection as we try to put our next movie release in the can.
I haven’t been in a store or a restaurant in about a month. My wife has ventured out with mask and gloves to do some shopping on a couple of occasions, and we’ve gone out for brief walks, but the cabin fever is setting in a bit. I woke up at five o’clock this morning and couldn’t get back to sleep, so it looks like my work day will start early.
At least I have a short commute now, although my consumption of audio books is way down as a result.
Anyway, I’m looking for projects, and one that I selected was to experiment with something that I learned about at Pacficon, the Bay Area ham radio conference that I attended last October.
That something is AREDN, the Amateur Radio Emergency Data Network.
AREDN is a high speed digital wireless mesh network that uses inexpensive hardware to link sites into a dynamically reconfigurable mesh network capable of carrying video and audio data, providing chat and messaging, and generally just any other services you might support and provide on the conventional Internet, but using a completely separate and non-commercial network.
Bob Ross, N7RBP, goes over the basic setup of what it takes.
Anyway, I thought it might be fun to try to tinker together something like this. Last October it seemed like there wasn’t a ton of activity in my area, but since then the SFWEM or San Francisco Wireless Emergency Mesh seems to have gained some momentum, and there is considerable activity on both sides of the bay. Going to their website, you can see a map of activity in the Bay Area:
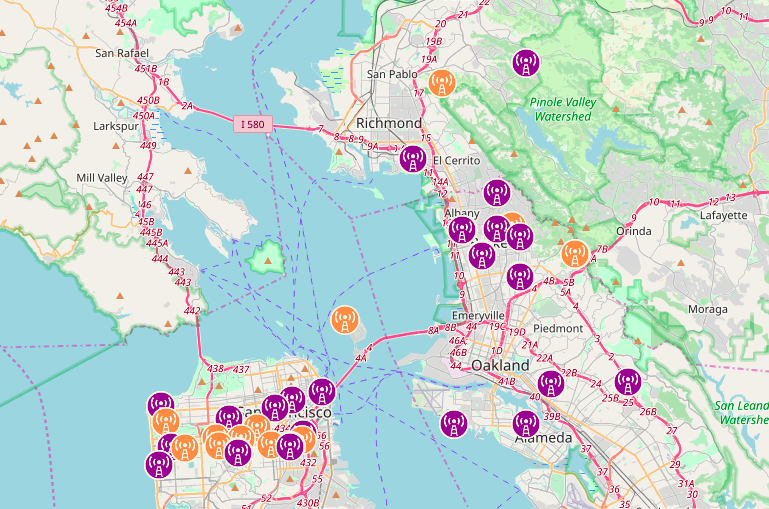
The purple nodes are operating on the 2.4Ghz band, whereas the orange ones are operating on the 5.8 Ghz band. (My own node is currently operating on the 2.4Ghz band, and is the node in the upper right of this map, but I am getting ahead of myself.)
From isolation, I decided to spend a few bucks and get some hardware. I chose 2.4Ghz hardware, for now other reason than it was slightly cheaper. For an external node, I decided to go with a TP-LINK CPE-210 which was about $40 shipped for free from Amazon. It’s basically a router, but with a more waterproof case that is meant to be mounted outdoors. It also has a POE (Power Over Ethernet) injector, which means that to power the node you only need to run a single Ethernet cable to the node. It carries (24v?) power along same cable that your data is carried, which makes installation simpler. I have not yet acquired outdoor-grade ethernet cable, but that’s on my list.
To support the AREDN network, you need new firmware which you can get from their website. My CPE210 turned out to be version 2.8, so I uploaded the v2 firmware from the AREDN site. For that device, it’s straightforward: just use the conventional interface to load new firmware, and you are good to go. The node will act like a conventional access point: you plug your laptop (or better, a switch) into the Ethernet that goes to the node, and it will act as a DHCP server and assign you a network address via Ethernet. You can then access the node via a web interface. Here’s what the mesh status page looks like from that node:
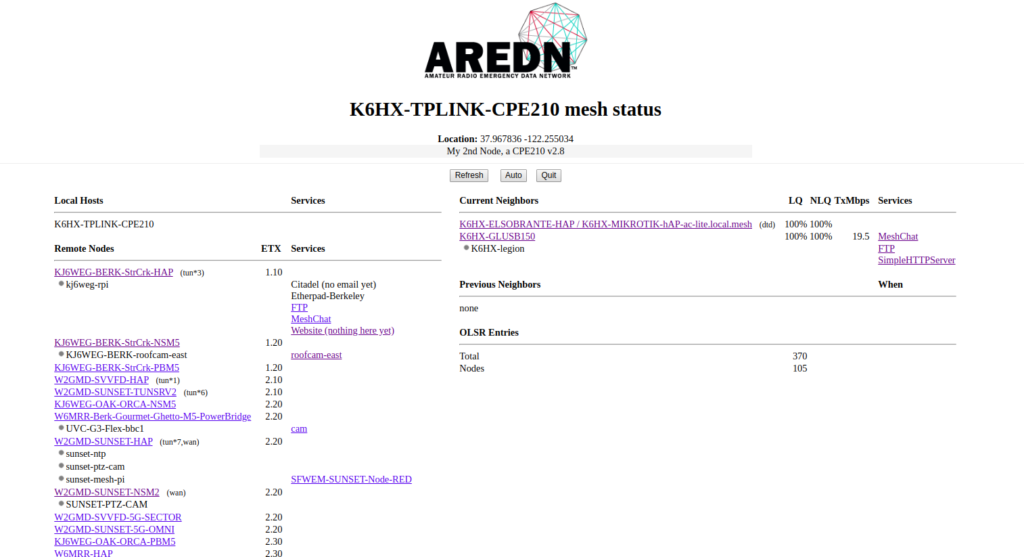
In the column on the left are the list of accessible nodes with their associated services. On the right is a list of the nodes that my node can see directly. There are two nodes you can see, both owned by me. The first is K6HX-GLUSB150, which is actually a GL.iNet microrouter which is a small USB gadget that costs about $30 and plugs into my laptop. It also is flashed to run the AREDN firmware, and looks to my Linux laptop like an ordinary USB Ethernet device. It is currently communicating via wireless to my TP-LINK device.
You can also see K6HX-ELSOBRANTE-HAP, which is a Mikrotik hAP ac lite device. which currently costs about $45 from Amazon. It is also running the AREDN firmware. It’s an interesting device, often called the “Swiss Army knife” of AREDN networking, because it can serve as a bridge between conventional Internet and the AREDN network. In particular, it is one of the simpler ways to provide an Internet “tunnel” to link AREDN networks which don’t have a good RF path to the network.
Like me.
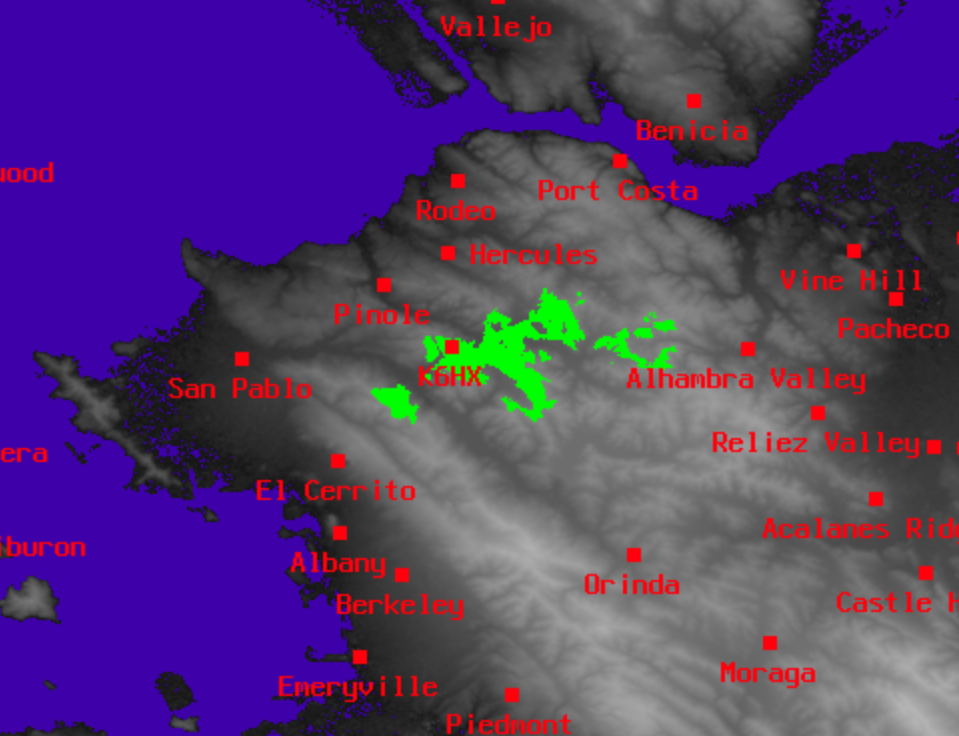
My house is actually in a bit of a valley, without good RF paths to most repeaters. I used the Splat! RF prediction software to see just how bad it is. Assuming I have the ability to place an antenna 50 feet up (doubtful) this is my coverage area. If you’ll compare this to the node map I posted earlier, you can see it’s not got a ton of overlap with existing nodes.
Luckily, Chris, KJ6WEG agreed to give me a tunnel connection that allows my small (three node) network to connect via the Internet to the broader network. This is “cheating” in some sense, but given the current rather poor prospects for a strong link elsewhere, it at least allows me to gain experience.
Anyway, my current setup looks more or less like this (from the AREDN beginner’s guide):
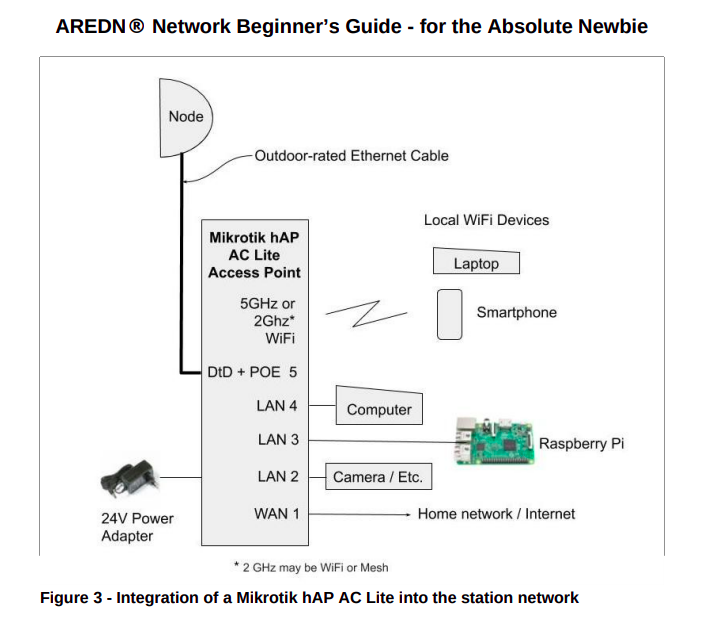
In addition to providing a way to tunnel to the Internet, the Mikrotik device can actually create a wireless access point that other devices (such as cell phones) can use to access the network as well. I’ll eventually get a Raspberry Pi configured to hang off it and provide some network services (like webcam, file and HTTP service).
Anyway, I’m having fun from isolation. There is a possibility that the fledgling Pixar amateur radio club may be interested in doing a project (the K6PXR repeater is located in Emeryville, and should have good connectivity across the bay into SF). There is a ton of stuff I still don’t know, and didn’t write up here. Hopefully I’ll learn and write some of it down.
Stay safe out there.