Category Archives: My Photos

Monkeying around with the Lytro Camera…

A couple of people on my twitter feed yesterday (aside: I tweet using @brainwagon, and passed 5000 tweets yesterday) had questions about how this light field camera worked, how fast the sensor was, how long it takes to acquire the image, etc… While this is the first Lytro camera I’ve ever had the time to tinker with, I did spend a couple of years doing R&D on computational photography in general and light field photography in particular, so I am pretty familiar with how these things work, and combined with information like the Lytro Meltdown and the lfp splitter, I was able to tear apart my example the files for the example “monkey” picture I took yesterday. For completeness:


So, how does the Lytro take pictures that can do this?

First, let’s take a look at the cross section of the camera, thoughtfully provided from Lytro on the web:

lytro

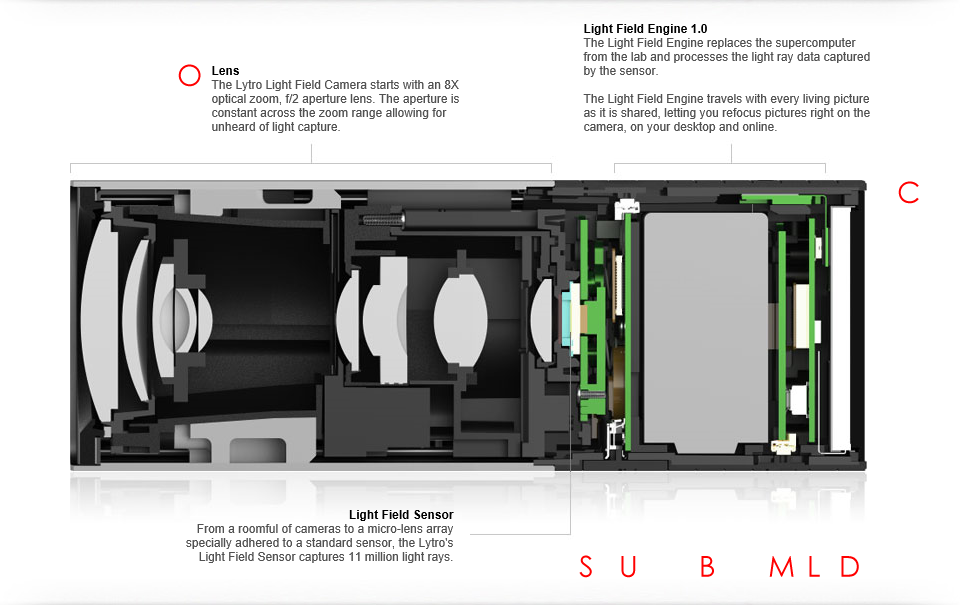
Despite it’s kind of primitive outer appearance, inside it’s remarkably complex. As someone who played a small part in the optical design of a similar camera, it can be remarkably tricky. But you might look at it and say: “Gosh, it’s a telephoto lens, big whoop! Where is the ‘secret sauce’?”

It’s in the area labelled light field sensor. Instead of having an ordinary CCD which simply samples the illumination on the focus plane at a bunch of individual locations, the light field camera has a micro lens array: an array of tiny lenses which allow the camera to not only measure the total illumination arriving at a location, but it’s distribution: what proportion of that light is arriving from each direction. It’s this property that will eventually allow the computational magic allows refocusing.

You probably aren’t able to visualize that very well (I certainly couldn’t when I began), but here’s an example which may (but probably won’t) help a bit. Even if you don’t completely get it, it’s kind of cool.

Using the lfpsplitter tools above, I extracted the “raw” pixel data from the monkey snapshot I did. If you are familiar with the way most cameras work, you might know that inside digital cameras is a sensor which can be thought of as an array of pixels. Some are sensitive to red, some green, some blue, usually arranged in an grid that is called a a Bayer filter or a Bayer mask. Software in your camera is responsible for looking at each individual R, G, and B pixel and combining them to produce RGB pixels of a resolution lower (usually by 1/2) of the native resolution of the sensor. The image below is a similar “raw” image of the sensor data coming from the Lytro. It is represented as monochrome values, each of which is 16 bits. It looks dark because all the processing of the Bayer filtering, exposure, color balance etc has not been done. The original images are 3280×3280, which I’ve shrunk down to fit on this page.

Screen Shot 2015-04-25 at 9.10.30 AM

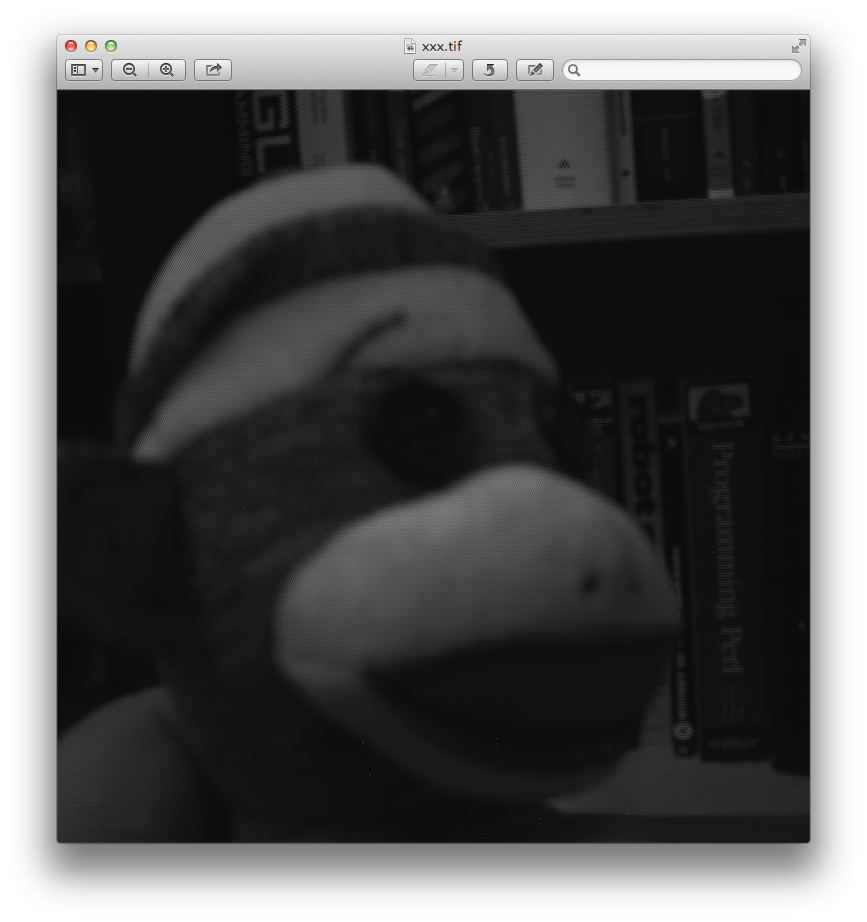
You can probably see monkey, but might ask, “again, what’s the deal? Seem just like a dark, bad image of the monkey?” Let’s zoom in.
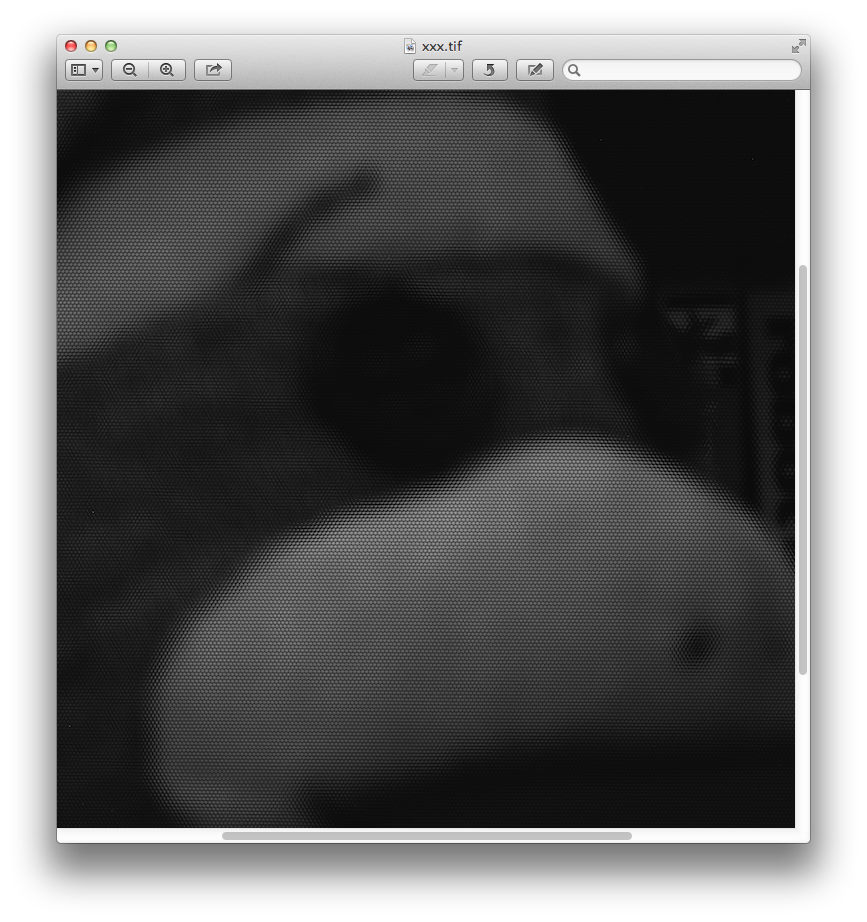
Screen Shot 2015-04-25 at 9.10.44 AM

And further?

Screen Shot 2015-04-25 at 9.11.04 AM

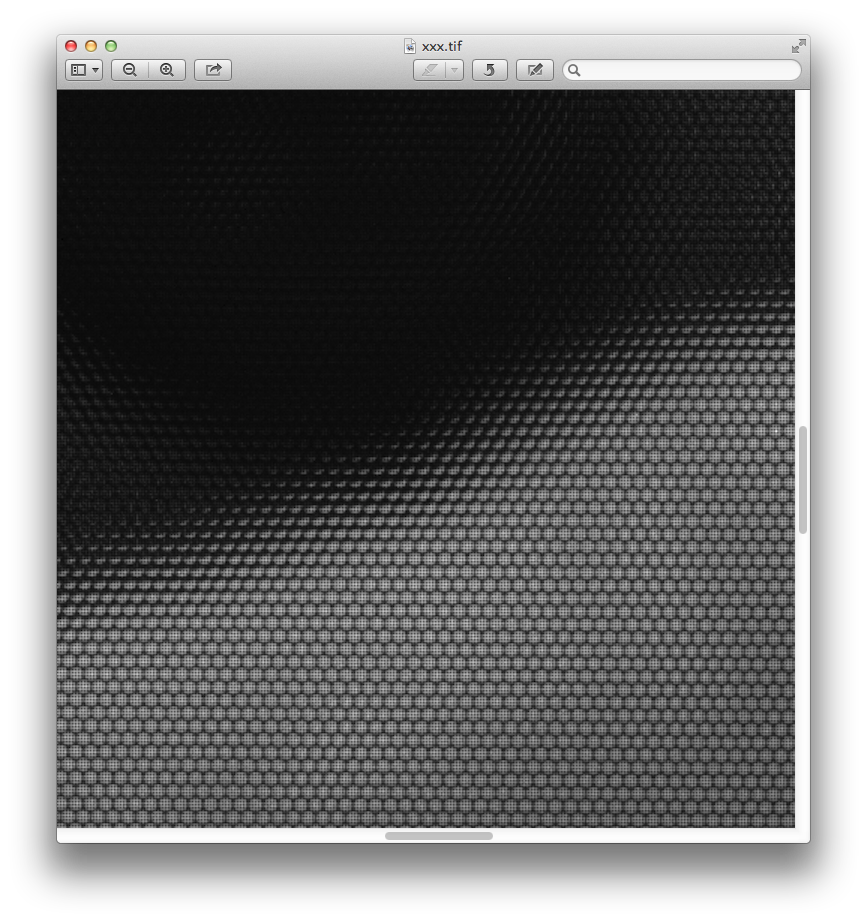
And finally down at the bottom, looking at individual pixels:

Screen Shot 2015-04-25 at 9.11.15 AM

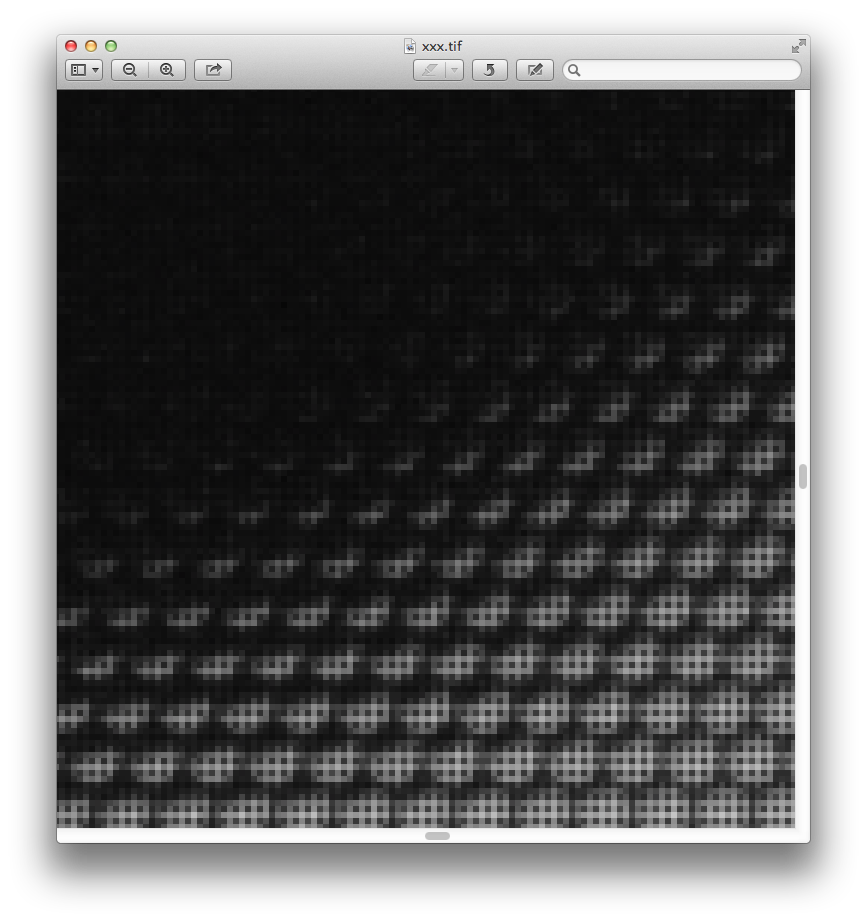
The large image is actually made up of little tiny circular images, packed in a hexagonal array. Each pixel is about 1.4 microns across. The circular images of each lenslet are about 13.89 microns across. The rectilinear “gridding” artifact you see is from the Bayer mask.

Pretty nifty.

The software that gets you from this raw image to the final image is actually non trivial, in no small part because the calibration is so difficult. But it’s awesome that I have a little gadget that can acquire these raw light fields (our prototypes were far bulkier).

Last night, I spent some time trying to understand the Wifi protocol, and wrote some code that was successful in receiving the callback messages from the camera, but had a bit more difficulty with understanding and getting the command messages to work. The idea is to create a set of Python programs that will allow me to pull this kind of raw data from the camera, without needing to go through the Mac OS/Windows Lytro Desktop software. If anyone has done this, I’d love to compare notes. Stay tuned.

Got a first generation (obsolete!) Lytro Camera…

I spent a couple years of my life working on a light field motion picture camera (and got named on two patents) as part of my former work, so I’ve been interested in light field photography and computational photography more generally. The company Lytro was basically the first to market such a device, and recently they were discontinued. Because of that, they were pretty cheap on woot.com, and I couldn’t resist picking one up. It arrived today.

Here’s my first picture. Try clicking on it in various places, or clicking on it and dragging a bit.


I may do a video review of the product, not so much as a product, but basically as an introduction to light field photography, which I still think is interesting, even though the technology isn’t quite their yet.

Stay tuned.

Addendum: The Lytro Meltdown site documents the Wifi protocol for the camera, which means that I might be able to hack together some python code to extract the images from the camera. I might use the Raspberry Pi to experiment. Basically, the camera creates a private wifi network, which you can connect to. Once on that network, you connect to the camera and issue commands over special ports, in a bizarre format. Why they didn’t choose to use HTTP? That’s why the product is no doubt discontinued.

Skeleton of a motion detecting video capture program for the Raspberry Pi + Camera…

Last week I was playing around with using “motion-mmal” to capture pictures of hummingbirds feeding at my feeder. That was fun, but if I wanted to get high resolution pictures, I could not get very high frame rates (maybe 2-5 fps at best). I thought that perhaps by writing my own capture application in C, perhaps I could do better. After all, the graphics processor in the Pi is capable of recording HD video and directly encode it as H264 video. There should be some way to use that hardware effectively, right?

As it turns out, there is.

As a tease, here is some of the video I captured yesterday:


It’s recorded at 1280×720 and 25fps (more on that later). It takes about 20% of the cpu available on one of my older Model B Raspberry Pi. The motion detection is done on the camera entirely in Python, and is a bit crufty, but works well enough to get some good video.

Warning: this code is presented as-is. If you aren’t a python programmer, you may not have the skills necessary to understand or use this code, but it is a good basic outline that spells out most of the parts you need. Feel free to adapt the code to your needs. If you redistribute it, it would be nice if you could give a nod to this code and my blog in some fashion, but I’m not going to be insulted if you don’t. And if you have any improvements, I’d love to hear about them.

[sourcecode lang=”python”]
#!/usr/bin/env python

# __ __
# _ _____ _/ /_____/ / ___ ____
# | |/|/ / _ `/ __/ __/ _ \/ -_) __/
# |__,__/\_,_/\__/\__/_//_/\__/_/
#
#

import numpy as np
import io
import os
import os.path
import fractions
import time
import random
import picamera
import picamera.array
import datetime as dt
import warnings
import platform
from pkg_resources import require
import subprocess

print platform.platform()
print "Using picamera version", require(‘picamera’)[0].version

#warnings.filterwarnings(‘default’, category=DeprecationWarning)

prev_image = None
image = None

def detect_motion(camera):
global image, prev_image
with picamera.array.PiYUVArray(camera, size=(256,144)) as stream:
camera.capture(stream, format=’yuv’, use_video_port=True, resize=(256,144))
#print "%dx%d:%d image" % (stream.array.shape[1], stream.array.shape[0], stream.array.shape[2])
if prev_image is None:
prev_image = stream.array.reshape([256*144, 3])[:,0]
return False
else:
image = stream.array.reshape([256*144, 3])[:,0]
diff = np.abs(prev_image.astype(float)-image.astype(float))
diff = diff[diff>35]
# print diff.shape[0]
prev_image = image
return diff.shape[0] > 200

def write_video(stream, fname):
# Write the entire content of the circular buffer to disk. No need to
# lock the stream here as we’re definitely not writing to it
# simultaneously
with io.open(fname, ‘wb’) as output:
for frame in stream.frames:
if frame.frame_type == picamera.PiVideoFrameType.sps_header:
stream.seek(frame.position)
break
while True:
buf = stream.read1()
if not buf:
break
output.write(buf)
# Wipe the circular stream once we’re done
stream.seek(0)
stream.truncate()

with picamera.PiCamera(framerate=fractions.Fraction(’30/1′)) as camera:
dir = "/var/tmp/capture"
camera.resolution = (1280, 720)
camera.framerate = fractions.Fraction(’30/1′)
camera.vflip = True
camera.hflip = True
camera.start_preview()
seconds = 5
stream = picamera.PiCameraCircularIO(camera,seconds=seconds, bitrate=8000000)
print "[ Buffer %s seconds/%d bytes ]" % (seconds, stream.size)
camera.start_recording(stream, format=’h264′, bitrate=8000000)
try:
while True:
camera.wait_recording(1)
if detect_motion(camera):
print "Dumping."
# generate a filename…
base = ‘cam_’+dt.datetime.now().strftime("%H%M%S")
part1 = os.path.join(dir, base+"-A.h264")
part2 = os.path.join(dir, base+"-B.h264")
camera.split_recording(part2)
write_video(stream, part1)
camera.wait_recording(15)
while detect_motion(camera):
camera.wait_recording(1)
camera.split_recording(stream)
with open("files.txt", "a") as f:
f.write("file %s\n" % part1)
f.write("file %s\n" % part2)
print "Dumped %s %s" % (part1, part2)
# Copy files to remote server
dst = ‘markv@conceptron.local:capture’
print "Copying %s to %s…" % (part1, dst)
rc = subprocess.check_call([‘scp’, ‘-p’, ‘-q’, part1, dst])
if rc != 0:
print "PROBLEM: (rc = %d)" % rc
else:
os.unlink(part1)
print "Copying %s to %s…" % (part2, dst)
rc = subprocess.check_call([‘scp’, ‘-p’, ‘-q’, part2, dst])
if rc != 0:
print "PROBLEM: (rc = %d)" % rc
else:
os.unlink(part2)
# ready to record some more…
camera.wait_recording(seconds)
finally:
camera.stop_recording()
[/sourcecode]

This would not be possible without the awesome picamera Python module and lots of careful engineering by the Raspberry Pi + Camera designers. They clearly foresaw this kind of possible application, and did everything that they needed to make it run efficiently and reasonably.

A few more short notes:

  • The motion detection code is terrible. It works after a fashion, but clearly could be tuned better.
  • To save space on my Pi, after capture it uploads each video file to one of my local servers, and then delete the file. I hardcoded it to use scp via subprocess. If you want to do something else, you can figure out what that might be and do it there. It won’t record new video while the scp is occurring: you could spawn a thread or some such to handle the copy and then dump back to the loop if you like.
  • You might want to write to a tmpfs file space, so it doesn’t eventually wear out your flash card with repeated writes and deletes, particularly if you can transmit these video files off as they are generated.
  • The picamera documentation is quite helpful. Indeed, it was my reading of that documentation which formed the basis of this initial script, which likely could not have been done (or not as easily) without them.

I will probably produce a tidier, better annotated version of this code and put it on github soon.

Hope this is of interest to some of you.

Addendum: If you want to see what the hardware looks like, you can see it here. Really just a cardboard box holding a pi, a powered hub, and the pi camera taped to the top, hung in the window.

Another hummingbird shows up on the camera…

When I got home today, it appeared that I had a few more images from my hummingbird cam. Luckily, I got several nice frames of him her (probably), so I put them together into an animated GIF. Nifty. When I get a chance to do more stuff on it this weekend, I hope to get even better recordings, and setup the camera closer. Till then, it’s been a fun project.

Hummingbird

Addendum: I converted the individual JPEG images into an animated GIF using the ImageMagick toolkit on Linux. The command was:

convert -crop 512x576+512x576 +repage -loop 0 -delay 200 frames.*.jpg loop.gif

The -delay value probably could have been shrunk a bit. I used the -crop option to just select the right half of the screen. When you post animated gifs in WordPress, you need to post them at full size, the shrunken versions won’t animate.

Motion Detecting Hummingbird Camera: Prototype

Prototype CameraI like to see hummingbirds. They seem completely incredible to me, like little hyper Swiss Watches, buzzing around the garden. I’ve seen a few of them in our yard, but I’ve been meaning to encourage them showing up more, so I recently installed a feeder. While the syrup level has gone down, I have never caught one actually feeding.

Of course, the way to solve this problem (as is true of all problems) is to apply technology! So, I quickly hacked together a little prototype camera that I could hang on my window and stare out at feeder. I’ve been thinking of doing this all week, and gotten proofing. In the end, I wasn’t getting anywhere, so this morning I decided on what I thought was the simplest possible prototype. I took one of my old Raspberry Pi’s, a DLINK powered USB hub to power it, and a Raspberry Pi camera, and taped them all in the cardboard box for an old laptop hard drive. My original idea was simply to duct tape it to the window facing the bird feeder, but a quick trial of this wasn’t promising: the duct tape kept relaxing, and the box was slowly drifting down. So, instead I got some wire and made a little hanger that would attach to two paperclips that I jammed in each side. It isn’t the greatest way to go, but it works.

I hung it from the top of the blinds in the kitchen, aimed it only very coarsely, and took my first picture by logging in and running raspistill. The aim isn’t very good, I only got the feeder at the edge, but this is just a prototype: if I start getting pictures of hummingbirds, I will refine the design/aim, and probably mount the camera outside so I can be a bit closer.

mingbird Feeder Prototype

Of course all you see are the drought stricken side of my hill, but if I get any pictures of birds, I’ll be posting them soon.

Addendum: I wandered outside as a quick test of the camera. While I am bigger than a hummingbird, I didn’t have any problem tripping the camera. I am concerned that the small, fast motion of a hummingbird may not be sufficient to trip the camera, but we shall see.

01-20150328135843-01i

A couple of additional words on the software. I use the “motion-mmal” program, a port of the popular “motion” program that is widely used on Linux with conventional webcams, but has been extended to use the Raspberry Pi camera, which are both high quality and inexpensive. The way I have this configured is that it does motion detection on a downresolution version of the video feed, and when it detects motion, it dumps the frame with the biggest difference to a local disk. Eventually, I may try to get it to capture video, and/or upload it automatically to google drive like I have done before for my cat camera. More later.

Addendum2: Huzzah! Within an hour of setting this camera up, I got my first picture! I guess it works. I’ll have to get it aimed a bit better and see how often I can catch birds, and maybe try to set it up to do motion capture too, not just stills.

04-20150328144545-02

Two more pictures from my foamcore 4×5 camera…

Here are two more photos I took at last night’s camera workshop. I wanted to take something slightly more beautiful than a selfie, so I chose the Luxo statue outside the Steve Jobs building at Pixar, and some white flowers from the garden. Both were taken rather late in the day, under partly cloudy skies using a 4 second exposure on some paper with an ASA value of around 4, and a 4 second exposure (timed by my accurately counting “Mississippis”). Both were shot at f/24. I scanned them using our copy machine at 600dpi, and then inverted them in gimp. I didn’t do any further processing on the Luxo. With the flowers, I adjusted the curve slightly to bring out some details in the darks between the flowers. I saved these versions as JPEGs, click on them to see them full resolution.

luxo

flowers

If you look to the upper right of the Luxo, you can see that there are some significant off-axis aberrations, as is also apparent in the background of the flowers. But the center of the field is remarkably sharp, considering. I’m rather pleased.

The legendary Ray Harryhausen dies at 92…

It is with a sense of deep sadness that I heard of the passing of Ray Harryhausen this morning. If I were to pick two things which influenced me as a kid growing up in the 1960s, it would have been the Apollo Space Program and the films of Ray Harryhausen, although at no time did I ever imagine that my own path would lead me toward a career in the film industry. What I found truly astounding about his work is that (perhaps by necessity) he excelled at all facets of his craft: from sculpting and character design, to animation and to the technical innovation necessary to make stop motion animation plausible in films. His work was always at the cutting edge of what was possible in special effects, and in spite of decades of progress they still remain vibrant films, important for their technical advances, but also because they are just fun to watch. Ray visited Pixar on several occasions, and while I didn’t get much personal time with him, I did get to thank him for his work and for helping to serve as inspiration, and he was kind enough to sign a copy of his book for me.

603634_10151433184967304_232343840_n

Pixar gave a nod to Harryhausen by naming a restaurant (curiously a sushi restaurant) after him in our 2001 film, Monsters, Inc. I doubt that there is anyone in the animation or visual effects industry who wouldn’t name Harryhausen as inspiration for what they do. So long Ray, and thanks for the films.

Fare thee well, Endeavour…

Here in the Bay Area, the Space Shuttle Endeavour did a victory lap, passing over Sacramento, the Golden Gate and many other Bay Area locations. Pixar Animation Studios is in Emeryville, quite close to the Bay Bridge, so I thought we had a pretty good chance of getting a good view. Sadly, all my good camera gear was stolen in our recent burglary, so all I had was my trusty iPad. I positioned myself along with lots of others out in the soccer field, and we caught this (not particularly amazing, but still impressive) view of Endeavour and it’s chase plane heading out toward the Golden Gate.

Fellow Pixarian Chris Walker was apparently at the Alameda Air Station with a better camera, and got much better results.

Endeavour was constructed as the replacement for the Challenger, and flew 25 missions into space, amassing 299 days of flight time in orbit. While digging around, I found this rare glimpse of it docked with the International Space Station, photographed from a departing Soyuz capsule.

Endeavour will find it’s final rest at the California Science Center in Exposition Park in Los Angeles. I’ll have to go have a closer look when it’s installed. Very cool.

Demo of Enigma and the Turing Bombe at Bletchley Park

Carmen and I just got back from a trip to London, and we had a blast. One of the geekiest things we did while there was to take a day trip by train out to Bletchley Park to see the site of the codebreaking efforts by the British during WWII. As any long time reader of this blog must know, I’m pretty interested in codes and cryptography, and this was a bit of a personal thrill for me.

While we were there, we managed to get demonstrations of a real Enigma machine (very cool) and the modern reconstruction they completed of the Turing Bombe. I shot some video of it using a Canon G11, which isn’t all that great (the sound in particular is pretty terrible) but I thought I’d archive it on YouTube in case anyone else found it of interest. If you get the chance to go to Bletchley, I heartily recommend it: we spent four hours there, and it really wasn’t enough. Besides the Enigma and the Bombe, they have a reconstruction of Colossus, the first electronic digital computer that was used to break the German teleprinter code that the British called “Tunney”. They also have huts filled with many artifacts of the period, including one containing a bunch of radio equipment, dating all the way back to the crystal sets of the 1910s and 1920s to the Piccolo secure modem transceivers that were used in British embassies well past the war. Nifty stuff.

I have some pictures that I’ll get onto Picasa sometime soon of related nifty topics.

Wall-E gets a Golden Globe

wall-e-photoI don’t spend much time talking about my day job here on the blog, but every once in a while, I have to take time out and crow a bit about Pixar and what a great place it is to work. Tonight, Wall-E picked up a Golden Globe for Best Animated Film. It was also nominated for Best Original Song for the great closing song written by Peter Gabriel and Thomas Newman, and performed by Peter Gabriel and the Soweto Gospel Choir.

I am once again amazed at how much fun a job can be, and how enormously fun and talented a crew we have. Special thanks to all the rendering crew, and congratulations to all who worked on Wall-E.

Quail!

My wife noticed a mommy and daddy quail at our fence, with a whole bunch of babies squabbling around in the grass at the bottom. Couldn’t get any good pictures of the babies, but shot this video of the parents:


Not sure the autofocus got the quails as well as they could have, here is the best still picture of them I managed to get, full resolution.

Quail!

Motion…

As a break from my amateur radio posts, here’s a photography one!

Most of my photographs are cool largely by accident. This is no exception. Well, that’s not quite true, I was sort of trying for this effect, but it turned out much better than I could have expected. It’s shot with the Night Portrait mode of my Panasonic point-n-click camera, which means that it holds the shutter open and hits the flash. Thus, you get some nice motion, and a fairly sharp image at the end. I think it’s kind of neat.

Motion…

PAP2 Acquires New Brain, No Longer Speaks to Me

A while ago, I wrote about how you could unlock a PAP2 and use it on Free World Dialup as a simple, cheap VOIP adapter.  Unfortunately, while playing around with Asterisk this morning, my adapter reset itself, promptly redownloaded some new firmware, and now is back to being locked with Vonage, this time, without the apparent hacks that make unlocking possible.

Sigh.  Things like this are enough to really piss you off.

So, temporarilly at least, my VOIP hacking is slowed.  I guess I’ll have to spring for something like a Clipcomm CG200 or a Linksys Sipura 3000.  Or maybe I should just go ahead and buy a cheap IP phone like a Grandstream or maybe a better one like the Sipura 841 or 941.  Anyone have any suggestions?

[tags]VOIP,Linksys PAP2,Hacking,Asterisk[/tags]

Croaking

Using the multi-shot capability of my nikon, I grabbed sixteen small exposures of the frog croaking, extracted them, aligned them by hand, and made the (rather large, sorry for the dialup users) images on the right.

[tags]My Photos[/tags]