Just a pointer to a cool project which appeared on Hackaday: a solar powered FPV plane that can fly forever (or at least until the sun goes down). Pretty spiffy!
The comments show a link to this solar powered plane developed at ETH:
It was in the air for 81.5 hours, and had a continuous flight distance of 2316km. It’s a slow flyer: average speed is just under 18mph. At the end, you can see that the wind conditions had deteriorated seriously. Pretty nifty.
Building my full sized quadcopter is going rather slowly (sigh) but in the mean time I picked up a little Hubsan X4 to play with. It’s cheap, and because it has a very low mass, it’s pretty hard to destroy. After more crashes than I can count, I’ve only managed to ding up one propeller (and replacements are pretty cheap and easy to get). But I must admit that one of the reasons I’m interested in quads and RC vehicles is to shoot video from them. While it is possible to get microquads that carry cameras, or even allow FPV, I kind of like the idea of home brewing something. Often, such projects are aided by following in the footsteps of giants, looking at how others have solved problems helps a bunch. It’s also inspiring. That’s why I was particularly enthused to find this article:
It suggested the Vitality H36 quadcopter. It has one really interesting feature: it’s compatible with the Flyky/Turnigy radio transmitters. It would be cool to use my big transmitter with the tiny quad.
Provides good hints on the video camera, transmitter and receiver module that you might want to use.
Good links to circularly polarized antenna construction details.
It’s an existence proof that it can be done! Awesome!
At work, we have an informal group that is interested in drones and quadcopters. Every third Thursday, we get together and fly. Today we went over to Cesar Chavez Park for a bit of flying. I was hoping that I’d have more of my own quadcopter completed, but instead I just observed Mark fly his Bixler and his One Piece Quad, while John flew his Phantom 2 around. They should have some footage up in the next few days. To tide you all over, here is some footage that Jeremy shot on two previous drone lunches, one filmed at work, and the other at the top of Mount Diablo. Enjoy.
A few days ago, I wrote about the EZCAP EZTV645 dongle that I got which could be used with RTLSDR software to implement asoftware defined radio that only cost $20. I also had ordered a NooElec radio (similar, but with the R820T tuner that most people seem to favor) as well as an MCX-SMA adapter pigtail so I could use it with my mag mount dual band hamradio antenna that I have.
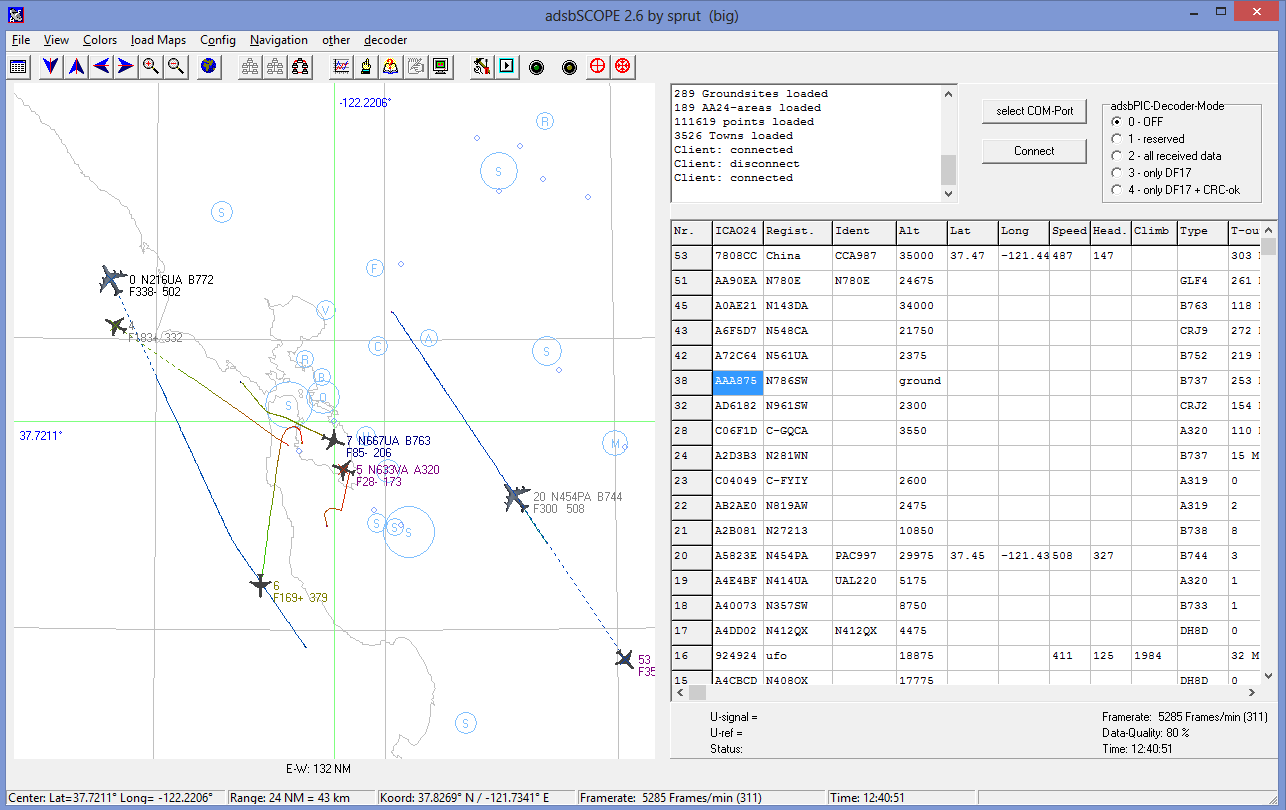
Today, for kicks, I drug it outside, hooked it up, and then started playing with it. Unlike my earlier tests, I could see some traces of a signal around the 1090Mhz ADS-B frequency, so I download ADBS# from here and fired it up. It immediately began detecting packets, so I went ahead and downloaded ADSBSCOPE from here, configured it to accept local data from the ADBS# server, and voila! It worked! Here are a couple of screen caps from a few minutes of sitting around outside at lunch:
Ironically, I didn’t see a huge difference in difference between using my mag mount antenna and the cheap antenna that comes with the dongle, but neither are optimized for the 1090Mhz frequency either, so perhaps that’s not any kind of meaningful test. I think I am going to try to build a stacked colinear antenna that is, and we’ll then do some range testing. But at least close to the OAK airport, I can definitely get some good signals.
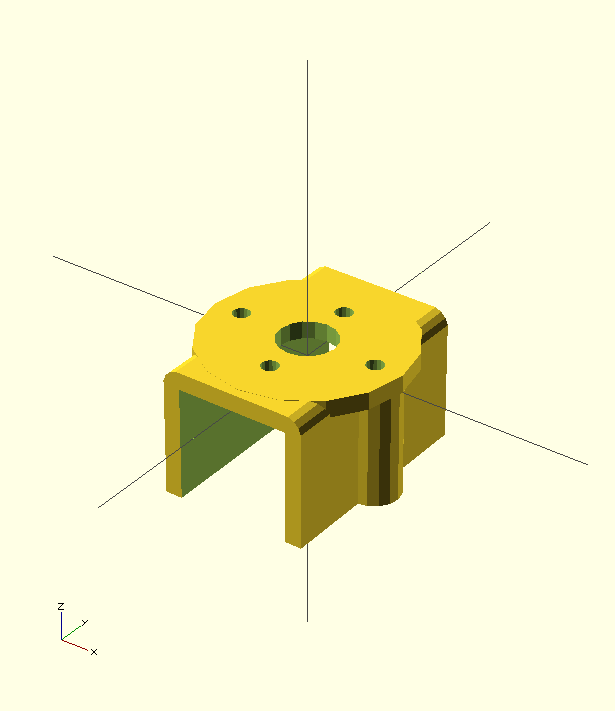
A few days ago I pointed at Mark Harrison’s Instructable on a 1 Hour Quadcopter. I thought it was cool, not so much because it could be built by him in an hour, but because it showed that quadcopters are actually not all that complex, and you might expect to be able to build one yourself. As I was mulling this over, I thought it might be nice to design and 3D print some motor mounts, just as I did for the Axon. So, I spent about 20 minutes tinkering an OpenSCAD version together, and came up with this:
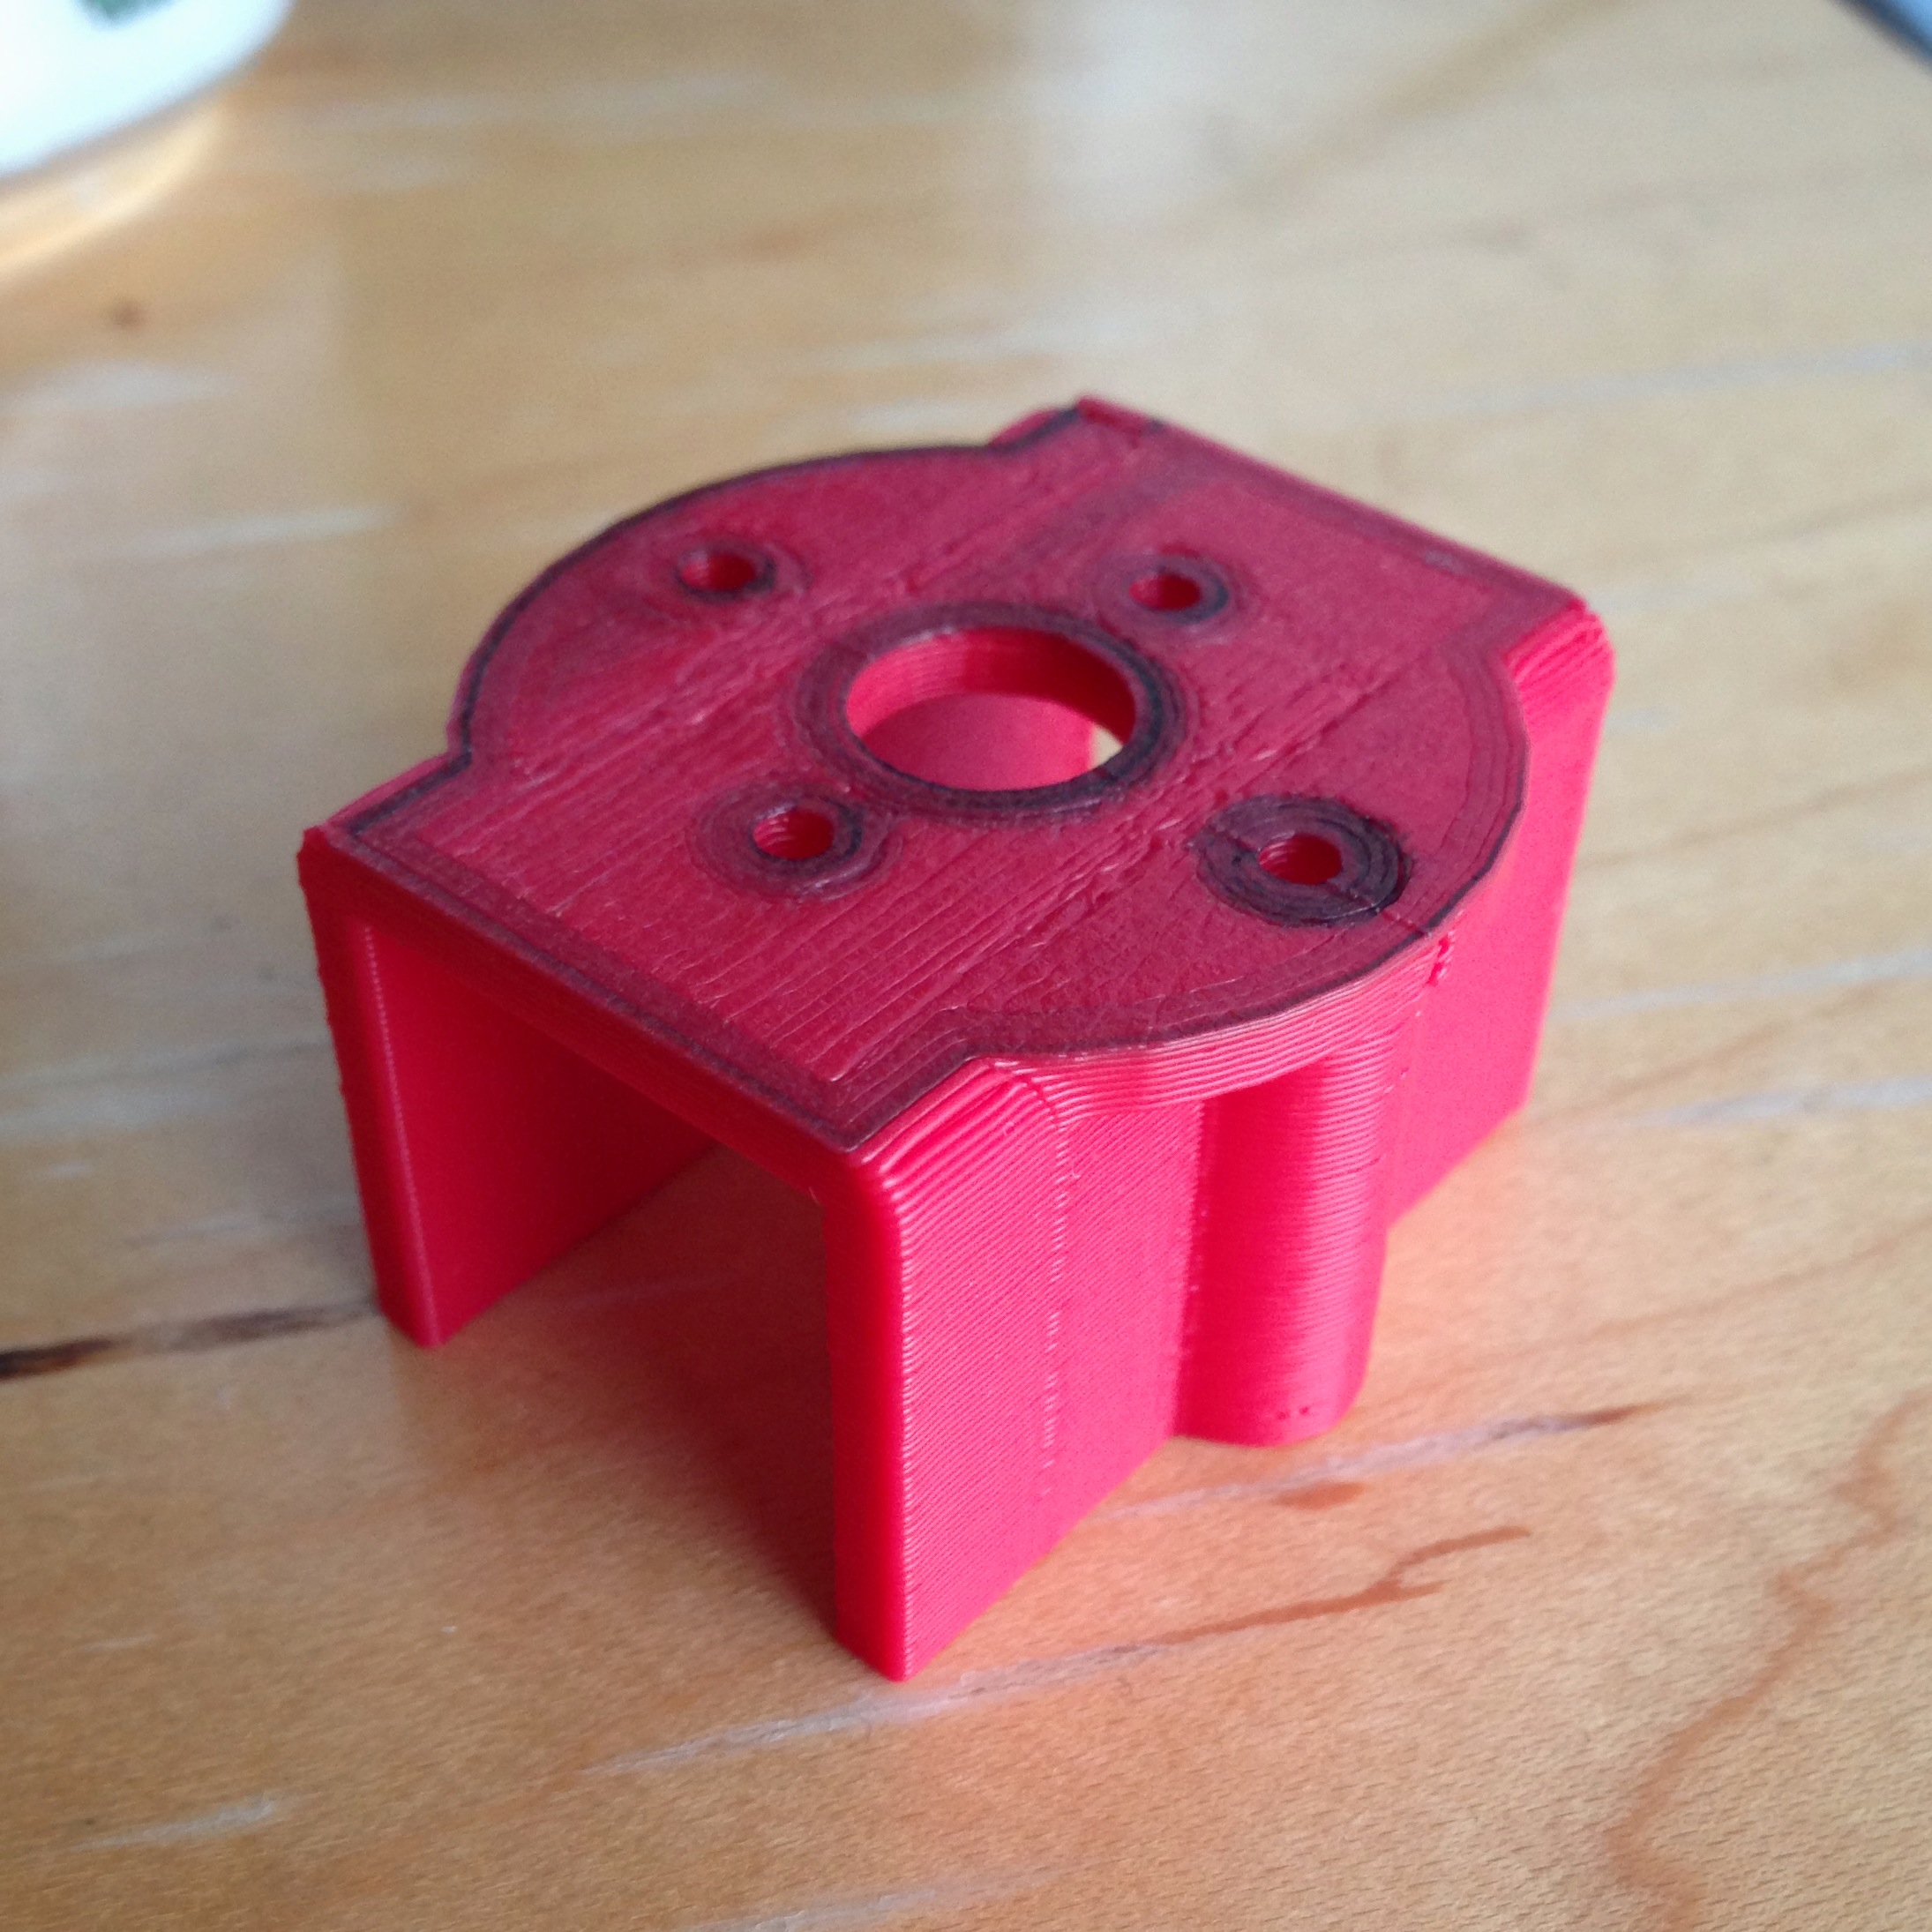
And it took about 24 minutes and 4 meters of PLA filament to print:
The blackish bits on the top are an artifact of the previous user printing something using black filament, which took a while to clear out. The weight of this bracket should be about 12 grams, but I printed this test with 100% infill, and I think other model changes could result in a significant reduction in overall weight (I think all 4 brackets could easily be less than 25 grams, and probably be less than 18 grams). As soon as I test this against the real motors, I’ll be putting the revised model files up for download on Thingiverse. Stay tuned!
My mentor in all things remote-control, Mark Harrison has written a pretty cool Instructable on how his flying buddy Andreas built a simple but reasonable quadcopter in only an hour.
Here is the cool timelapse, ending with a short flight after fifty-one minutes elapsed:
Mark has more details and photos here, as well as some realtime construction video. Andreas originally did it as a friendly wager, but I think there is lots of good material here, not the least of which is just the inspiration of seeing someone build a quadcopter in a reasonably short amount of time, using equipment that isn’t very esoteric. Yes, you need the motors, props, ESC and flight control board, but other than that, it’s basically wood and screws.
Thanks to Mark and Andreas for posting this.
Addendum: Moments after posting this, I noticed this new video by David @ flitetest on constructing a tricopter from scratch:
If you are at all interested in RC stuff, flitetest is highly recommended: lots of cool information, lots of good forums, and even some cool kits.
Last year, Mark H (who blogs at Eastbay RC got me into the world of building RC airplanes. While my early attempts were limited in their overall successfulness (I demonstrated that I was awfully good at snapping props) I have been keeping up in my interest, and slowly acquiring more tools and hardware. Recently, I’ve had the opportunity to serve as a mentor to some local students and one of them expressed a desire to build his own RC airplane. I had recently been inspired by the great videos by Ed Orsine of the Experimental Airlines Youtube channel, so we decided that constructing an Axon, one of his designs would be a cool design to try:
A lot of it can be constructed with just Dollar tree foam and packing tape. But i recently got access to a 3D printer, and I thought it might be cool to fabricate some parts using that. A good candidate was the motor mount: we wanted the motor to be firmly held, with the appropriate 5 degrees of down angle. I just recently started teaching myself how to design simple parts using OpenSCAD. It bills itself as the “Programmer’s Solid 3D Cad Modeller”, and I couldn’t agree more: it plays right into my skillset. I’ve made an printed a few objects, and for these kind of purely functional 3D objects, I found it to be easy and straightforward.
The basic idea is to make a little plastic bracket that can be mounted at the end of a piece of 5/8″ square wood which is held with mounting tape inside the main fuselage. It took me about twenty minutes to design, and it went through a couple of minor tweaks before it got to it’s final form. And here it is, mounted in my student’s plane:
Mark H. thought it might be of interest to others in the builder/RC community, so I placed it up on thingiverse. Feel free to download it and print it, and let me know of you find it of value.
The guys over at flitetest have a great series on building airplanes around a swappable fuselage. The basic idea is to house the receiver, esc, and battery in a fuselage that can be easily attached and detached to different wing setups, essentially giving you different planes without having to duplicate all the same receiver/ESC in each. It’s a neat idea. Today, I noticed this video from Busybee TV, showing his own version of the swappable with a cute twist. He built it significantly smaller (my guess is about 60% as large as the flitetest version) which means that the wing loading is significantly lower, and you can hold the wings in place with magnets. Oh, and it costs about $50. He demonstrates to mini-airplane wingsets. Build videos are supposed to be coming soon. Check it out:
Today I spent a lot of time making bread and pumpkin cheesecake for tomorrow’s Thanksgiving day feast, but in between I decided to build some more parts for a “So” twin boom foam flyer, using the KFm3 wing that I photographed yesterday. My goal wasn’t so much to build a flying plane today, but to just test the design out, and see if there were any difficulties or tweaks to be made. So, I made two twin triangular booms, the 13″x4″ stabilizer, tail fins, and the body. Here’s the result:
It’s a fairly nice looking design. The twin booms and stabilizer presented no serious issues, except for maybe alignment: making sure they are parallel and at right angles to the wings and stabilizers. I cut the internal bevels on the boom freehand, which made them look a little rough, but that presented no real problem once they are glued and folded. The fuselage body was a bit trickier: the instructions call for cutting a 36″ long strip, 1″ wide that separates the two sides. I cut a pair of 1″ wide strips, since the stock that I had is maximum of 30″ wide. I free handed the curve at the front of the fuselage, cutting both sides simultaneously. I then glued the strip along once side with hot glue, then spread hot glue on the other side and lowered it down. It isn’t perfect, but seems okay. I haven’t covered it with packing tape: my skills at covering flat sheets are pretty good, but irregular shapes seem a bit trickier. I’m pondering building a similar plane, but using the Experimental Airlines 2.5″ square fuselage.
But it looks pretty good. I’ll be able to weigh the model and work out the wing loading and some of the balance issues. I’ll also be able to think about how to place the servos, receiver and battery. I may just hang it from the ceiling of my office.
Okay, I haven’t had much time to work on RC airplanes. I’ve been meaning to try to find something a little tamer than my Nutball to fly (it seems to be a bit twitchy) but I haven’t really done too much other than watch videos on YouTube and scout around on the rcgroups forums for inspiration. But I have been thinking alot about wings, and wing fabrications. I ended up making three different wings from Dollar Tree foamboard, and thought it might be nice to show what they look like, and what I learned in building a few of them.
The first of these is the so-called Armin Wing, championed by Ed on the Experimental Airlines channel. I’ve made a few versions of these. The nice thing about these is that they have a nice airfoil shape. The version that I have here isn’t the fancy version, with the knife-edge trailing edge, but it’s pretty nice. I used a piece of 3/16″ dowel to stiffen it (carbon fiber would be better, but I was just experimenting).
Ed’s videos show in great detail how to make these, if they interest you, go review those. The one disadvantage is that they are a little bit involved, compared to the two designs that follow, but they aren’t really difficult, and I suspect that they might perform better than simple KFm airfoils, although mine have pretty blunt leading edges, which could make for higher drag than you might like, at least for high speed flights.
While watching flitetest’s video on Airfoils, they constructed a KFm3 style stepped airfoil to replace a damaged wing on their Cessna model. They didn’t go into any details on how they did it, but I thought it might be pretty easy. The airfoil has steps at 50% and 75% of the wing chord, so I cut a piece which was 12″x30″, and another which was 6″x30. I folded the 12″x30″ piece 4″ back from the leading edge, and clamped and glued it around the 6″ piece, resulting in a wing with an 8″ chord, and three thicknesses of foamboard. Because there was so much area to be glued, I didn’t use hot glue, I used Gorilla glue, and clamped it for a couple of hours. It worked, but also had a blunt leading edge. Not sure I liked it.
The “So” design that I linked in my last posting was also a KFm3 wing, but constructed a bit differently. This wing has a 6″ chord, so you begin by cutting a 9″x30″ of foamboard, and then score halfway through it 3″ back from one edge. You then cut a shallow bevel on either side, so you can fold it back. A piece 1.75″ wide is first glued 1.5″ back from the trailing edge, and then the bevelled part folded back and glued to the top edge of the 1.75″ piece. Okay, that’s a crappy description, but here’s the result. The bevel allows the leading edge to be sharper than the previous one.
All three seem credible designs. I probably will use the third technique if I go with the KFm3 style wing. I like the So design, so I might try putting one together shortly, although I’m considering the “trainer” mods (polyhedral wing, with rudder rather than aileron). But the Armin wings aren’t that much harder, and make for kind of a spiffy looking wing.
Stay tuned for more foamboard madness. The cat is enjoying playing with the scraps at least.
Addendum: The KFm3 wing can be scaled up. Check out this video of a 96″ version (almost 5x the size of the one I just put together):
I’m constantly on the lookout for interesting and simple airplane designs. This design from foamflyer is interesting in a couple of different ways. First of all, it’s made from cheap dollar tree foamboard, which is nice. It has an overall pleasing shape with a nice KFm3 style airfoil, constructed a bit differently than the one that I made as a test recently. It’s a pusher prop configuration (which might be nice for FPV/video) and most interestingly, it has just a single aileron. I like it!
The build log appears on this page on the rcgroups forums, and includes lots of build details. Really nice. He’s also got a terrific website chock full of two hundred planes that he’s constructed. Great stuff.
Addendum: The lack of dihedral may make this a less than ideal trainer aircraft, but one of the commenters constructed a similar airplane with a polyhedral wing to add dihedral, and used a rudder-elevator setup instead of the single aileron (my guess is the single aileron doesn’t work as well with the dihedral in place). Also worth looking into!
I snapped awake at 5:30AM this morning, and couldn’t get back to sleep, so I started a loaf of bread to bake later tonight, and then settled in to thinking about airfoils some more. I had seen references to the “Clark Y” airfoil, but didn’t know how it was defined, so I set out to figure it out. A few minutes of googling revealed a fascinating resource, the UIUC Airfoil Data Site. It has data definitions for literally hundreds of airfoil profiles, including coordinates for the Clark Y. I then dusted off my dim knowledge of gnuplot to draw this (properly scaled) version of the airfoil.
There is a trick to getting gnuplot to work. Here’s the set of commands I used:
set terminal png size 1024,256
set size ratio -1
set ytic .1
set xlabel "Clark Y Airfoil"
plot "clarky.dat" with lines
(You could probably make it look prettier with a bit more work.) The important bit is to set the size ratio: without it gnuplot will change vertical and horizontal scales to fit the data in the window.
As I was staring at the cross sectional diagram of the Armin wing I constructed yesterday, I began to think about airfoil shapes in general. I knew from reading done years ago that there were standardized ways of describing airfoil shapes, but didn’t recall any details. I didn’t have a copy of Abbot’s Theory of Wing Sections, and I loaned Mark H. my copy of Simon’s Model Aircraft Aerodynamics, so I had to turn to Google and Wikipedia to sate my desire for knowledge.
A few minutes of searching uncovered this Wikipedia entry on NACA airfoils. It’s pretty helpful, and includes formulas for generating the airfoil profiles of a wide variety of standard wing shapes. I hacked together a quick python program to generate the profile coordinates for 4 digit NACA airfoils, and as soon as I verify the results, I’ll post the code here. It won’t be hard to use this to generate a PostScript/PDF file which you could then directly print to make templates.
Ed over at the Experimental Airlines Youtube channel has a nifty way of constructing wings for RC airplanes out of cheap Dollar Tree foamboard. Last night, I was feeling kind of brainless, so I decided to practice my arts and crafts by constructing another, this time using a piece of 3/16″ dowel to stiffen it. When I was done, I thought it might be nice to figure out how it really ranks as an airfoil. For that, I needed two things: some accurate measurements, and a program to do some simulation on the wing. I haven’t got as far as the second, but I took out my cheapy Harbor Freight calipers and took some measurements, and created the following scale drawing. I didn’t bother computing nice spline curves for the top surface, but the leading edge is pretty close. The back doesn’t use Ed’s nifty tapered tape edges: I just put a bevel on the base, and then glued the top down, so it’s basically the thickness of the 1 layer of foam board at the back. Anyway, here’s a PNG, if you click on it, you should get a 300dpi version which is lifesized.
Click for full scale 300dpi PNG of my Armin Wing, 7″ Chord…
I’ll try to get this into an airfoil simulator, and compare it to other simple wings (plates and KFM2 wings, hopefully) to see how it compares. I also want to get a precise weight for the wing, so I can figure out how the lift and weight compare).
Anyway, that’s what passes for arts and crafts at my house. Stay tuned.
Addendum: Josh and Josh over at flitetest have a nice video I hadn’t seen before on airfoils. It wasn’t super technical, but it did show an interesting KFm style stepped airfoil made from what appears to be the same Dollar Tree foam I was using. I had made one for my glider prototype that was a KFm2 airfoil (two layers, with the step at 50%), but they use one that appears to be more like a KFm3 airfoil, with the bottom and top layers created from just one piece, folded over a middle piece. What’s especially cool is that they used it to replace the conventional (and complicated) wing for one of their Cessna models, and it seemed to work great. I’ll have to try making one of those too.
I’m pretty interested in autonomous vehicles, and because of the wide availability of cheap electronics and compute power, experimentation in this realm is increasingly within the grasp of amateurs. I like the idea of building small aerial drones which can not only follow a predetermined coarse, but can also work to avoid obstacles and the like.
Today I found a press release for a paper “Low-Power Parallel Algorithms for Single Image based Obstacle Avoidance in Aerial Robots”, which seemed right up my alley. A quick Google revealed this web page, containing links to their papers. The math involved is a little beyond the casual, but I think I’ll be able to sort it out. Very nifty stuff, bookmarked for later.