A brief introduction into color spaces, as used in SSTV…

March 11, 2014 | SSTV | By: Mark VandeWettering

Rob (AK6L) was interested in my recent experiments in slow scan television, but didn’t know much about color spaces. It’s an interesting topic on many fronts, and I thought I’d write a brief post about it here to explain it to those who may not be familiar.

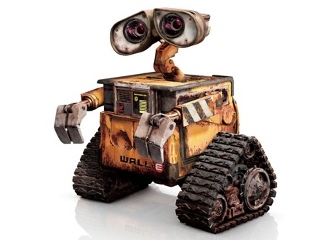
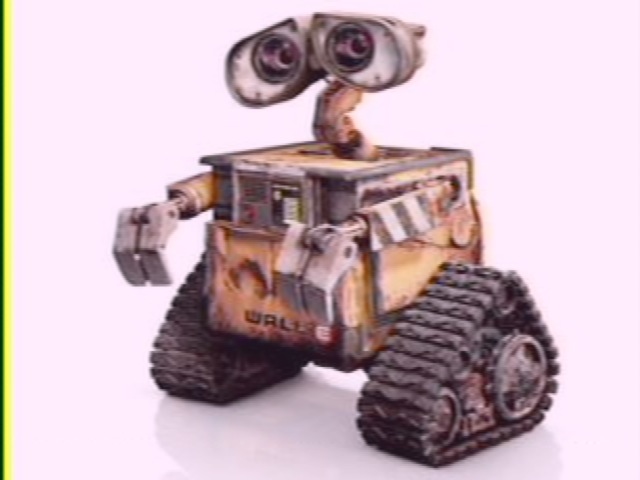
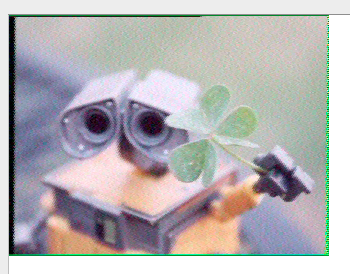
Consider this nice 320×240 test image of Wall-E that I’ve been using:

wall-e

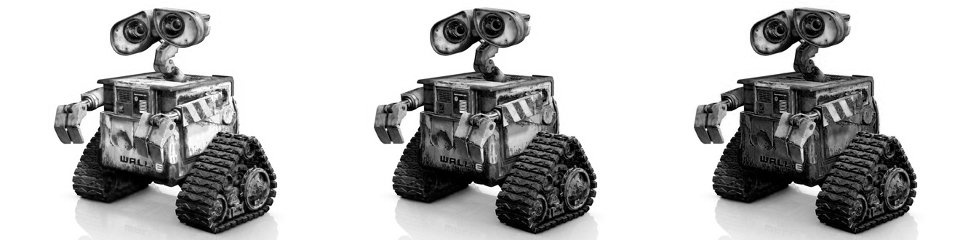
Most of you probably know that these images are really combinations of images in three different colors: red, green and blue. If you take a magnifying glass and look at your TV, you’ll see that your television displays images as a combination of glowing red, green and blue dots. If we instead split this color image into separate images, one for red, one for green, and one for blue, and display each one separately, we can see the image in a different way:

RGB

One thing to note: there is lots of detail in each of the three sub-images. That means that there is considerable redundancy. When data streams have lots of redundancy, that means there is an opportunity for compression. Compression means we can send data more quickly and more efficiently.

So, how can we do this? We transform the RGB images we have into a different set of three images, where most of the visual information is concentrated in one channel. That means we can spend most of our time sending the dominant channel, and less effort sending the other channels, maybe even sending lower resolution versions of those channels.

But how do we do that? Well, let’s do some magic, for each pixel in the image, let’s compute a new image Y from the R, G, and B images. Y will consist of 30% of R, 59% of G and 11% of B. This computes a representative black and white image from the R, G, and B channels. (If you didn’t know a lot about color science, you might just try averaging R, G, and B, but your eyes have different sensitivity to R, G, and B light. If you use the proportions I describe, you’ll get a lot better subjective match to the value of each pixel.) Then, let’s compute two additional channels, the channel that consists of R – Y, and the channel that consists of B – Y.

If you are mathematically inclined, you’ll see that this process is invertable: no information is actually lost. Given the Y, R-Y and B-Y images, we can recover the RGB images. But what do these images look like?

YCrCb

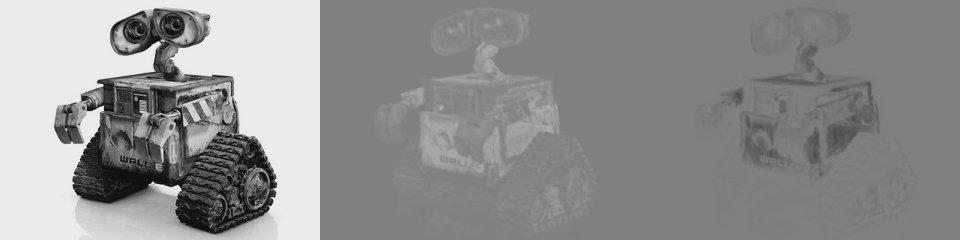
(Since R-Y and B-Y may be negative, we actually compute (R-Y)/2 + 0.5 and similar for B-Y).

Neat! Now, the most detail is confined into the Y image. In the Robot 36 SSTV mode, each scanline spends 88ms transmitting the 320 pixels for the Y channel. The R-Y and B-Y channel are first downsampled (resized down) to just 160×120 (half size in both dimensions). Robot 36 takes just 44ms to send each of those. But because we’ve resized down in Y, we only have half as many scanlines in R-Y and B-Y channels. So Robot 36 operates by sending one 320 pixel row for Y, then one 160 pixel row for R-Y, then the next 320 pixel row for Y, then one 160 pixel row for B-Y. Each pixel in the R-Y and B-Y channels will then cover 4 output pixels.

I’ve glossed over a lot of details, but that’s basically how color spaces work: we convert an image into an equivalent representation, and then transmit some channels at lower resolution or lower fidelity than the others. This idea also underlies image compression technology like JPEG.

Addendum: I generated the images above using gimp. If you go to the Colors…Decompose menu, you can bust images into three different RGB images, or YCrCb.

Additional Experiments with SSTV, with some ideas….

March 9, 2014 | Amateur Radio, Raspberry Pi, SSTV | By: Mark VandeWettering

Previously, I had written an encoder for the Robot 36 SSTV mode. I chose this for a simple reason: it appears to be the most common mode used in downlinks from satellites, such as the ARISSat-1. It’s not a bad choice, and presents reasonable quality in just 36 seconds.

Today, I decided that I should probably go ahead and implement another of the “Robot” modes, specifically Robot 72. It transmits images with the same resolution (320×240) as Robot 36, but with a bit better quality, and I suspect a bit better fidelity. Both modes transform the RGB colors of the original into a different color space with a luminance channel (usually labeled Y for Ylluminance) and the color encoded in a R-Y and a B-Y channel. To speed transmission, Robot 36 downsamples the last two channels into half resolution images in both dimensions (it really only sends a 160×120 image in those channels). Robot 72 does a similar thing, but only downsamples in the horizontal direction, sending R-Y and B-Y in 160×240.

It wasn’t too hard to modify my Robot 36 code to transmit Robot 72. For fun, I set it up and tested it. It works! Sending the resulting file to my Macbook and decoding with Multiscan 3B, I got:

wall

(The image has been expanded by 2, to 640×480, which makes it look a bit soft)

So, anyway, I was thinking about where to take this idea a bit further. I want to create a project that others can duplicate and expand upon, and that maybe promote the SSTV in a way that is amusing and fun. I wanted to build upon the work I’ve done so far, but take it further, and make it into a project that others might want to duplicate.

What I envision is a small box, consisting of a Raspberry Pi, a Raspberry Pi Camera, and a PiTFT display, together with a USB sound card like this one. (You need a USB sound card because while the Pi does have sound output, it doesn’t have sound input.) Add a microphone and a speaker. This collection will be interfaced with a radio: let’s assume for the moment an amateur radio like a the little Baofeng BF-888S radio I’ve been playing with. Add some buttons for interface.

Here’s what I’m imagining as the use case: it’s an interface to your HT. You could talk, and have it relayed to the radio. You could listen to the radio through the speaker. But you can also click a different button, and it will capture and send an image via SSTV. And if it hears an SSTV image, it will decode it and display it on the TFT display. I’ll probably initially support some of the low resolution black and white modes as well as the Robot 36 and Robot72 modes. I can also imagine a keyboard interface that will allow you to add text to your live images and send it out as well. The fastest, lowest resolution BW modes are just 160×120, and transmit in just 8 seconds. With an 8×8 character matrix, you can send the equivalent of a tweet (about 120 characters) in one image.

To make this work, I’ll have to work on a demodulator. So that’s the next step. Stay tuned.

SSTV travels through the Ether! A minor success!

March 8, 2014 | Amateur Radio, Raspberry Pi, SSTV | By: Mark VandeWettering

So, this morning I played around a bit more with my Raspberry Pi code to try to see if I could make an SSTV beacon. The idea was to use two existing bits of code, raspistill and my own SSTV encoder (robot36), and glue them together with a small bit of Python. The code uses raspistill to snap a 320×240 image, a bit of the Python Imaging Library to add some text, then my own robot36 encoder to convert that to a sound file. The Pi would then play the sound file, which would be piped into my $17 BF-888S transmitter, which was set into VOX mode, which means that when it hears a signal, it begins to transmit. For this test, I used it in the low power setting, transmitting on the 70cm calling frequency.

To receive, I fired up my trusty FT-817, which was then piped into my Windows laptop running the classic MMSSTV software. At first, I tried using the laptop mic to just listen to the sound played on the 817, but the results were less than stellar. I finally found the right cable to do a direct connect, set the levels appropriately, and voila (I doubled the image size for easier viewing):

cqk6hx

Not bad! Total distance: maybe 35 feet or so (blocked by two walls). After I was done, I realized that I actually don’t have an antenna hooked to my FT-817, so I suspect much greater ranges are capable. The BF-888S is basically operating as an FRS radio here (in fact, the BF-888S can be programmed to act operate on FRS frequencies) so even if you don’t have an amateur radio license, you could probably build a similar setup without a lot of hassle.

Fun.

The Baofeng BF-888S as an SSTV beacon?

March 7, 2014 | Amateur Radio | By: Mark VandeWettering

28-020-101Yesterday’s musings about SSTV using the Raspberry Pi has me thinking about creating a little SSTV beacon using the super-inexpensive (less than twenty dollars with charger) BF-888S HT from Baofeng. It’s hard to imagine a cheaper HT than this: it doesn’t even have a display. It has 16 channels, and announces which channel you are on with an (English or Chinese) voice. I used the open-source and free program CHIRP to program this with a set of useful frequencies in the FRS and amateur bands, and it seems to work pretty well.

But could I use it to make an SSTV beacon on UHF?

Seems pretty straightforward. I would just need a little bit of interface between the Pi and the BF-888S. Luckily, the Baofeng does seem to support VOX mode, so in principle just using a little 3.5mm jack should work just fine, but I think I’ll go to the trouble of adding an isolation transformer, a potentiometer to set the levels (probably just a little trim pot) and an AC blocking cap. In theory then I’d just need to play the wav file out, the VOX would pick up the sound and start transmitting. Voila!

One small bummer: the BF-888S does not have an external power jack. If you were going to install this in a permanent location, you’d probably have to rig up a 3.7v power supply to feed in through the battery terminals. Perhaps a good opportunity to 3D print something!

To make a fully functioning beacon, I think you just need to combine the “raspistill” program which can do frame grabs and save them as JPEGS with my “robot36” code which will convert them to wave files, and glue them together with some Python code. A rough prototype could probably be hacked together in an hour. Seems like fun!

Stay tuned.

Addendum: Here’s a link to the BF-888S on Amazon. $17.69! If you add a remote mic and the programming cable, it’ll set you back $31.34. You can find an attempt a the manual here. Many functions are enabled/disabled by holding down the MONI and PTT buttons while turning it on. For instance, tuning to channels 1-5 and doing so sets the VOX on or OFF (and sets the sensitivity, I think, more experimentation to come.)

Some thoughts on SSTV and the Raspberry Pi…

March 6, 2014 | Amateur Radio, Raspberry Pi | By: Mark VandeWettering

Screen Shot 2014-03-06 at 9.55.29 PMToday I found an interesting Instructable on running SSTV on the Raspberry Pi. It uses an interesting bit of software which uses the Pi to directly generate an FM signal. Strictly speaking, I doubt this is a great idea without some outboard harmonic filtering, but it’s cool that it could be done.

I recalled that a while ago I wrote an encoder for the Robot36 SSTV mode. I wondered how efficient it was: could it be used to construct a nice Raspberry Pi SSTV beacon? I transferred it over, installed the necessary dependencies (the jpeg library and libsndfile1) and timed it. Eek. 18 seconds to encode image. That seemed excessive, so I set about figuring out why it was slow.

It didn’t take me to long to discover that the vast majority of time was spent in the libsndfile library. That was in no small part because I used it to write individual floating point samples, one at a time. I hypothesized that if I buffered up a bunch of samples, it would be better. So, I coded it up quickly, and voila: it now can decode a jpeg and create the resulting wav file in just 1.878 seconds. Awesome. Playing the wav file back into Multiscan (an OS-X SSTV program) resulted in just the image I wanted.

It should be pretty easy to modify this script to read directly from the Raspberry Pi camera and send it directly to the sound card. A little bit of interfacing to an HT, and I should have an SSTV beacon ready to go. Stay tuned.

Puppet Making, and Mathematics…

March 2, 2014 | Arts and Crafts, Puppets | By: Mark VandeWettering

I’ve been taking a puppet making class, and I must admit, it’s been a lot of fun. Too much fun, in fact. I’ve been thinking about puppet making, watching puppet making videos, and scouring the web for inspiration and guidance.

To date, I’ve only completed one puppet (his name is Gerfil, and he may still acquire eyes), so I have a lot to learn, but it’s fascinating.

Gerfil is a pretty ordinary hand puppet, but has a shape which is more refined than many of the simple arts and crafts patterns you can see on line. But I got fascinated by the process of pattern making. Digging around, I discovered this nifty video.

I rather liked the spherical head, but thought that it was a little odd that he disassembled a baseball cap to generate the pattern. The mathematician in me thought that it must be possible to generate a similar pattern using, well, mathematics. I began by considering a couple of basic design criteria. The top of the head would be a hemisphere, divided into six identical gussets. I decided to settle on an eight inch diameter head, which means that the total circumference is about 25 1/8 inches around. Since all six gussets are identical, it makes the base of each triangular gusset a little over 4 inches across the base. I set the height to be the circumference divided by four, or a little over six inches. But then the question became how to draw the curve connecting the base to the apex of this triangle.

I decided to test a few ideas, and then print them out on paper to see how well they worked. I suspect that the ideas I used to generate this pattern are simply not quite right, but they aren’t hugely off. The sides are defined by a simple quadratic bezier, set to establish the tangent at the base to be a right angle, and the apex of the triangle to have a sixty degree angle.

The result looked like:

sector

Cutting them out, and taping them together resulted in this:

photo (4)

It’s not bad, but it’s not great either. I suspect that if it was rendered in foam, it would be a bit better, as the foam is both compressible and stretchable. I suspect that to really do the job right, I’d need to simulate that more directly, and use real optimization techniques. But I did this while watching the Oscars (I’ve got 11 right so far) which means I can’t concentrate enough to pull off harder math. I’ll think about it more and try again in the next few days.

Addendum: Here’s a nice puppet pattern with some construction tips.

Products of Primes and the Primorial Function…

February 26, 2014 | Math | By: Mark VandeWettering

A friend of mine was working on a programming exercise, and it turns it out was based on a chunk of math which I thought I should have seen before, but either have not seen or have forgotten. It’s basically that the products of all primes less than some number n is less than or equal to en and in the limit converges to precisely en. First of all, I wrote a chunk of code to test it out, at least for primes less than a million. Here’s the code I wrote (I swiped my rather bizarre looking prime sieve code from a previous experiment with different sieving algorithms):

[sourcecode lang=”python”]
from random import randint
from math import sqrt, ceil, floor, log
import time
import sys
from math import *

def sieveOfErat(end):
if end < 2: return []

#The array doesn’t need to include even numbers
lng = ((end/2)-1+end%2)

# Create array and assume all numbers in array are prime
sieve = [True]*(lng+1)

# In the following code, you’re going to see some funky
# bit shifting and stuff, this is just transforming i and j
# so that they represent the proper elements in the array

# Only go up to square root of the end
for i in range(int(sqrt(end)) >> 1):

# Skip numbers that aren’t marked as prime
if not sieve[i]: continue

# Unmark all multiples of i, starting at i**2
for j in range( (i*(i + 3) << 1) + 3, lng, (i << 1) + 3):
sieve[j] = False

# Don’t forget 2!
primes = [2]

# Gather all the primes into a list, leaving out the composite numbers
primes.extend([(i << 1) + 3 for i in range(lng) if sieve[i]])

return primes

sum = 0.
for p in sieveOfErat(1000000):
sum += log(p)
print p, sum/p
[/sourcecode]

Most of the code is just the sieve. In the end, instead of taking a very large product, we instead take the logarithm of both sides. This means that the sum of the logs should be nearly equal to n. The program prints out the value of the prime, and how sum compares to the value of p. Here’s a quick graph of the results:

sieve

Note, it’s not monotonically increasing, but it does appear to be converging. You can run this for higher and higher values and it does appear to be converging to 1.

This seems like a rather remarkable thing to me. The relationship between e and primes seems (to me) completely unobvious, I wouldn’t have any idea how to go about proving such a thing. A quick search on Wikipedia reveals this page on the primorial function but similarly gives little insight. Recalling Stirling’s approximation for ordinary factorials suggests that these large products are related to exponentials (Stirling’s approximation not only has a factor of e in it, but also the square root of two times pi as well), but the idea that the product of primes would precisely mimic powers of e seems deeply mysterious…

Any math geniuses out there care to point me at a (hopefully simple) explanation of why this might be? Or is the explanation far from simple?

The Minima — A General Coverage Transceiver

February 15, 2014 | Amateur Radio | By: Mark VandeWettering

A while ago, Bill Meara from Soldersmoke brought Ashar Farhan’s new design, the Minima to my attention. The Minima is a general coverage transceiver which has a lot of cool features. It’s a superhet design which is Arduino based (actually, it incorporates a bare bones Arduino, which is little more than an Atmel ATMega328 chip.) Farhan is the designer of the popular BitX design, and this design has a lot of cool features, and yet seems rather straightforward.

Some versions of this are beginning to appear in the wild. Mark, G0MGX seems to have done the best at documenting his build on his blog. Here’s his video demonstrating the receiver:


Raspberry Pi Camera NoIR…

February 10, 2014 | Raspberry Pi | By: Mark VandeWettering

I’ve been playing around with the Raspberry Pi Camera for a number of different purposes, but one thing is pretty apparent right off: while the quality overall is quite good, it’s not very good in low light. Because at least part of my potential application is watching the night-time activities of wildlife (most likely my cat, but perhaps including foxes that cruse around yard) I decided to order the version of the Raspberry Pi Camera which had no IR blocking filter, called the Raspberry Pi NoIR. It arrived today, and at the same time I ordered an inexpensive IR illuminator to serve as a light source. Addendum: The illuminator died after less than 12 hours of use. Do not buy this one. It’s rubbish.

It arrived today!

Out with the old camera, in with the new, power on the illuminator (if you order the same one, note that it does not come with a wall-wart to power it) and voila:

Screen Shot 2014-02-10 at 8.35.00 PM

Scrappy Cam!

Okay, a couple of quick notes. The illuminator is just not that strong. Here, the illuminator was a little under five feet from the the couch. For stuff that is more distant, it’s clear that the illuminator just isn’t good enough to reach into the corners of the room. Check out…

Screen Shot 2014-02-10 at 8.33.32 PM

You can see me standing to the side. Obviously, the color balance is all wonky, it’s going from magenta to purple. The frame rate is still quite low, which in my streaming application manifests itself as a pretty long delay. Still, seems pretty cool! More experiments soon…

Streaming Video From the Raspberry Pi Camera…

February 6, 2014 | Raspberry Pi | By: Mark VandeWettering

First of all, let me get this off my chest: video over the web is a hideous Tower of Babel.

With that basic complaint, let me start by saying that this project started with a Raspberry Pi and the Raspberry Pi Camera. Previously, I had used the Pi with a USB webcam and had connected it to my wireless router and run the “motion” program to serve as a kind of cat cam. But to be honest, I wasn’t really very happy with the results. The videos it recorded were low frame rate. The quality of the camera was pretty low. It was good enough to allow me to monitor my cat while I was on vacation, and have some assurance that he was still alive, but it left something to be desired.

After picking up some new $8.88 TP-Link Wifi dongles, I decided to see what else I could do. The trick with making this work was trying to find a way to leverage the video compression hardware that already runs on the raspberry pi, and to do as little as possible to it, but still allow it to be streamed to standard web browsers and devices.

I briefly went through experimenting with mjpegstreamer which works, but didn’t really offer the quality that I was after.

Then, I stumbled on this great article on using nginx-rtmp to stream live video from the Raspberry Pi. It looked like just what I wanted. It took me an evening (mostly spent waiting for nginx and ffmpeg to recompile) but I have it working now. Check it out:

Screen Shot 2014-02-06 at 8.56.16 AM

I’m currently able to stream 720×486 wide video at 25fps directly from the Pi at around 25fps, using somewhere around 13% of the available cpu on the Pi. It can be accessed by both desktop browsers and my iPad/iPhone. Seems really good!

With a couple of caveats. Remember that Tower of Babel I mentioned? Yeah, that. To stream to desktop browsers, they must run Flash. That is because nginx-rtmp uses RTMP, which is a proprietary streaming video protocol. But, I’m sure you say “how does this work on the iPad/iPhone?” The answer is it uses a different protocol for those devices, the HTTP Live Streaming protocol, which is also transparently supported by the RTMP server. Why can’t you just use HLS on the desktop? Because most desktop browsers don’t support HLS. Sigh. HLS also has increased latency compared to the RTMP protocol.

Sigh.

But anyway, it works! I’m awaiting the arrival of an Raspberry Pi camera with the IR filter removed and an IR illuminator, and I’ll be doing more experiments. I’ll maybe write up more explicit instructions for this when i get the entire thing working. If anyone wants to give this a try and has trouble, don’t hesitate to sing out with questions.

An $8.88 WiFi adapter for my Raspberry Pi…

February 2, 2014 | Raspberry Pi | By: Mark VandeWettering

g1I was out running errands the other day, and found myself at Fry’s Electronics. I needed to pick up a VGA extension cable to replace one that had inexplicably become bad, and as I often do while wandering around, found myself doing a bit of window shopping. (Not Windows shopping, I’ve had enough of that.)

While doing so, I found myself staring at a variety of wireless network dongles, including the exceptionally tiny TP-Link WN725N for a mere $8.88. I wondered if it might be a good match to a couple of the network-less Raspberry Pis that I had lying around. A little of judicious searching on my phone indicated that some people had used them for this purpose, and that they worked well even without a hub, so I bought two of them and brought them home.

I was hopeful that if I just jammed them in, they would be detected automatically and then a short bit of network config later, I’d have a working adapter. Sadly, it did not go that smoothly. It appears that while v1 of the hardware worked out of the box with Raspbian, the v2 hardware (which I had) does not. So, the google search begins…

Ill skip to the end, so you won’t have to do the search. Go to this website, it has all the information. Basically, you have to find the right version of the kernel model to match your version, and install it in the right place, and rerun depmod -a. They even have a link to a script that can find the right version to download. Once I got the driver installed, I had no further issues. The dongle appears to work quite well, and my raspberry pi no longer has a tail connecting it to my router. Awesome! I haven’t stress tested it, but it appears to work as well as any other adapter I’ve tried. I consider the experiment a success.

JT65/JT9 not impervious to false positives…

January 20, 2014 | Amateur Radio | By: Mark VandeWettering

I haven’t had a lot of time to operate JT65/JT9, my preferred digital mode at the moment, but I often leave my receiver hooked up and monitoring the bands for reception reports. My wet-noodle of an antenna can usually pull in signals from about 40 different counties in the span of a week of monitoring. I usually leave it running on 40m during the night, and 20m during the day. Sometimes I’ll toss in 15m just to see what’s going on. Here’s a screengrab of the last 24 hours, for instance:

full

If you want, you can go to the PSKReporter website and enter my callsign K6HX (or any other) and get a live report. In this map, the blue dots are signals that I received on 40m, the yellow ones are 20m, and the brownish ones are for 15m. If you look at these regularly, and over time, you can begin to get some idea of how propagation works by frequency and by time of day.

But look at that map closely, in particularly in the area up above Scandanavia, you should see a single yellow mark well above the Artic circle. A little poking indicates that this was for the rather unusual callsign JW4BHO, which comes from Svalbard. I’d never seen a radio spot from there, which is always exciting. I looked up JW4BHO on the callsign database on QRZ.com, and I felt a bit sadder. His callsign wasn’t registered: not a good sign. I also did a db search on PSKReporter to see if anyone else had spotted him. No one else had. Rats.

One thing bothered me though: the callsign and the marked for the reception report matched. JT65/JT9 signals both encode the Maidenhead gridsquare to indicate the position of the transmitter. If this was just random noise, then how did the location and the callsign match? That seemed very unlikely by chance.

Luckily, I still had WSJT-X up, and could scroll back and look at the reception report:

crop

Here you can see that WSJT-X reported a signal from JW4BHO to T07NAA from gridsquare OQ65, at a SNR of just -17. -17 isn’t a particularly weak signal, which surprised me a little, but the reception report is obviously bogus. T07 doesn’t even refer to a valid country. But somewhat oddly, the gridsquare OQ65 isn’t even the gridsquare marked on the map. For some reason, the PSKReporter website has decided to substitute a generic square marking the center of the country instead of using the actual gridsquare marked in the reception report. That seems odd to me.

And this isn’t the first time it happened to me, I’ve seen it a couple of times over the last month, including a fictious spot from Somalia.

Has anyone else had this problem?

On Computer Chess, including Stockfish and SmallFish

January 13, 2014 | Computer Chess, Computer Games, My Projects | By: Mark VandeWettering

Off and on I’ve been pondering some changes to my computer checkers program called Milhouse. Most of these changes have relatively little to do with checkers per se, but are just changes to the algorithms that are common to nearly all game-tree search programs. Since computer chess has always been more popular than computer checkers, that means I’m reviewing a lot of chess programs and papers on chess.

Years ago when I started milhouse, the open source chess programs that I knew about were basically gnuchess (which has gone through a bunch of different versions, including some complete changes of the underlying chess engine) and Bob Hyatt’s Crafty. Bob is a veteran of computer chess, having written the famous program Cray Blitz which one several ACM chess events, and two World Computer Chess Championships. Crafty is very cool, and can obviously play chess at a much higher level than I ever aspire to.

But it turns out that in the last few years, chess engines continue to get better. Like a lot better. The top ranked computer programs now have ELO rankings of around 3200. By way of perspective, Gary Kasparov was the first human to break the 2800 barrier in 1989. A 400 point difference between (say) Houdini and Gary Kasparov means that we’d expect Houdini to win 92% of all games between the two. (You can find some some ratings for current chess engines here)
Poor old Crafty, ranked 600 points below at around 2621 (with 2 cpus) would probably struggle to win one game out of 100.

I find this fascinating: it’s clear that modern chess engines are plumbing depths of chess knowledge which have been beyond human understanding, and that the difference between the best human play and what is achievable by “God’s algorithm” is still pretty broad.

Anyway…

During this, I found out a few things.

First, the latest version of GNUchess is based upon the Fruit engine, and that it is probably at least in the same league as Crafty, which it wasn’t before. So, if you were dissatisfied with the old versions of GNUchess, revisiting it might be a good thing to do.

Second, a very competitive engine called Stockfish was available. The multi-cpu versions of Stockfish are very near the top performers on every ranking list I could fine, and probably represent more chess knowledge than you could ever home to find.

Third, and perhaps what is cooler, is that you can get nice IOS versions of chess programs that use Stockfish, with cool interfaces! Download versions for IOS, Android, or get the source code!, and it’s free on the iPad/iPhone. Very, very nice. I particularly like that the app includes the ability to mail the log of completed games, so you can use other programs to analyze your play.

But perhaps you are thinking: “I don’t need the best chess engine in the world, I’m just an average player, and being crushed repeatedly doesn’t help me enjoy the game.” Well, then you can definitely try out SmallFish. SmallFish uses the same powerful insides as Stockfish, but it’s wrapped in a friendly wrapper that allows you to tone it down. In fact, I found it’s default “average” difficulty level to be a bit too easy for me to beat. Here’s the log from a game I played over lunch, where I easily crushed it. I let Crafty provide an annotation to the game, so I could find out how many blunders it made. The answer appears to be about 4x as many as I made, and often quite serious ones. I’ll have to tune it up (probably to ELO 1600 or so) to keep me on my toes.

[Event "?"]
[Site "Pixar Atrium"]
[Date "Jan 13, 2014"]
[Round "1"]
[White "Mark"]
[WhiteElo ""]
[Black "Average"]
[BlackElo "1200"]
[Result "1-0"]
[Annotator "Crafty v23.4"]
{annotating both black and white moves.}
{using a scoring margin of +1.00 pawns.}
{search time limit is 10.00}

  1.      d4     Nf6
  2.     Nf3      d5
  3.      e3     Bf5
  4.     Bd3    Bxd3
  5.    Qxd3     Nc6
  6.     O-O      a6
  7.     Bd2      e6
  8.      c4     Be7
  9.     Nc3     Nb4
 10.     Qe2    dxc4
 11.    Qxc4     Nc6
 12.      a3     O-O
 13.      e4     Qd7
 14.    Rad1    Rfe8
 15.     Bf4     Bf8
 16.     Ne5     Na5
 17.    Nxd7    Nxc4
 18.    Nxf8     Nh5
                ({18:+1.99}  18. ... Nh5 19. Nxe6 fxe6 20. Bc1 Nf6 21. e5 Nd5 22. Nxd5 exd5 23. Rfe1 Re6 24. b3 Na5 25. Rd3 Rf8 26. Bg5 Nc6 27. Rc3 $18)
                ({18:+0.35}  18. ... Kxf8 19. a4 Nh5 20. Bc1 Rad8 21. e5 c5 22. dxc5 Nxe5 23. Ne4 Nd3 24. Nd6 Nxc1 25. Rxc1 Re7 26. Rfd1 Nf4 27. Rd2 $14)
 19.    Nxe6      c5
                ({18:+4.47}  19. ... c5 20. Nc7 Nxf4 21. Nxa8 Rxa8 22. dxc5 Nxb2 23. Rd7 Nc4 24. Rxb7 Nxa3 25. c6 Nc4 26. c7 Rc8 27. Rd1 Ne6 28. Rb8 $18)
                ({18:+2.02}  19. ... fxe6 20. Bc1 Rf8 21. f4 Rad8 22. e5 g6 23. d5 exd5 24. Nxd5 c6 25. Ne3 Rxd1 26. Nxd1 Rd8 27. Ne3 Nd2 28. Rd1 $18)
 20.     Nc7    Nxf4
 21.    Nxa8    Rxa8
 22.    dxc5      h6
 23.     Rd7     Rb8
 24.    Rfd1     Ne5
                ({21:+7.13}  24. ... Ne5 25. Rd8+ Rxd8 26. Rxd8+ Kh7 27. b4 Ne6 28. Rb8 a5 29. Rxb7 h5 30. f3 Nd8 31. Rb5 Nc4 32. c6 Nxc6 33. Rxh5+ Kg6 34. Rc5 N6e5 35. bxa5 f5 36. Nd5 fxe4 37. fxe4 Nxa3 $18)
                ({21:+4.95}  24. ... Ne6 25. Na4 g5 26. R7d5 Kh7 27. g3 g4 28. Rc1 Na5 29. Nb6 Nb3 30. Rc4 Re8 31. Nd7 Kg7 32. Kg2 Rc8 33. Ne5 Na5 34. Rb4 h5 $18)
 25.    Rd8+    Rxd8
 26.   Rxd8+     Kh7
 27.      b4      h5
 28.     Rb8      h4
 29.    Rxb7     Nc6
 30.    Rxf7     Nh5
                ({22:+12.07}  30. ... Nh5 31. Rc7 Nd4 32. c6 Ne6 33. Rf7 h3 34. gxh3 Kh8 35. c7 Nxc7 36. Rxc7 Nf4 37. Rc6 g5 38. Rxa6 Nxh3+ 39. Kg2 Nf4+ 40. Kf3 Nd3 41. Re6 Ne1+ 42. Ke2 Nc2 $18)
                ({22:+9.96}  30. ... Ng6 31. Rc7 Nd4 32. Ra7 Nf4 33. Rxa6 h3 34. gxh3 Nde6 35. Rd6 Nxh3+ 36. Kg2 Nhg5 37. Rb6 Nf4+ 38. Kg3 Nge6 39. Ra6 Kg8 40. Nd5 g5 41. Nxf4 gxf4+ 42. Kf3 Kf7 $18)
 31.      e5
                ({23:+10.21}  31. e5 Kh6 32. Rd7 Kg5 33. Rd6 Ne7 34. c6 Nf4 35. c7 Kf5 36. Rxa6 Ne6 37. Nd5 Nc8 38. Ne3+ Kxe5 39. Ra8 Nd6 40. Re8 g5 41. Ng4+ Kf5 42. c8=Q Nxc8 43. Ne3+ Ke5 44. Rxc8 $18)
                ({24:+12.17}  31. Rc7 Nd4 32. c6 Ne6 33. Rf7 Kg8 34. c7 Nxc7 35. Rxc7 Nf4 36. Rc6 h3 37. gxh3 Kf7 38. Rxa6 g5 39. a4 Nxh3+ 40. Kf1 Nf4 41. b5 Ke7 42. Rc6 Kd7 43. Nd5 Nxd5 44. exd5 $18)

 31.     ...     Kh6
 32.      e6     Nf6
 33.      e7     Kh7
 34.    Rxf6    gxf6
                ({17:Mat09}  34. ... gxf6 35. e8=Q Ne5 36. c6 Nc4 37. Qf7+ Kh6 38. Qxf6+ Kh7 39. c7 Nb6 40. Qxb6 Kg7 41. c8=Q Kf7 42. Qd7+ Kf8 43. Qbd8# $18)
                ({21:+20.29}  34. ... Nxe7 35. Re6 Nf5 36. Ne4 Kg8 37. c6 Kf7 38. Ng5+ Kf8 39. c7 Ne7 40. Nh7+ Kf7 41. Rxe7+ Kxe7 42. c8=Q h3 43. Qf8+ Kd7 44. Qxg7+ Kd6 45. Qh6+ Ke7 46. Qxh3 Kf7 47. Qd7+ Kg6 48. Qd3+ Kg7 $18)
 35.    e8=Q     Ne5
 36.      c6      a5
 37.    bxa5
                ({11:+30.34}  37. bxa5 Nxc6 38. Qxc6 Kg6 39. a6 h3 40. a7 hxg2 41. a8=Q Kf7 42. Qae8+ Kg7 $18)
                ({11:Mat06}  37. c7 Kh6 38. c8=Q Kg5 39. Qg8+ Kh6 40. Qf5 Nf3+ 41. gxf3 axb4 42. Qh8# $18)

 37.     ...    Nxc6
 38.    Qxc6     Kh6
 39.   Qxf6+     Kh7
 40.     Ne4      h3
 41.    gxh3
                ({5:+23.89}  41. gxh3 Kg8 42. Qd8+ Kh7 43. Nf6+ Kg6 44. Ng8 $18)
                ({5:Mat03}  41. Ng5+ Kg8 42. Qf7+ Kh8 43. Qf8# $18)

 41.     ...     Kg8
 42.     Nd6     Kh7
 43.     Nf5     Kg8
 44.    Qg7#
       1-0 

Both programs are free and highly recommended.

IRLP/Echolink. Raspberry Pi. Baofeng. Cheap.

January 7, 2014 | Amateur Radio | By: Mark VandeWettering

I love cheap hacks and cheap gadgets. Don’t get me wrong: I also like the expensive good stuff, but if you don’t have a clear idea of what you want and need, spending a lot of money on gadgets just isn’t in the cards. But if the gadgets are cheap enough, experimentation becomes possible for money that would normally by you pizza.

Today’s musings came about by thinking about:
1. The Raspberry Pi ($35, and I have some already)
2. The Baofeng BF-888S, a single band HT that costs less than twenty bucks on Amazon

The question I had was: could I setup some kind of inexpensive simplex VOIP node (in ham radio we use Echolink and/or IRLP most commonl) that could use these two items? I live in the bottom of a small valley, and my coverage to nearby repeaters isn’t great. It would be kind of cool to make a little mini-node to allow radios in the
valley, and hop via the internet out to the broader world. And of course, when you look, you find:

KP4TR’s great site which seems like what I want.

I’ve bookmarked this hear for future exploration.

Combinations…

January 4, 2014 | Games and Diversions, Math | By: Mark VandeWettering

This is a math/geeky/computer post of something relatively simple, but it arose in the wild in a program that I wrote several years ago, and when I saw it again, it confused me, and I spent a bit of time thinking about it, and I thought I might just write it up. If math/geeky/computer stuff bores you, perhaps you should move on.

If I’ve still got you, today’s post is about combinations, a topic that arises in lots and lots of computer programs. For instance, the program that spawned this post was this program for computing the number of possible positions in a game of checkers that I did back in 2009. It uses a function called “comb” which takes two arguments a and b, which computes the number of different ways of selecting b objects from a collection of a objects. Here’s the implementation from that post:

[sourcecode lang=”python”]
def fact(n):
if n == 0:
return 1
else:
return n*fact(n-1)

def comb(a, b):
return fact(a) / (fact(b)*fact(a-b))
[/sourcecode]

If you’ve done a lot of programming, this probably seems fairly obvious to you. This is one of those formulas that I don’t have to think about: I learned it so long ago that I don’t even remember how I originally learned it. It might have been when I first learned about Pascal’s Triangle back in grade school. I probably learned the formula to compute these coefficients using the factorial function, and I’ve probably used it dozens and dozens of times in various contexts. But really, when I thought about it, the factorial function doesn’t seem to me to be completely obvious when staring at the triangle. When I first learned about Pascal’s triangle, the rules were something like this. First, write down a at the top, then write a bunch of rows underneath it, each row containing one more number so they form a triangle. The first and last number in each row needs to be a one. The other entries are the sum of the numbers above and to the left and above and to the right. If you think of the number of path starting at the root, and reaching the desired new node, it’s clear that it’s the sum of the number of paths reaching the node above and to the left, and above and to the right.

Pascal's Triangle

Pascal’s Triangle

Which brings me to a different chunk of code. In the posting above, I had mentioned that I had written a program to compute the number of possible checkers positions before, but had lost the code, causing me to write the code above. Butr recently I found that original code. But this code didn’t contain the factorial/comb implementation above. It had code that looked like this.

[sourcecode lang=”python”]
def c(a, b):
if b == 0 or b == a:
return 1
r = c(a-1, b-1) + c(a-1, b)
return r
[/sourcecode]

At first, this seemed less familiar to me. But if you think about Pascal’s triangle, this is exactly what I described above. If you think of trying to compute the bth number in the ath row, it’s just the sum of the numbers in the row above, to the left and right.

And this works! If you compute c(52, 5), you can verify that there are 2598960 ways to deal a 5 card poker hand from a single deck. In a way, this code seems more elegant to me: what was with all that multiplication and division stuff up above? But there is a problem: performance.

A moment’s thought should reveal why that should be the case. This code only returns 1, or the sum of two other terms. That means to come up with the 2598960, it bottoms out that recursion… 2598960 times. Modern computers can count that high, even by ones, even in python rather quickly. It took about 1.4s to compute. But to compute c(52, 6) takes about 7 times longer (because the number is roughly 7x larger). Computing c(52,13) is out of the question with that code.

But my original program computed the number of combinations this way, and was reasonably efficient. What gives?

Well, I lied. The code in my npos program wasn’t exactly like that. Here’s the complete code:

[sourcecode lang=”python”]
#!/usr/bin/env python
#
# some programs to compute the number of legal positions in checkers
#

import locale

locale.setlocale(locale.LC_ALL, "")

mem = {}

def c(a, b):
if b == 0 or b == a:
return 1
if mem.has_key((a, b)):
return mem[(a, b)]
r = c(a-1, b-1) + c(a-1, b)
mem[(a, b)] = r
return r

def num(b, bk, w, wk, f):
r = c(4,f)*c(24,b-f)*c(28-(b-f),w)*c(32-b-w,bk)*c(32-b-w-bk,wk)
return r

def np(n):
total = 0
for b in range(min(n, 12)+1):
for bk in range(min(n, 12)-b+1):
for w in range(min(n-b-bk, 12)+1):
for wk in range(min(n-b-bk, 12)-w+1):
for f in range(min(b, 4)+1):
total += num(b, bk, w, wk, f)
return total – 1

tot = {}

for n in range(25):
tot[n] = np(n)

maxnew, maxtot = 0, 2**64-1
for n in range(1, 25):
new = tot[n] – tot[n-1]
newstr = locale.format("%d", new, True)
totstr = locale.format("%d", tot[n], True)
maxnew = max(maxnew, len(newstr))
maxtot = max(maxtot, len(totstr))

print " N%s" % "possible positions".center(maxnew)
print (maxnew+3)* ‘-‘
for n in range(1, 25):
new = tot[n] – tot[n-1]
newstr = locale.format("%d", new, True)
print "%2d %s" % (n, newstr.rjust(maxnew))
print (maxnew+3)* ‘-‘
totstr = locale.format("%d", tot[24], True)
[/sourcecode]

Can you spot the difference? The c function is memoized. The vast majority of invocations of the function have been evaluated once before. So, this code remembers the value of each invocation, and before computing, looks up the result to see if we’ve computed it before. An obvious way to implement this lookup would be as a two dimensional array, but Python’s dictionary types are quick and easy. When the program is run, it stores stores 306 values. With this added, the entire program, which counts 500,995,484,682,338,672,639 positions executes in just about 1 second on my laptop. And while it does rely on bignum arithmetic, it doesn’t require multiplication or division: just addition works fine.

I like it.