I’ve had my Creality CR-10 for quite some time, and fairly early on I decided that I needed a bed leveling sensor. It wasn’t just because it was difficult to level the bed. The bed itself isn’t anywhere close to flat. Since the printer doesn’t know that, you have all sorts of problems with adhesion. To be honest, I’m not 100% certain I understand what math the bed leveling sensor does (it’s been on my list to understand). Let’s say that the bed has a 0.1mm crown in the center. Does this make the printer lay down a first layer which is 0.1mm thinner in the center? Or does it distort the print so that the first layer actually follows that contour and maintain a constant layer height?
I don’t know, but for now I don’t care. I just wanted it to work better when laying down the first layer to make sure that it stuck.
So I ordered the easiest bed level sensor solution I could find: the EZABL from TH3D. It’s not super cheap, but it’s convenient and didn’t require any soldering. They also have a version of the Marlin firmware available (the TH3D Unified Firmware) for download which is simple to configure for a wide variety of printers and directly supports their hardware.
And it works… okay.
About 9 times out of 10 I’ll get a good first layer. But every once in a while, the calibration will be twitchy, and something bad will happen. I think that ultimately it boils down to lack of repeatability. The sensor is a non-contact capacitive sensor and it appears to me (without scientific testing, and no slander intended) that the repeatability of probing (especially if I haven’t let the sensor heat up for quite a while) is pretty low. I’ll probably investigate that further, but in the mean time I thought it might be worthwhile to consider using a different type of sensor entirely: namely, a BLTouch, which uses a contact sensor. This has the advantage that whether I print on the aluminum bed, on tape, or on mirror tile I usually do, it will sense the actual surface that I’m printing on. That seems good to me, and the BLTouch has been pretty well regarded.
So I ordered one. Not super cheap either. You can get cheap clones on AliExpress, but I didn’t feel like waiting. With Prime I received mine yesterday.
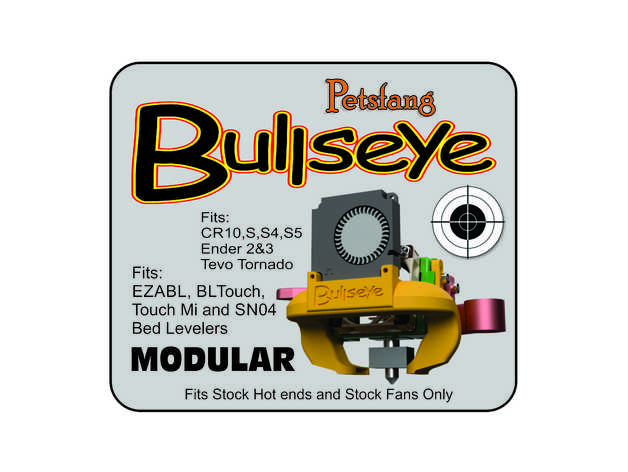
So, I started thinking about installing it. I knew that I’d need a different mounting to put it on my printer. I had been using the PetsFang duct with the EZABL, so I thought about printing another one, but I noticed that they had updated a new design called the “Bullseye” which seemed to fix a few mechanical issues that I didn’t especially like with the original. It was also a modular design that enabled me to print holders for either the EZABL or the BLTouch, so that seemed like a good thing. I downloaded the parts and it took about six or seven hours to print all the parts.
Now, onto firmware and wiring…
And here’s where this project turned into a bit more of a headache than I would like. In a previous posting, I complained that the MELZI motherboard in the CR-10 used an ATmega1280 which has just 128K of flash. As it happens, the firmware that they’ve jammed into the CR-10 is really close to the limit. Thus, when you add new features to the firmware, you are often playing a game of “what features do I enable or disable to get it to fit.” This game is annoying. When I was using the TH3D Unified Firmware, they had done a lot of the work already, but the BLTouch is not (or badly) supported by recent versions of their firmware. The stock Marlin is a bit of a rats nest though, and while it does use platformio to compile (which I love), getting the configuration options set up properly is not a lot of fun.
But it gets worse…
The BLTouch sensor has basically five pins which need to be wired to it, and the MELZI motherboard doesn’t direct support for it. The usual solution is to hijack the pin that provides the buzzer sound (pin 27) and hijack it to control the BLTouch. This requires a bit of wire snipping and soldering, or you could use a board which looks like this:
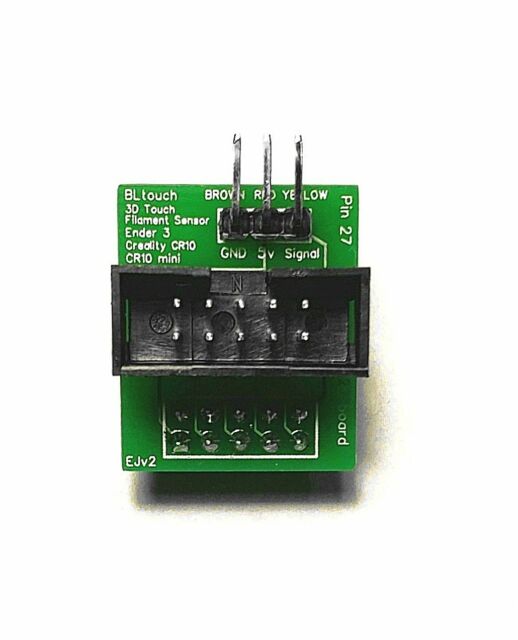
It’s a dumb little board whose purpose is to inject itself between the the connector for the display and the motherboard, and then breaks out the right pin to the side where you can easily attach the BLTouch. It’s got no active components on it at all: just a 10 pin IDC socket, with 10 header pins on the bottom and three 90 degree header pins on the side.
And they sell for a ridiculous amount of money (one seller on Amazon charges $20 for this little adapter board.) Absolutely insane. I’m pondering spending an afternoon to dust off my meager KiCad skills, draw up a quick PCB board, and have a bunch made by JLC PCB, as well as making the Gerber files made available so you can make your own. Stay tuned for that.
And I’ve found it difficult to find instructions that compile a reasonable version of Marlin for such a configuration. If I get time this weekend, I’ll try to work my way through it and document it so that any humble reader who stumbles across this can make one for himself.
Okay, that’s it for 3D printing this weekend. Have fun melting plastic.