Yearly Archives: 2012

Happy Birthday Alan Turing…

Today would have marked the 100th birthday of Alan Turing. Turing’s contributions in artificial intelligence and computing alone would have guaranteed his place among the greatest thinkers of the 20th century, but that was only a small part of his genius. His pioneering work on cryptography at Bletchley Park allowed the British to crack the German Enigma code, with the likely result of shortening the war by years, saving millions of lives. Tragically, he was persecuted for his homosexuality, and committed suicide before his 42nd birthday. The savior of millions could not find acceptance in the society he helped preserve.

In a 2009 official apology from the British government:

Thousands of people have come together to demand justice for Alan Turing and recognition of the appalling way he was treated. While Turing was dealt with under the law of the time and we can’t put the clock back, his treatment was of course utterly unfair and I am pleased to have the chance to say how deeply sorry I and we all are for what happened to him … So on behalf of the British government, and all those who live freely thanks to Alan’s work I am very proud to say: we’re sorry, you deserved so much better.
Prime Minister Gordon Brown, 2009

Amen. Happy Birthday, Alan.

Adapting a webcam for telescope use…

Over the last few weeks, I’ve been a bit more intrigued by one of my old interests: telescopes and astrophotography. During the transit of Venus, I hooked up an old black and white video camera, and tried to take some snapshots, but wasn’t really pleased with the results. So, I decided to try to adapt a webcam for telescope use. A bit of research online said that the Microsoft Lifecam Cinema HD was a good choice, and an adapter was available that should make a nice, lightweight camera.

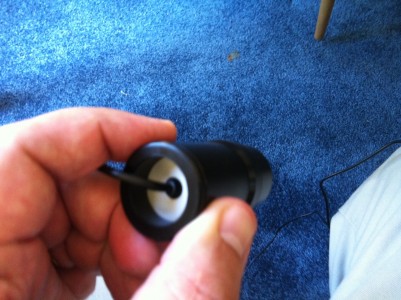
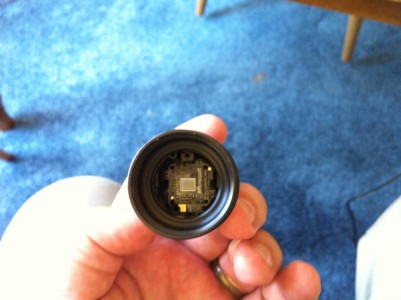
The Microsoft Lifecam Cinema HD is very small, nearly ideal package, but you do have to do some modifications to get it into the barrel and adapt it for telescope use. You can find some of the rough instructions here: you need to disassemble the camera, remove the button and microphone, and then get rid of the lens and IR filter. When you are done, you reassemble it, and it slides into the Billet Parts adapter just as neat as you please and is held in place by an O-ring in front and the back screwing in the back. A very tidy package. Oh, and you probably want to get rid of the bright blue led that remains on the front panel. I took an Exacto knife and just cut it off.

Here are some pictures of the assembled package:


Here are a couple of the pictures I snapped from it after plugging it into a 6″ f/5 reflector I have, and aiming it by hand up the hill. Without a tripod, it wasn’t possible to focus it accurately, but it gives you an idea about what the capabilities are. The colors are wacky precisely because the IR filter of the camera was removed, and it’s a very bright and warm sunny day here.

Twigs on the hill about 100 feet away...

Leaves against the sky, again about 100 feet away

I’ll try to get it hooked up for some real imaging this weekend. Stay tuned.

A few more notes on the OpenBeacon…

A few days ago I wrote about my experience building the OpenBeacon, and Jason Mildrum, NT7S, it’s creator was nice enough to happen by my blog and leave a comment. In that original article, I said that the instructions were (and I quote) “barely adequate”. Jason asked (perhaps more politely than was truly deserved) what I meant and how he could make the instructions clearer so that someone could build the kit with greater confidence.

A very class act, I must say.

First, I should mention that I find no mistakes in the instructions. I built it as described, and it worked the very first time. I don’t think any experienced kit builder will have any difficulty getting the kit to work.

But I think instructions as they written make assembly a little less smooth than they could be. Here are my specific suggestions.

  • First, I thought it was odd that the BOM was the only place that you could find the component values. For instance, if you are marching down the component list, and you see you need to install Q4, you have to refer to a different document (in my video, you can see me hopping back and forth on my iPad) to find out what Q4 actually is. It really wouldn’t be that hard to expand each of these with the actual component value in line.
  • It would be nice to clarify the general way idea of how it’s going to be assembled. First the USB/Microcontroller. Then the oscillator. Then the power amp. Although I actually found it simpler to mount pretty much all the caps and resistors first, and then worry about the rest, but that’s nit picking. It would also be nice to have a diagram showing the components installed in each stage to help you navigate a bit easier and check for errors.
  • I built the kit while working from the BOM as it was displayed on my iPad, but I kind of like instructions that have a checklist that you can check off as you do each part. Helps keep me organized.
  • Link the schematic on the same page. At one point I powered on the microcontroller, and D7 wasn’t lit. I consulted the schematic, and then realized that it was driven by the 2N7000, which I had forgotten to install. It would be nice to have that handy.
  • The troubleshooting page is linked from the top of the page, which isn’t typically where you need it (put a link at each place where you make a check perhaps). When a check fails, you won’t have to search for where to go.

For all that, I’m nitpicking: I shouldn’t have used the words “barely adequate”. They are entirely adequate, just not as conveniently organized as I would like. I think a section describing a calibration procedure for the WSPR mode might be nice too.

My OpenBeacon is off the air until next week, but expect it back shortly, in a more temperature-controlled enclosure. And thanks to Jason for the cool kit.

Still from a video snap of the Venus Transit

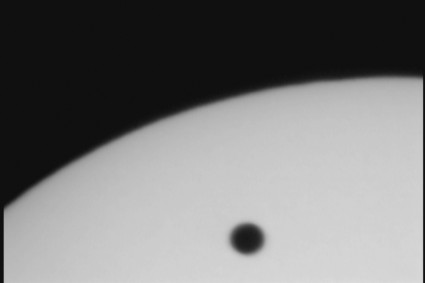
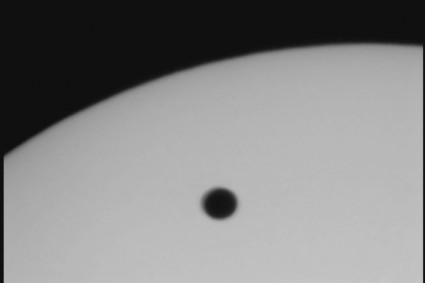
I did try to take some video of the transit, but the higher magnification created by the rather small imager in the video camera, combined with too much AGC and a lot of wind buffeting didn’t make for very interesting imagery compared to the surprisingly excellent iphone snaps I had before. But just to give you an idea of what they look like, here are a couple of snaps…

Shot with my P23C video camera from Supercircuits...

Another, nearly identical image... same setup.

About all these are good for is judging the relative apparent size of the sun with Venus. But it was a fun outing.

iPhone photos of the Venus transit…

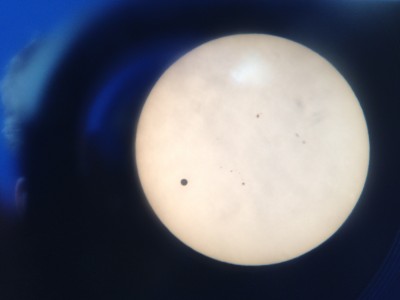
Yesterday, I setup my Meade ETX-90 outside with a solar filter in the courtyard between buildings at work so that my coworkers could have a glimpse of this rather rare astronomical event. I had a pretty steady stream of people coming out to have a peek throughout the day. I managed to shoot some video of it as an experiment, but again, wind buffeting and the like made focus difficult and the overall image was pretty bouncy.

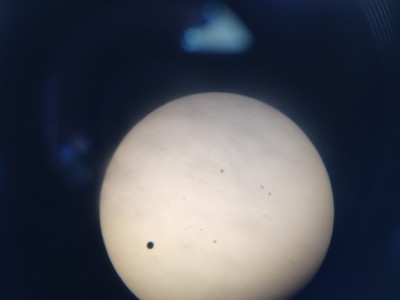
But David Munier, one of my coworkers spent a few minutes clicking away by holding his iPhone at the eyepiece, and came away with these two awesome pictures! Very, very nice! I normally call this style of astrophotography “ghetto astrophotography”, but I think these are good enough to just call them astrophotographs.

Not bad, for an iPhone!

Even better! Great job, Dave!

The blue blobs are light flare from reflections near the eyepiece, but they look kind of cool!

I’ve got some more photos and stuff that I’ll try to get up shortly, but until then, enjoy!

First reception report for the K6HX OpenBeacon…

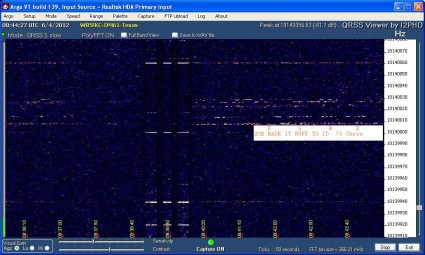
The honor goes to Chris, WB5FKC. Chris and I exchanged signal reports occasionally back when I last was on the QRSS kick a couple of years ago, so it was nice and fitting that he was the first to spot me again. The signal is pretty rocky, but the power level here is just 100mw, which is just 1/50th the power of the previous 5W that I commonly used for QRSS back then.

I don’t know if I could have spotted this, but here is the screen grab that Chris sent me:

First spot!

I thought I would be transmitting about 35hz lower than is shown here. I’ll have to look into that more.

Thanks Chris, and good to be heard by you again, OM! 🙂

My OpenBeacon is on the air…

Sometime last week, I got my Etherkit OpenBeacon kit in the mail. Like many of my projects, it was probably destined to sit on the shelf for some time, but in a fit of personal productivity (for a loose definition of productivity) this week I cleared a few hours of my time and got it assembled, and now is on the air with the cloud warming power of 100mw. I positioned it’s signal in the middle of a bunch of QRSS signals as received by my IC-735, so it should be within the QRSS sub-band on 30m, but my IC-735 itself is rather poorly calibrated (off by 150 Hz or so) so I’m not as yet certain of it’s exact frequency. But it should be in the ballpark. I’d love to here from anyone who hears it and can provide a signal report. It’s currently sending DFCW3.

But I got ahead of myself. About the kit: it is a very nice PC board, well laid out and not too cramped. All components are traditional through-hole. It requires that you wind three toroidal coils: two ordinary ones with sixteen turns, and one bifilar transformer of ten turns. If you haven’t wound coils before (and I’ve only wound a few) you probably will find that the most daunting part of the construction.

The instructions are.. well… I’d characterize them as barely adequate. They consist mostly of a BOM and a few rough pointers. If you look carefully, you can install things incrementally, but it’s kind of a pain to do things that way. I began by simply installing all the caps and resistors, and then enough to test the microcontroller was functional. The board uses an ATtiny85 by Atmel, and runs software which allows it to appear as a USB device. That all worked fine the first time I booted it up, no great surprises. When I finished fleshing out the oscillator, I was slightly confused because it didn’t appear to start, and I noticed that the red LED indicator wasn’t on. A bit more careful examination of the schematic showed that unless the 2N7000 was installed that would probably be the case, so I ignored it and simply fleshed out the rest of the rig. In the end, it all turned out fine. I think they could be a bit clearer on how to mount the power transistor: the double line indicates the backside (non-label side) of the transistor. That would be easy to screw up if you weren’t careful.

When I powered it on, I could hear it’s signal about 4Khz low on my IC-735, even without any antenna hooked up. You have three adjustments: one cap controls the frequency, one controls the bandwidth of the modulated signal, and a trim pot controls the output power. By the time I finished this, I was a bit tired, and didn’t have much desire to do detailed testing. I hooked up my SDR-IQ to accurately measure the output frequency, and tweaked it to be right around 10.140000 Mhz. The tuning is fairly twitchy, even small turns of the tuning cap can send the oscillator two or three hundred hertz from where you start. But with the SDR-IQ, you can watch fairly easily, and I soon had it on frequency.

I didn’t have a dummy load or anything yesterday, but I put it on the air. I didn’t see any sign of it on W4HBK’s Florida grabber (most closer ones appear to be off the air for now), but I think it was all working.

Today, I wanted to make a more accurate estimate of the output power. I constructed a small dummy load out of 4 180 ohm resistors wired in parallel (yes, that’s just 45 ohms, so sue me). I then clipped my handy Rigol scope on either side of the resistors, and measured the RMS voltage. Setting it to 4.5V into a 45 ohm load should make for 100mw. I also checked the limits: right around 300mw, just as described in the documentation.

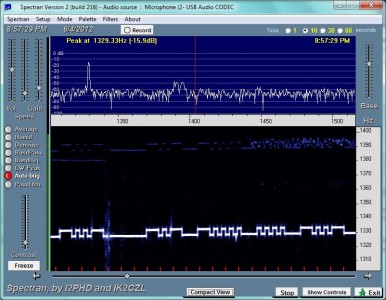
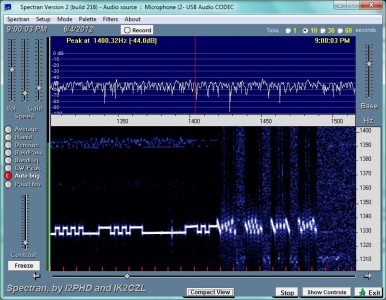
Here are a couple of screen grabs that I made using Spectran while testing the beacon. The first shows it’s default DFCW3 signal, the second, the somewhat less effective but still cooler looking Hellschrieber.

Spectran showing my DFCW3 callsign...

Testing the multi-tone Hellschreiber mode..

I also recorded part of me assembling it in time lapse mode on my iPhone. Not informative, but fun to watch. Sadly, my batteries died before finishing it, next time I’ll use an A/C adapter on the phone. The utility I used OSnap! is nice, but very slow in constructing the video and uploading the results to YouTube.

I’ll try to follow up with more information about this project in the near future.

No Saturn, but how ’bout the moon?

I thought I’d give my video camera a test. I considered Saturn, but by the time I got outside the weather was getting colder and blustery, and I wasn’t feeling very good, so I just managed to snap some quick video of the moon. The wind was buffeting the telescope, and I was impatient, but I snagged some video and then used Registax 6 to make the best of a sorry collection. Here’s the result of my amateurish efforts:

The video camera is probably a mistake: even with the mods that I put in, the AGC gets in the way, and the capture seems to have an interlacing problem that causes nothing but trouble. Perhaps it’s time to get a decent webcam + adapter and try the same. Oh well. More when I get better.

Prepping for the upcoming transit of Venus…

I’ve been pretty quiet on the blog, but I’m trying to get some projects going. This week marks a rather rare event: the Tuesday (for us in North America) transit of Venus across the front of the sun. According to this transit calculator, the transit will occur between 3:06 and 9:47 (well after sunset).

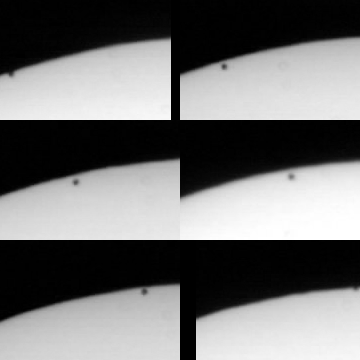
Back on Nov 15, 1999, I observed a transit of the planet Mercury across the sun. I snapped a few pictures, and created this rather unimpressive animated GIF:

Nov. 15, 1999 transit of Mercury in front of the sun

I don’t even recall what crude webcam setup I had back then.

I think that I can do better this time. You may have seen my “ghetto” astrophotographs of the solar eclipse a couple of weeks ago. I shot those using a solar filter over my little Meade Maksutov. I though I’d press it into service again, but instead of doing the crazy “catch as you can” approach of clicking away with a hand held point and shoot at the eyepiece, I thought I’d dig up something better.

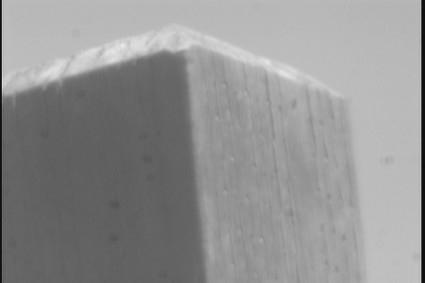
Better in this case was an old black and white security camera that I had bought from Supercircuits years ago with the idea of doing some video astronomy. I even modified the camera to allow the disabling of its automatic gain circuitry, which typically is useless for astronomy, as it causes the camera to overexpose everything you wish to see. More digging found the other necessary bits (various camera adapters and the like). I wanted to capture images to my laptop, so I needed a little Video->USB capture card. A quick trip to Fry’s netted me a MyGico Capit card for the princely sum of $20, with a $15 rebate. It took me a couple of tries to get the drivers installed, but it seemed to work okay. I then aimed my rig out the window up my hill, and shot this picture of the fencepost at the back of my property:

My fencepost, viewed through the Maksutov/Video Camera setup

The focus wasn’t perfect, but I could actually see an ant crawling around on it. Not bad. Not bad at all.

Except for one thing. The distance to the post is about 135 feet, and the post is a 4×4. A little math works out the field of view of this camera as being roughly .2 degrees. The sun is roughly one half a degree in size. This means that whatever I do, I won’t get a full disk image of the sun. That’s kind of a bummer.

Of course, I could have made a math error. I’ll drag this rig out into the sunshine and see if I can shoot some pictures/vids of the sun today (should see some sunspots anyway) and see how close my math is.

I’ll try to shoot some Youtube video that will further document this setup later. Stay tuned.

Working toward Digital JT65 WAS award…

I’m currently working toward something something which I don’t normally do: an achievement award. For about two months, I’ve been trying to log contacts via the JT65 mode on ham radio, with the eventual goal of making contacts in every state. It’s not a particularly difficult award: I suspect that it will mostly require patience to get the remaining states, but it’s been kind of fun, and has made me pay attention to propagation, and make at least a minor improvement to my antenna setup. As of today, I have 33 confirmed states, with unconfirmed contacts in several others. The states I have remaining are:

Alabama, Arkansas, Delaware, Georgia, Maine, Minnesota, Nevada, North Dakota, Ohio, Oregon, Rhode Island, South Carolina, South Dakota, Tennessee, Vermont, West Virginia, and Wyoming.

It’s amazing that I’ve managed to somehow avoid Nevada and Oregon: you’d think they would be easy, but for whatever reason, my signals seem to skip right over them. And of course, some states are hard to get just because of the low ham population. I’ll be stalking NT5HS a bit, which is a club station listed in Texas, but in fact operates remotely from a station in South Dakota. I’ve tried a couple of Maine stations before, but had difficulty reaching them.

Anyway, I’m having fun. If any of my readers lives in one of my “to do” states above, try looking for me on 20m (with occasional diversions to 15m and 40m) and see if I can’t put you in the logbook.

The Beaglebone: an $89 Time Machine…

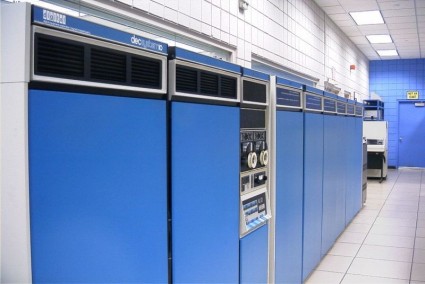
A DEC SYSTEM 10, just like the computers of my past.

At the Maker Faire, I splurged for a little bit of computing hardware called the Beaglebone. It’s an $89 ARM based computer that runs at 700Mhz, and includes a MicroSD card slot and Ethernet, as well as a USB connector. I wasn’t sure what I was going to use it for, but I frankly can’t resist cheap hunks of hardware, and unlike the Raspberry Pi (which frankly is more interesting, since it includes video, which the Beaglebone lacks) you can actually walk up to a counter (well, at the Maker Faire you can) and buy one. So I did. Because Tom bought one. And I wouldn’t want to be left behind.

But what to do with it? Well, it boots Linux off the SD card, so I could do anything with it that I could do with a Linux machine. I’ve mused about my computing past before on this blog. So, I thought: “let’s see if I can get simh installed on it, and simulate the PDP-10/DEC 1091 of my computing past.

It’s frankly pretty trivial to do. It’s got gcc and wget installed, so all you have to do is fetch the source and compile it. You might want to get the pcap library installed so you can do simulated networking, and the machine itself is pretty slow (I discovered that when it’s powered from the USB, it runs at only 500Mhz, which seems really slow). But there is no trouble getting it installed. Then, all you need is some software to run on it.

In my previous excursion into the world of simh, I worked through installing TOPS-10 from scratch, but I didn’t feel like stumbling through that process again, so I searched the web and found a prebuilt image suitable for use. I downloaded it, unpacked it, and ran pdp10, starting it just as documented.

And… I was again hurled back through time. BASIC, COBOL and FORTRAN. 36 bit architecture. Craziness. Running on $89 worth of hardware, consuming 1W and the size of an Altoids tin.

I haven’t benchmarked it, but I suspect that it runs several times as fast as the original machine. I configured it to allow one to telnet into the server to simulate serial connections. I’m sure with a little work, I could dust off the corner of my brain that held information about this stuff, and figure out how to get ADVENTURE running.

And then I thought to myself: what if I wanted to hook real serial terminals to it? A little investigation reveals that the Beaglebone has six hardware UARTs. One is dedicated for connection via USB, but four are wired to expansion pins. I dug a little more, and uncovered this awesome project: the DECbox. The author mounted a beaglebone inside of a vintage DEC VT100. He even talks about modifying the VT100 to have serial connectors on the back so you can hook in additional terminals. Since the Beaglebone can simulate a wide variety of DEC machines, you could have a PDP-8, PDP-10 or PDP-11 all inside the same space.

Very cool. I’ll be keeping my eye out for a real VT100.

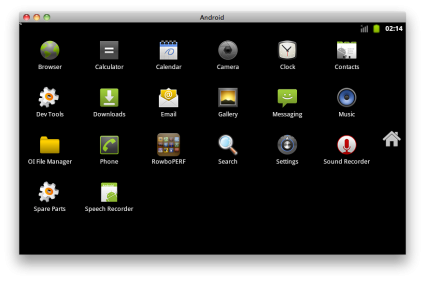
Addendum: in my spare time, I downloaded an image for the Gingerbread release of the Android OS. Because the Beaglebone doesn’t have a display, you start a VNC server which serves as a virtual graphics device, and then connect to it via a VNC client like TightVNC (for Windows) or Chicken of the VNC (for Mac OS X). I did this more for curiousity than anything else: it’s too slow to really be an adequate demo platform. But it might be of interest.

Gingerbread Android, running on the Beaglebone and viewed using Chicken of the VNC.

Addendum2. I was digging around to find power requirements for the board. It turns out that if you don’t use the onboard USB, the current is supposed to be around 170ma, which makes the power less than 1W. But using the USB raises that a lot: the peak is almost 500ma during boot, which is about 2.5W. If you are concerned about power, ditch the USB as a power source.

Photos from the eclipse…

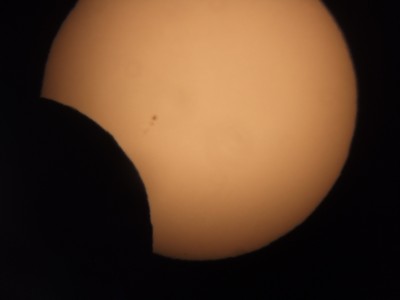
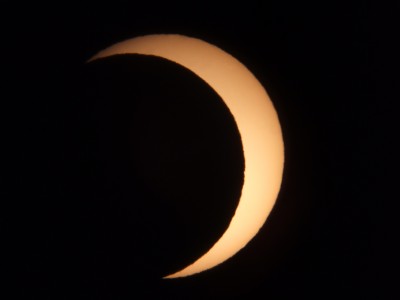
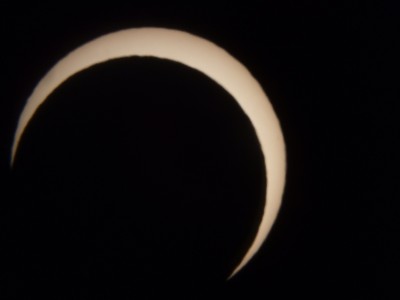
Okay, these are the best of the photos that I snapped during yesterdays annular solar eclipse (well, it was really only a partial eclipse here). We had just left the Maker Faire, and were in the parking lot of Oracle on 10 Twin Dolphin Drive in Redwood City, CA. I took out my 4″ Meade Maksutov telescope, along with a full aperature solar filter and a 25mm eyepiece. To take the pictures, I used a Fuji W1 camera, held up to the eyepiece, set in manual mode with an exposure of 1/100th of a second and f/4. Alignment was tricky and twitchy, and there are more crappy photos than good ones. These aren’t particularly good, or sharp, but heck, they are mine, and as a reminder of a kind of neat event, they work just fine.

A Maker Faire Post Mortem…

Phew. My legs are sore, and my voice is just returning to normal after a whirlwind two days at the Maker Faire in San Mateo. Thanks to everyone I bumped into and chatted with: I had a very nice time, and the partial solar eclipse was an added bonus (some pictures to come in a different post).

But in spite of all the fun I had, by the middle of Sunday, I had begun to have a bit of a uneasy feeling, a feeling that perhaps the event wasn’t really so much about making, but more about just a slightly different kind of consumption. For every individual who worked on some whacky project that they brought to exhibit, there seemed to be a dozen which were companies (mostly small, but some large) which were identifying “makers” as a new market segment that they wanted to sell products to.

In many ways, that’s not a bad thing: after all, I want companies like Sparkfun and Adafruit to succeed, because they make interesting components and technologies accessible to ordinary people with a desire to build. But I can’t help but wonder where are the consumers of these kinds of technologies? Of all the hundreds of thousands of Arduinos sold, why are there so few examples of cool artistic or technical applications being demonstrated on the tables at Maker Faire?

The reason that I go to the Maker Faire is to celebrate in the joy of craft and tinkering. I want to be inspired to think broadly and creatively, to extend my skills, and to share in the pleasure of making the world a tiny bit more beautiful/amazing/fun.

What seems really odd to me is that I heard more than one person lament the sorry state of science/electronics/shop skills in “kids” today, that it’s just really hard to learn this stuff. I couldn’t help but blink: with the internet, with YouTube, with resources like IRC and mailing lists, with great companies (large ones like Digikey, and smaller ones like Sparkfun and Adafruit) I don’t think it’s ever been easier. One lamented the long ago loss of Don Herbert: TV’s Mr. Wizard. It was a great loss, to be sure, but we don’t need a TV network to promote science to young people. We can blog, podcast, form clubs and hackerspaces, and communicate with people all over the world. We have Khan Academy, Udacity, the Khan Academy, Vi Hart, and dozens of others to help inspire and educate.

In other words, we can all be Mr. Wizard. We are challenged not just to be students, but to also be instructors. To inspire others, as well as to be inspired.

By five, our little group was tired, and we were heading back to the car. At 5:18, the moon started to cover the sun, and by 5:30 we were back to the car, where my little Meade telescope and solar filter was waiting. We watched as the moon slowly ate the sun, and shadows of point sources showed the tell-tale crescent shapes. The sky got oddly dark. The temperature seemed to drop, and the wind picked up.

And then, the sun started to grow again. We packed up, and decided to head to dinner.

And I started to talk this out. And I realized that the feelings that I had were really just feelings of my own failure to live up to the ideas that I set out above. After all, I didn’t bring any cool projects to the Maker Faire. (Okay, I wasn’t a total slouch, I helped some young people who did bring stuff there, but the point remains.) Rather than complain about what needs to be done, I could just do something myself. If the ratio of independent creative projects to others is too low, then there is something I can do: I can bring something next year.

And, of course, over the last month, my blog has gotten a thick patina of dust. I’ve not been doing much with it. I could make excuses, but they don’t even ring true to me. I want to do better. I’ll start with trying to resume some regular posting of my ongoing projects. I’ll endeavor to be more creative, and less of a consumer.

Hmmm. Maybe the Maker Faire really does work fine just the way it is.

States heard in the last week on JT65

I’ve got something like 30 states worked via JT65 over the last month or so, but I’ve obviously heard a lot more than that. I took my listening log, extracted all the U.S. callsigns, and then wrote a simple Python/sqlite script to look up each state for the callsign, and see how many states I’ve actually heard. It came out with 49 states. A quick perusal showed that I didn’t receive any calls from Wyoming or South Dakota. A moment’s further inspection showed that I had received several calls from Washington, DC, which accounted for the discrepancy.

Here’s the breakdown of stations heard by state:

AK KL7YK
AL KF4RWA, KI4PG, KK4A, KK4AFS, N4AU, ND4Q, W4YXU, WB4KDI
AR AC5EI, AE5ZZ, K5DTE, K5XH, KF5HTK, KO6FU, W5TT
AZ AC7LB, AE7CD, K0TW, K3WYC, K7DTB, K7KDX, K7LOL, K7TEJ, KB7RLY, KD7PMS,
   KM3N, N1LS, N7AMA, N7GDP, N7NEV, N7SKV, N7THN, NO7P, NR5O, W7PP,
   W8FDV, WM7CH
CA AA6TF, AC6JA, AG6IP, AK1P, K0CFI, K6AZR, K6CLS, K6DKY, K6EU, K6HX,
   K6SID, KB6J, KC6OVG, KD6HQ, KD6MHL, KD6NJE, KF6XE, KG6AF, KG6WIK,
   KI4MI, KI6HS, KI6UAL, KI6VJY, KI6YAA, KJ6CC, KJ6DQR, KJ6RKZ, KO6KL,
   N3PV, N4SF, N6BO, N6BRP, N6BX, N6OL, N6RRY, N6TE, N6WS, N7LMV, NM3S,
   NM6W, NN6XX, W6DTW, W6KAP, W6ONG, W6QB, W6TQV, WA6ALA, WA6OWM, WB6EZH,
   WB6RLC, WB6ZXM, WO6M
CO AA0DW, AB0YM, AC0ZL, K0BAM, K0SU, KB0QC, KC0ONP, KD0BIK, KF0QZ, KI0J,
   N0SMX, NN0G, W0GLB, W0QL, W0RGD, W7RTX, WB4CIW
CT AG2K, WA1NGH, WF1G
DC AB3UM, N3ES, N8HM
DE AB3OF, K3BH, W3MLK
FL AD5ZA, AJ4LU, AJ4WC, K4EOD, K4LRP, K4TFT, KA4USN, KB4VC, KJ4YAC,
   KK4CIS, KK4XO, N4ABN, N6AR, ND3H, W4DAS, W4JCM, W4TV, W9IL, WA4KBD,
   WB8VQU
GA AB4RH, K2TOD, K4CHC, K4GB, K4LDC, KI4UMX, N3XX, N4LXB, N4MEP, N4PHT,
   W4ED, W4KDA, WB4WTN
HI KH6OO
IA AA0N, AC0XY, N0GR, WA0EIR, WU0U
ID KF7GMV, N7OQF, W7URX
IL K9EEI, K9JKM, K9PLX, KA9BHD, KA9CCH, KA9RXK, KB9ILT, KC9MEG, KC9NWH,
   KC9UNL, N9APK, N9FYX, N9GRG, N9OQW, N9SS, NG9R, W9RVG, W9YX, WA9KXZ,
   WA9MNF, WD9IOK
IN K9JUI, K9MQ, KC9NBV, KY9J, N9ACD, N9FDF, N9WKW, N9WVM, W9FFA, WB9IIV,
   WC0Y
KS AE0AR, KI0KK, W0PSK
KY K9AAN, KA4OJN, KD7YZ, KV4AJ, N9DFD, WA4PBM, WB4ZFO
LA AA5AU, AE5VB, K4QAL, KB5GA, NF5Z, NO5L, W5ADD, W5GAD
MA K1HFR, KB1ESR, KB1UIF, KT1B, N1GJ, N1MGO, NZ1MT, W1BS, W1MA, W1UU,
   W1XP, WA1GPO
MD AB3RS, K3IO, KB3VQH, N3FHW, N3KV, W2JVE, WA3MEJ
ME KA1QW, N1IPA, N7GLR, W1BFA, W2ZEN, W3HBM
MI KB8RMX, KC8GTX, KD8CXQ, KD8OTT, KD8RV, KG8OC, N8BB, NZ8V
MN K0JWC, KA0UEH, KB0HQD, KB0MDQ, KC0OUZ, KC0YFC, N0UE, NA0F, ND0M,
   W0DYD, W0RSB
MO AC0LP, AC0MW, K0GK, K0TPP, KD0QJL, KD0QYN, KF0IQ, KG0KP, KL7QW, W0RL,
   W0TTN, WB0LCW
MS AE5SK, KB5WKQ, KD5NDU, N4UPX, N5GDM, W8DM
MT K7CPY, KS7R, NT7R
NC K4BSZ, K4YTE, KJ4DJ, KJ4OHK, KR4RO, N4JS, W4MPS, WB4M, WB4QIZ, WZ5X
ND KI0QS
NE K0LUW, NI0B, W0YF, WD0DMO
NH KB1GKN, KJ1J, W1MSN, W1YQ
NJ K2AFY, K2RH, KC2WUF, ND2K, WX2H
NM AB5Q, K5USF, KC5TY, W5GEM
NV AB7KT, AG7CM, KE7S, KK7CC, KS7DX, W7UV
NY KA2AEY, KC2MBV, KD2BIP, N2YZS, W2MDW, WA2GSX, WB2KEC, WB2SXY, WF2S
OH AA8EN, AC8FT, K0KC, K8GI, KC8HNZ, KD8BIN, KD8RDH, KN8DMK, N8IR, N8TL,
   N8XYN, NC8T, NT8Z, W8BI, W8MDG, WA8ICJ, WT8D
OK AF5Q, K5WPN, KB5LER, NZ5C, W5LE, WQ5O
OR AA7CU, AE7TO, K2NCC, K7JPF, K7TLP, KF7JGF, KK7CG, N7MQ
PA AD2L, AK3J, K3BS, K3DY, K3HR, K3NVI, K8WHA, KC3DS, KC3U, KT3L, N3MVX,
   N3WLB, N3YEA, NC3P, W3BI, W3HZL, W3RC, WA3CAS, WA3DNM, WA3ERQ, WA3NGU,
   WA3ZKZ, WD2RA
RI K1NPT
SC AI4GY, K4AMA, K4BTC, KG6MC, KJ4IZW, KJ4ZQX, KK4DSD, WB2GJD
TN AJ4HW, AK4DW, K4KQZ, K4PJO, K4TRH, KE4TG, KX4WB, ND2E
TX AA5KK, AE5TI, AF5BO, AK5V, K2OO, K5FRD, K5TCJ, K5WW, K5YUR, K6VNG,
   KD5HOP, KD5ZAT, KE5MC, KF5IAK, KF5MDZ, KN8KAZ, N5JWM, N5LYJ, N5VP,
   NA5AA, NO5B, NT5HS, NW5P, W0LPD, W5IPA, W5MDB, W5REM, WA5MS, WA5PGS
UT K7KKY, KJ2U, N7SMI, NS7B, WA7ADK, WE7BBQ
VA K0PT, K4LCM, KE4SAV, KJ4VTH, KU4FO, KX4P, N4ST, W4KZK, W7OTQ
VT AA1E, AB1NJ, K1LES, N2BJW, W1FNB, W1HRM
WA AC7IJ, AC7SG, AE7KI, K7LFY, K7MSC, KD7PCE, KK7UQ, NY7U, W7EWG, W7NBH,
   W7PI, W7SSK, W7VAN, WA7KPK, WA7SCH, WB7AJP, WE7P, WR7K
WI AB9DK, KA9SWE, KE9JF, KE9LZ, NA9J, WB9BJQ, WB9NRK
WV K8OHZ, KC8GCR, WB8QPG

Addendum: Here’s the states (32 of them) that I’ve worked over the last month.


AK KL5E, KL7YK, WL7BDO
AZ AC7LB, K7TEJ, KM3N, KW7E, N7NEV, NV1D, W8FDV
CA N6BX, N7LMV, W6KY, WA6OWM
CO AA0DW, AB0YM, KC0ZGK, NK0G
CT KB1UUB, WA1NGH
FL KK4XO, N4ABN
HI KH6GRT, KH6SAT
IA K8OM, N0GR
ID KF7GMV, N7OQF
IN N9WKW
LA W5ADD
MA KB1UIF
MD K3IO, K3VPZ, N3CAL
MI KK8MM
MO AC0MW, WD0ECA
MS N4UPX
NC KR4RO
NE WD0DMO
NH K1CF
NJ K2AFY, K2RH
NM KC5TY, WA5DJJ
NY KC2MBV, WA2GSX
OH N8TL, WT8D
OK AA5CK, AE5US, K5WPN
PA AD2L, W8IJ
PR NP3FS
SC N4ITM, WB2GJD
TX K5WW, N5LYJ, WA5MS
UT KJ2U
VA N4RP
WA AE7U, K7MSC, KE7WEG, W7PI, WB7AJP
WI AD9P, WB9SDD
Countries heard (not worked) on JT65 in the last 7 days…

Not a bad list, really, given how crappy my antenna is. Most of the DX was heard on 20m.

Alaska, Argentina, Asiatic Russia, Australia, Austria, Belgium,
Brazil, Canada, Chile, China, Cuba, Curacao, Czech Republic, England,
Estonia, European Russia, Fed. Rep. of Germany, Finland, France,
Gabon, Guantanamo Bay, Hawaii, Indonesia, Japan, Netherlands, New
Zealand, Poland, Puerto Rico, Republic of Korea, South Africa, Spain,
Switzerland, Taiwan, Thailand, US Virgin Islands, Ukraine, United
States, Venezuela