Pondering computer chess…

August 20, 2014 | Computer Chess | By: Mark VandeWettering

At the risk of name dropping, on my flight out to Vancouver for SIGGRAPH last week, I had the exceedingly high luck of scoring a seat next to Pat Hanrahan. 25 years ago, I was working at Princeton in the Applied Math department, and the single smartest thing I did was make Pat’s acquaintance. Besides providing countless insights into computer graphics over lunch and chats, he helped me score my current job, where I’ve been gainfully employed for the last 23 years. He claims that he occasionally even reads my blog, so if you are reading this Pat, thanks a million!

During the two hour flight, our chat ranged over a wide variety of topics. One topic that is completely unrelated to my work is my interest in computer chess and checkers, mainly as applications of game tree search. Even as an undergraduate, I was fascinated by this topic, but when Deep Blue beat Kasparov 2-1 in a six game series in 1997, I kind of pushed this to the back of my mind. I mean, I thought it was over.

I’ve made this mistake before.

What’s amazing is that computer chess programs have gotten better recently. And not just a little better, a lot better. One particularly interesting chess program is Stockfish. Firstly, it is an open source project, which means that its innards are available for your inspection. Secondly, it is available on a wide variety of platforms, including as a free application on the iPhone. I interrupt this diatribe to show the game I played against Stockfish on my return flight. I don’t play very often, but managed to eke out a shaky draw against Stockfish with it taking 10 seconds per move. I only lost concentration once and stumbled into an obvious blunder (which I shamelessly took back and went at for another try). Here’s the game, using a spiffy WordPress plugin.

[pgn width=”512″]
[Event “Airplane Chess Game”]
[Site “WestJet 1776”]
[Date “Aug 14, 2014”]
[Round “?”]
[White “Mark”]
[Black “Stockfish”]
[Result “1/2-1/2”]

1. e4 e5 2. Nf3 Nc6 3. c3 d5 4. Qa4 Bd7 5. exd5 Nd4 6. Qd1 Nxf3+ 7. Qxf3 Nf6 8.
Bc4 e4 9. Qe2 Bd6 10. O-O O-O 11. d3 exd3 12. Bxd3 Re8 13. Qc2 Nxd5 14. Bxh7+
Kh8 15. Bf5 Bb5 16. c4 Qh4 17. g3 Qxc4 18. Qxc4 Bxc4 19. Rd1 Be2 20. Rd4 Bf3
21. Rh4+ Kg8 22. Bd2 Be7 23. Ra4 Bf6 24. Nc3 Rad8 25. Rb1 Ne7 26. Be4 b5 27.
Rb4 c5 28. Rxb5 Bxc3 29. Bxf3 Bxd2 30. Rxc5 Ng6 31. Kf1 Ne5 32. Be2 Bb4 33. Rb5
Rd2 34. Rxb4 Rxe2 35. Kxe2 Nc6+ 36. Kd2 Nxb4 37. a3 Rd8+ 38. Ke2 Nc2 39. Rc1
Nd4+ 40. Ke3 g6 41. Rc5 Nf5+ 42. Ke2 Kg7 43. b4 Rd6 44. g4 Re6+ 45. Kd3 Nh4 46.
a4 Nf3 47. h3 Ng1 48. h4 Nh3 49. f3 Nf4+ 50. Kc4 Re1 51. Rc6 Ng2 52. h5 Nf4 53.
hxg6 Nxg6 54. Ra6 Rc1+ 55. Kb5 Rc7 56. Rc6 Rd7 57. Ka6 Ne5 58. Rc5 Kf6 59. Rb5
Nc6 60. Rb7 Rd4 61. Kb5 Nxb4 62. Kc5 Nc2 63. Rxa7 Rf4 64. a5 Rxf3 65. a6 Rc3+
66. Kb5 Nd4+ 67. Kb4 Rc1 68. Rb7 Nc6+ 69. Kb5 Ne7 70. a7 Rb1+ 71. Kc5 Ra1 72.
g5+ Ke6 73. Rb6+ Ke5 74. Rb7 Nc8 75. Rxf7 Nxa7 76. Kc4 Nc8 77. Kd3 Rg1 78. Rg7
Rg3+ 79. Ke2 Nd6 80. Rg8 Kf5 81. Rf8+ Ke6 82. Rg8 Ne4 83. Re8+ Kd5 84. Rd8+ Kc6
85. g6 Rxg6 86. Kd3 Nd6 87. Ra8 Rg5 88. Kd4 Rd5+ 89. Ke3 Kd7 90. Ra7+ Ke6 91.
Kf4 Rf5+ 92. Ke3 Rb5 93. Rh7 Re5+ 94. Kf3 Kd5 95. Rd7 Rh5 96. Kg4 Rh8 97. Kf4
Re8 98. Kf3 Ke5 99. Ra7 Nc4 100. Rf7 Rd8

[/pgn]

Anyway, the third thing that I thought was cool about Stockfish was that stockfish is really good. It’s clear that it would crush all human players in a match: it’s ranked about 400 points higher than Magnus Carlsen, which means that Stockfish 5 would be expected to score about 90% against Carlsen. I didn’t think that this increase in the state of the art could have been done purely as the result of CPU speed improvements, so I wanted to look into it a bit and see what might have helped Stockfish get so good.

Interestingly, I think one of the greatest causes is from exhaustive testing. The Stockfish project has implemented a distributed testing facility called Fishhtest. The idea is pretty simple: volunteers contribute cpu time to exhaustive test commits to the source tree to see the effect on gameplay You can read more about it here.. According to the Wikipedia article on Stockfish, this allowed Stockfish to gain 120 ELO points in just 12 months.

Anyway, my chats with Pat and pondering some of the ideas from Stockfish make me want to dust off my Milhouse checkers program, and see if I can’t borrow some ideas from Stockfish as well as other ideas from Pat (implementing checkers on an FPGA?). We’ll see what happens.
My Atari 2600 Pong Clock

August 6, 2014 | Atari 2600 | By: Mark VandeWettering

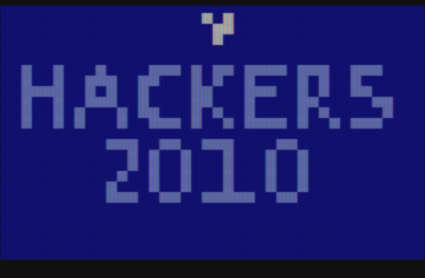
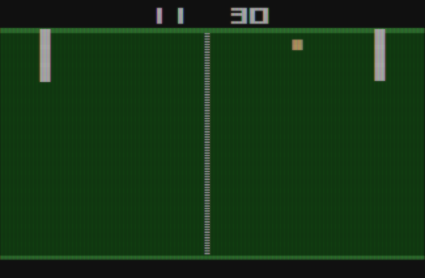
While looking for something completely different, I ran across the code and binary images for my old Atari 2600 “Pong Clock”. I realized that my previous post on the matter didn’t have pictures of my final version, so just for fun, here are a couple of Stella screengrabs (in NTSC “TV” mode, for enhanced realism).

I included a tiny intro screen. I showed this at a 2010 get together. The Conway glider at the top is animated:

simple.bin_6

It plays a game of pong against itself, with the score representing the current time. You can set the time using the left joystick. When the minutes tick change, the right player wins. When the hours change, the left player does.

simple.bin_7

It also works on black and white tvs. I never did the changes necessary to make it play in PAL mode, although it should be pretty straightforward. The Atari 2600 was practically built for implementing Pong.

Still, it’s got some finesse in it. I never could have done it without all the hints from the Atari Age forums and the Stella 2600 emulator. My source code references a nice little bit of code from an Atari Age tutorial series, which I shamelessly purloined. I left a comment saying:

;;; According to the documentation, A isn’t really the position (0-160),
;;; you have to add +7 to the position. But I find that the offset in
;;; stella is +5. I haven’t done the cycle counting to figure it out,
;;; but I’ve had good luck trusting stella, so that’s what I’m going
;;; with.

Perhaps I’ll revisit that sometime and figure out what was right.

Two more “primitive” cameras…

August 5, 2014 | Photography | By: Mark VandeWettering

My previous experiments with a foam core 4×5 camera has whetted my appetite for more camera experiments. In particular, I was looking for cameras that could be built quickly, and where amateurs could construct their own lenses out of surplus optics. I am particularly interested in cameras that use the old fashioned meniscus landscape lens design, which takes just a single meniscus lens, and symmetric lens designs like the Steinheil Periskop. Most DIY camera projects seem to fall back to using modern or antique lenses, but I did come across two cameras from the same maker that took a more basic approach.

This large format camera is basically a pinhole camera, but with a stop right at the lens, yielding a focal ratio of about 90. Check out the flickr set, which includes both pictures of the camera and taken through the camera. This camera doesn’t include a focus mechanism, but since it is operating around f/90, it already has a great deal of depth of focus. It straddles the line between a pinhole and a conventional camera. But still, it creates some cool images.

The same maker created another awesome camera, but this one is a lot more awesome. The frame is wood, it has a focusing bellows, and takes a 4×5 film holder. The Flickr set for this camera shows some really awesome portraits, and one can tell it’s a lot more versatile and fun to use. Awesome, inspiring stuff.

An antenna for receiving ADS-B…and velocity factor of RG-6

July 29, 2014 | Amateur Radio, Software Defined Radio | By: Mark VandeWettering

Allright, last night’s experimentation with the RTL-SDR dongle on my Raspberry Pi Model B+ was pretty successful. Incidently, I forgot to mention that this worked fine with the dongle plugged directly into the Pi, I didn’t need a powered hub. That’s pretty cool. Previously, I had experimented with decoding ADS-B signals from airlines. I thought this might be a pretty good thing to do with the Pi. I ordered a little MCX->Female F pigtail off of Amazon for under $6 shipped, and then thought about doing a better antenna. I would have also ordered a little case for the Raspberry Pi, but all the ones I could find for the B+ seem to be back ordered. Sigh.

Anyway…

I know that Darren at Hak5 and whixr at tymkrs.com had build colinear antennas out of coax for this purpose. I went to review what they had done before. It’s a pretty straightforward antenna to make. Darren has a nice video and writeup:

Darren’s How to Build An ADS-B Antenna

I was curious though: his discussion of velocity factor ended with… our velocity factor is 0.85. That might be true for his coax, but how do we know?

Well, we could trust the manufacturer. Or we could guess, based on the material that we think the dielectric is. But I think I’ll use my MFJ antenna analyzer to figure it out. The basic idea is to take a length of coax of length L. Sweep up from the low frequency and find the lowest frequency where the coax is resonant (where it is a pure resistance, which will also likely have the lowest SWR). Say that frequency is f. if you divide 300 by the frequency in megahertz, you should get the wavelength in free space in meters. But in the coax, four times the length of your coax is the wavelength in your coax. So, if you divide that length by the free space length, you should get the velocity factor of the coax.

When I get some coax, I’ll try this out. Getting this length right is probably pretty important. I might also try to run some simulations to find out how systematic changes in fabrication affect the performance.

I’ll probably do a 8 or 12 element colinear. I suspect that without an antenna analyzer that can go up that high, fabrication errors for more elements will lead to dimininishing returns and ultimately maybe even diminishing performance.

Addendum: A nice video showing good construction technique…


RTL-SDR on Raspberry Pi…

July 28, 2014 | Raspberry Pi, Software Defined Radio | By: Mark VandeWettering

Just a quick note. I have been meaning to try out the combination of the Raspberry Pi with one of the popular $20 RTL-SDR dongles, to see if the combination would work. I was wondering how well it would work, how hard it would be, how much of the available (small) CPU power it would use. The short answers: reasonably well, pretty easy, and maybe 20% for rtl_fm. That’s pretty encouraging. I’ll be experimenting with it some more, but here’s a short bit of me recording KQED, the bay area PBS FM station, using the pitiful tiny antenna that came with the dongle. It should be noted that my house is in a bit of a valley, and FM reception in general is quite poor, and I recorded this from inside my house, which is stucco and therefore is covered in a metal mesh that doesn’t help. Not too bad. I’ll work out a better antenna for it, and then try it more seriously.

Addendum: Here is a page with lots of good information on RTL-SDR/dump1090 on the Raspberry Pi.

More musings of computers past: Popular Electronics, the COSMAC ELF

July 27, 2014 | Retrocomputing | By: Mark VandeWettering

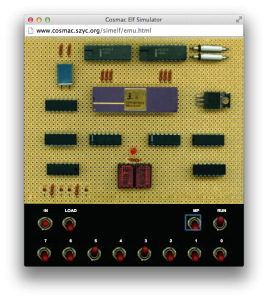
Screen Shot 2014-07-27 at 5.14.34 PMMy musings about my earliest memories of computers brought me back to 1976 and the appearance of the COSMAC ELF in Popular Electronics. I was only twelve, and probably had only the vaguest understanding of what such a machine could do, or why I might want one, but I remember reading these articles and it capturing my imagination. It probably laid the ground work for my continuing fascination with computers. Still, I never really developed any serious understanding of the architecture.

Now, when I stare at datasheets for the 1802 processor, it doesn’t seem particularly hard to understand, but it’s a pretty peculiar little chip. Wikipedia has a good introduction. It found some significant usage aboard satellites and space probes, including aboard the Galileo probe. You can get more documentation here. While the processor is not well known now, it actually generated significant interest until the 6502 hit the market.

I’ve just begun to dig around for more information:

Four articles that appeared in Popular Electronics on the COSMAC ELF
A JavaScript simulator the ELF

Addendum: There is a huge pile of RCA 1802 code on archive.org. Judging by the filenames, not all of it is 1802 related, but there is a ton of stuff.

My programming career began with this magazine article…

July 25, 2014 | My Diary, My Projects | By: Mark VandeWettering

From tiny acorns, giant oak trees grow. Likewise, seemingly trivial events and items can affect our lives.

As a kid, I had been interested in computers for a while. I think it must have postdated the appearance of the Altair 8800, which debuted in Popular Electronics in 1974 (I would have been ten or so then), but I do recall reading articles about the COSMAC ELF computer in 1976 and 1977. Quite frankly, I don’t have the faintest clue why they attracted me. Perhaps it was just the idea that you could display a picture of the Enterprise on your TV screen (in horrendously blocky black and white), and that it wasn’t absolutely impossible to imagine that I could earn enough money to build one. Some interest in this old computer still exists, you can build a version of that old ELF with lots of upgrades. Seems like fun. But I digress. Constantly.

My first computer would actually be signficantly more powerful. In December of 1980, all of my savings from a year of yard work was pooled with some additional funds that Mom kicked in as a Christmas gift, and on December 24th, I got my first computer: an Atari 400 with 16k of memory, and a BASIC cartridge.

I didn’t even have a storage device. It would take a few more months until I saved enough money to get one of the Atari 410 tape drives. I began to plunk along with BASIC, writing programs to do simple things like adding numbers, and changing the color of the screen. I also got a copy of Star Raiders. And I began to wonder, why were the BASIC programs that I was writing so… pitiful, compared to what was possible. I had begun to read articles from the computing literature of the day that hinted at things like “player-missile graphics”, and I knew a tiny bit about machine code.

This all changed with game called “Shoot”, published in Compute! Here’s a link to the article. It was like having a pocket watch, and knowing what the time was, but then one day levering the back of the watch open, and revealing the mechanisms inside. It was the source code to a game that was simple, yet clearly beyond what I was accomplishing with my forays into BASIC programming. It had the complete assembly code, available for inspection. I dutifully typed in the code, and played the game for ten minutes or so. But the real game was the code! Reading it over and over again, I learned a lot. I experimented more. I got the Atari Assembler cartridge, and then ultimately got MAC/65, a much more powerful macro assembler. I experimented. Tweaked. Hacked. Learned. And it never really stopped. Thanks to Compute! and John Palevich.

Learning the ropes…

July 24, 2014 | Retrocomputing | By: Mark VandeWettering

Over the past few years, I’ve expressed an interest in the AGC, or Apollo Guidance Computer. If you haven’t had the time to look at it, the Wikipedia page is good enough to get a brief overview, but if you want to dig deep, you can find all sorts of information and simulators.

I found myself looking back into it this week for two related reasons: one, the anniversary of the Apollo 11 landing, which I still remember, and because of a new argument that I’ve read (but won’t dignify with a link) that claims the moon landings were fake because the AGC could not have worked. But I must admit, he pointed at one bit of the AGC, its core rope memory which he claimed couldn’t work. I think the safer claim would be that he didn’t understand how it worked, but when I thought about it, I realized that I didn’t really know how it worked either. And that bothered me, so I thought I’d dig into a bit more.

Here’s a brief, high level introduction:


The basic idea is pretty simple, and relies on using ferrite toroids as transformers. Imagine that you have two wires going through a ferrite core. If you send a pulse in one wire, it will generate pulse on the other wire. This principle is used in all transformers, which may vary in the number of turns to step the voltage up and/or down by varying the number of turns through the toroid. You can generate a simple memory using this principle. This kind of memory is demonstrated admirably by SV3ORA who created a 70 bit ROM that serves as a decoder for 7 segment LEDS A pulse (or pulse stream, even better) on one of the ten input lines generates the appropriate set of output voltages to display the corresponding numeral on a 7 segment LED display. His webpage has some nice, easy to follow circuits, and a cute little video of it working.

But if you look at the diagram for the Apollo Guidance Computer, it looks a little different. It has a series of “inhibit” lines that weave in and out of the cores, in addition to some sense lines.

Screen Shot 2014-07-24 at 8.35.03 PM

The first description I found was around page 90 of this report, MIT’s Role in Project Apollo, Volume 3. But to be honest, I didn’t really understand it. Luckily, I found what appears to be a better description: P. Kuttner’s 1963 paper, The Rope Memory — A Permanent Storage Device. I still need to work through the details, but it makes a lot more sense to me. I begin to see how the address decoding works. I’ll ponder it a bit more, but it is beginning to make sense, and as it makes more sense, I see it for the clever bit of engineering it is. It was a remarkable bit of engineering in its day, and allowed densities of 1500 bits per cubic inch, including all the address decoding. Very cool.

Addendum: Hacker friend Jeff Kellem was unable to post a comment to this blog (got trapped by the spam filter, no doubt because of the high number of links, which normally indicate spam, but in this case indicates SCIENCE!) but he was kind enough to drop me an email with additional reading. I’ll reproduce it here:

You might find this July 1976 issue of BYTE magazine interesting:

Coincident Current Ferrite Core Memories
https://archive.org/stream/byte-magazine-1976-07/1976_07_BYTE_00-11_Core_Memories#page/n7/mode/2up

Also, maybe check out:

Magnetic Core Memory Systems
http://www.cs.ubc.ca/~hilpert/e/coremem/index.html

Ferrite CorePlanes and Arrays: IBM’s Manufacturing Evolution
http://ibm-1401.info/IBMCoreArraysIEEEMagnetics1969.pdf

And start with Volume 1, Issue 2 (May 1973) of Amateur Computer Club Newsletter, there’s a several part series titled “Core for Stores” in there:

http://www.smrcc.org.uk/members/g4ugm/acc.htm
http://www.smrcc.org.uk/members/g4ugm/ACC/Vol1-Issue2.pdf

Look forward to reading more about your exploration into core memory.

fyi.
-jeff

All very cool resources. All us old-timers probably remember Byte magazine (but to be honest, I didn’t recall that they had ever had an article addressing core memory) but I had never actually heard of the Amateur Computer Club newsletter. It’s deliciously old and homebrew. The description of core memories is great, it includes some of the drive circuitry that one would have built back in 1973. I’ll have to check it out further.

Addendum2: If you want to go to a lot of trouble (and per bit, a huge expense) to make a core memory that can be read by your Arduino, Wayne has a lot of advice and detail on his page.

I got it! I got it! I really got it!

July 23, 2014 | Baseball | By: Mark VandeWettering

I haven’t had much of a chance to get to ballgames this year. I normally go to about a dozen or so A’s games during a typical season, but this year I basically haven’t made it to any. Life has just filled up with other things to do. But last night, the mystical forces of the diamond converged in the form of a pair of free tickets and a free parking night at the O.co Coliseum. Athletics vs. Astros, woohoo!

It was a beautiful night for a ballgame. Temperature was in the mid sixties or so, with very little wind. At first pitch, it didn’t seem like there would be a very large crowd. There were lots of empty seats. I guessed that fewer than 10,000 fans were in attendance, which was actually kind of okay with me. I like the relatively lay back atmosphere of these mid July games. But as the game wore on, more and more people began to sit down. Checking this morning, official attendance was 22,908. Not too bad.

A very nice game all in all. The A’s gave up 2 runs in the top of the third, but scored in the bottom half and again in the sixth to tie the game. It remained that way until the end of regulation, but L.J. Hoes would end up hitting a home run for the Astros in the top of the 12th, and the A’s went down 1-2-3 in the bottom half.

Ah, but I’ve buried the lead.

In all the years that I’ve been going to ballgames, I have never come away with a foul ball. I have been hit in the head by one, but my slow reflexes, and the near concussion meant that I didn’t come up with the ball on my one best shot at getting one. But last night, I finally did it, in the most surprising way.

Carmen and I were seated in row 29 of section 113, which is directly (but far) behind the visiting teams dugout. The top of the third had just ended, so I was just sitting there, checking my phone when…. suddenly people around me are excited. I look up just in time to see a ball, which literally landed in my lap, bounced against my chest, and stopped. I’m guessing that one of the Astros lobbed this ball trying to get it to the very cool pair of Astros fans in row 20 or so, but had misjudged. And so, this time without the threat of head injury, I got my first game ball:

ball2

ball1

Awesome! Achievement unlocked.

Happy Birthday, brainwagon!

July 21, 2014 | Blogging | By: Mark VandeWettering

bw-birthdayOn this date back in 2002, I started this blog. Since that time, I’ve published 4019 posts, with a total of 725,146 words. I hope some of you have enjoyed it. I’m slacking off, but still find stuff that I think is fun, and hope you drop in from time to time to read and drop me a comment.

Large Format Shoebox Camera…

July 18, 2014 | Photography | By: Mark VandeWettering

My recent experiments with large format photography with primitive cameras has me googling and surfing around. In my rampant clicking, I uncovered this very simple camera, which is even simpler than the 4×5 cameras that our class constructed. It’s just a positive meniscus lens with a 120 mm focal length, stopped down to f/90, held in place by something called “patafix” (a kind of clay adhesive) and used to illuminate an 8×10 paper negative. At f/90, it’s definitely straddling the line between pinhole and a real lens. There is no provision for focusing at all. But at f/90, the depth of focus is rather large, and his examples are pretty impressive. Worth checking out. You can see an album of pictures from this camera here on Flickr.

Another image from my foamcore 4×5 camera

July 14, 2014 | Photos | By: Mark VandeWettering

Another picture from my foamcore 4×5 camera. Roughly 150mm landscape lens, f/24, 3:50 second exposure onto Ilford Multigrade RC paper, could have probably developed a bit longer, but not bad. Inverted the print in GIMP, but no other tonal adjustment.

mikey

Ken tinkers with DTL, and SV3ORA’s transistorized 4-bit digital computer made out of discrete DTL

July 9, 2014 | Homebrew CPU, Homebuilt CPUs | By: Mark VandeWettering

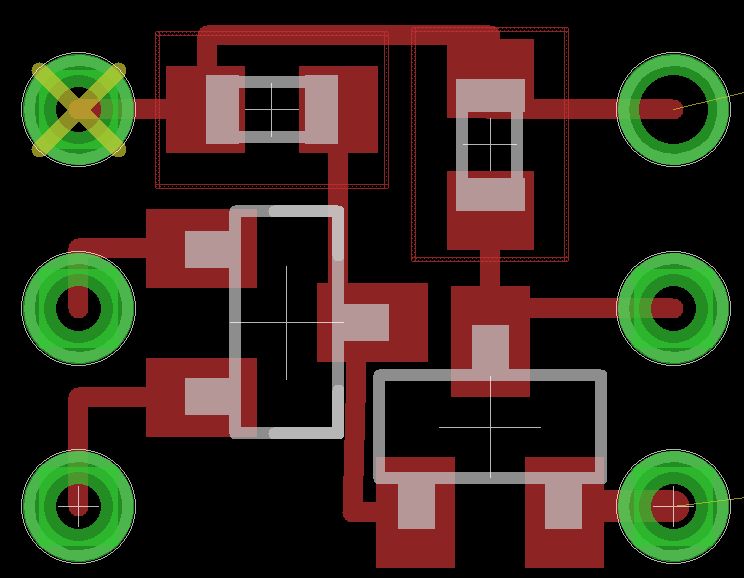
Ken stumbled on one of my earlier posts about DTL (diode transistor logic) and was interested enough to do some basic exploration. He reduced the DTL NAND gate to a double diode, a transistor and two resistors. Ken sent me the LTSpice and EagleCAD screen dumps that fit in about .4″ square:

nand

Pretty cool. In an email, Ken goes a bit further:

I’m working towards a bitslice pcb that implements either an ALU or a Program counter. Remarkably their logic is so similar that a single block of logic could be configured to match either requirement. I think I can get it all on to a 4″ x 2″ pcb with a couple of LEDs and a toggle switch on the front edge. Stack 8, 12 or 16 of these together and you have something similar to the PDP-8.

Awesome Ken! I hope to hear more about this when you have some hardware running.

I haven’t even done any real thinking since then, but I went back and tried to find some more information of people building stuff with DTL logic. I’m not sure if I spotted SV3ORA’s 4 bit digital computer before, but rereading it today, it turned out very cool. He constructed the logic on perfboard with just ordinary components. Very nice.

A transistorized 4-bit digital computer made out of discrete DTL

Addendum: Ken also pointed out the NAND to Tetris course in his email, which I believe I may have blogged about before, but which is a great resource for someone seeking to develop a more complete vertical understanding of computers from the ground up. Ken’s addition of actual soldering to the project makes it even cooler.

Some example python code to fetch weather forecasts…

July 8, 2014 | My Projects, Python, Web Programming | By: Mark VandeWettering

Need to get some weather information? The website forecast.io has a nice web based service you can use up to one thousand times a day for free. I was thinking of using it for an automated sprinkler application, but just to test it, I wrote this simple chunk of python to try it out. To use it yourself, you’ll need to get your own API key and modify it to use your own latitude and longitude. It’s not that amazing, but you might find it of use.

[sourcecode lang=”python”]
#!/usr/bin/env python

# __ _
# / _|___ _ _ ___ __ __ _ __| |_
# | _/ _ \ ‘_/ -_) _/ _` (_-< _|
# |_| \___/_| \___\__\__,_/__/\__|
#
# A python program which used some publically available
# web apis to find out what the forecast will be.
#

# You’ll need an API key below… you get 1000 requests per day for free.
# Go to forecast.io and sign up.

API="PUT_YOUR_OWN_API_KEY_HERE"
URL="https://api.forecast.io/forecast/"

# Your latitude and longitude belong here, I use SF for example
LAT= 37.7833
LNG=-122.4167

directions = ["N", "NNE", "ENE", "E", "ESE", "SSE", "S", "SSW", "WSW", "W", "WNW", "NNW"]

def bearing_to_direction(bearing):
d = 360. / 12.
return directions[int((bearing+d/2)/d)]

import sys
import os
import time
import optparse
import json

import urllib2

now = time.time()
cached = False

if os.path.exists("WEATHER.cache"):
f = open("WEATHER.cache")
parsed = json.loads(f.read())
f.close()
if now – parsed["currently"]["time"] < 900:
cached = True

if cached:
print "::: Using cached data…"
else:
print "::: Reloading cache…"
req = urllib2.Request(URL+API+"/"+("%f,%f"%(LAT,LNG)))
response = urllib2.urlopen(req)
parsed = json.loads(response.read())
f = open("WEATHER.cache", "w")
f.write(json.dumps(parsed, indent=4, sort_keys=True))
f.close() ;

c = parsed["currently"]
print ":::", time.strftime("%F %T", time.localtime(c["time"]))
print "::: Conditions:", c["summary"]
print "::: Temperature:", ("%.1f" % c["temperature"])+u"\u00B0"
print "::: Dew Point:", ("%.1f" % c["dewPoint"])+u"\u00B0"
print "::: Humidity:", ("%4.1f%%" % (c["humidity"]*100.))
print "::: Wind:", int(round(c["windSpeed"])), "mph", bearing_to_direction(c["windBearing"])

d = parsed["daily"]["data"][0]
print "::: High:", ("%.1f" % d["temperatureMax"])+u"\u00B0"
print "::: Low:", ("%.1f" % d["temperatureMin"])+u"\u00B0"

d = parsed["hourly"]["data"]

for x in d[:12]:
print time.strftime("\t%H:%M", time.localtime(x["time"])), x["summary"], ("%.1f" % x["temperature"])+u"\u00B0"
[/sourcecode]

Two more pictures from my foamcore 4×5 camera…

July 8, 2014 | My Photos, My Projects, Optics, Photography, Photos | By: Mark VandeWettering

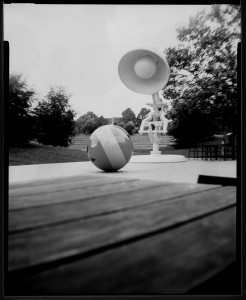
Here are two more photos I took at last night’s camera workshop. I wanted to take something slightly more beautiful than a selfie, so I chose the Luxo statue outside the Steve Jobs building at Pixar, and some white flowers from the garden. Both were taken rather late in the day, under partly cloudy skies using a 4 second exposure on some paper with an ASA value of around 4, and a 4 second exposure (timed by my accurately counting “Mississippis”). Both were shot at f/24. I scanned them using our copy machine at 600dpi, and then inverted them in gimp. I didn’t do any further processing on the Luxo. With the flowers, I adjusted the curve slightly to bring out some details in the darks between the flowers. I saved these versions as JPEGs, click on them to see them full resolution.

luxo

flowers

If you look to the upper right of the Luxo, you can see that there are some significant off-axis aberrations, as is also apparent in the background of the flowers. But the center of the field is remarkably sharp, considering. I’m rather pleased.