Category Archives: electronics

Building tanjent’s “bliplace” kit…

I was in the mood to melt some solder, but didn’t really have a lot of time and/or brainpower last night, so I turned to my box of little electronics kits that seems to have been growing over the last few years. I located a small plastic bag which contained tanjent’s “bliplace”, a tiny kit that he generously was handing out at a conference we both attended. It’s simple: an Atmel ATTINY 8 pin controller, three caps, five resistors, an electret microphone and a battery is all it takes to get it to run. I figured it would take me about 20 minutes to assemble. It took about 35, mostly because I wasn’t paying attention and soldered the first two resistors in the wrong place (the board has a very symmetric layout, and I got turned around). That got me some practice in using my solder sucker, and had to solder in two new 1K resistors from my junkbox. But in the end, it worked!

What is bliplace? In his words:

Bliplace is a wearable, hackable, sound-activated blinky light toy. It uses a small microcontroller and a mix of hardware and software feedback to automatically synchronize with and adapt to the sounds around it – it should pulse along with the ambient noises around you no matter if you’re in a quiet park or a thunderously loud concert.

Here’s the video of the thing working. Pardon the sound levels when I turn the radio up, I shot and edited this on my iPhone.


It’s a clever little gadget by itself. But what’s especially cool is that it is open source. You can get the board and schematic files, Gerber files, and the source code for the firmware. I think it would be interesting to make an “amped up” version of this thing, which would drive some big power transistors to switch some truly high power CREE LEDs. The code is released under the MIT license, so modifications should be easy and redistributable. It should be trivial to get this to run on the Arduino platform as well, which will make experiments easier for the wider audience.

I’ll be staring at the code a bit harder over the next few days. Stay tuned.

On RC Filters…

Over on the #savagecircuits IRC channel on irc.afternet.org, Atdiy was trying to decipher the mysteries of a mainstay of analog circuit design: the RC filter such as the one pictured on the right (diagram cribbed from Wikipedia) It dawned on me that (newbie as I am) I didn’t really have a clear understanding of them either, so I thought it would be worth the exercise to go through the mathematics of them as well, and try to derive the simple formulas from (more or less) first principles.

First of all, it’s interesting to just try to understand what happens at DC voltages. No current flows through the capacitor at DC, so the output voltage is just the input voltage (when measured as an open circuit, more on this later). If you are a total newbie like me, you can look at the capacitor symbol, and note that one side is not connected to the other (it’s an open circuit), so no current can flow across it (at least, at DC) frequencies. But at higher frequencies, we need to consider the behavior of the capacitor, which means that we need to consider impedance.

If you don’t grok complex numbers, the road ahead will be a tiny bit bumpy. I didn’t have enough brain power to write an intro to complex arithmetic, but if it’s new to you, consider reading up on it. For now, just remember that complex numbers can be manipulated like regular numbers (adding, multiplying,dividing and the like) but have different rules.

Rather than derive anything at this point, we’ll just cheat a tiny bit and introduce a formula to find the reactance of the capacitor. (You should not feel too uneasy at this point by introducing what seems like magic at this point. The following equation just describes how capacitors work. You probably accepted that resistors could be described by a single number (expressed in ohms). Because capacitors have more complicated behavior in AC circuits, they need a bit more complicated description, but not too much).

The capacitive reactance of the capacitor is given by:

[latex]X_C = \frac{1}{2 \pi f C}[/latex]

where [latex]f[/latex] is the frequency of operation, and [latex]C[/latex] is the capacitance in farads (be careful, not microfarads). For instance, a 1 nanofarad capacitor has a reactance of about 160 Ohms at 1Mhz.

I glossed over something a bit there. The reactance we computed is measured in ohms, which makes it seem like it’s a resistance. But in reality, it’s an impedance (usually written as the symbol [latex]Z[/latex]). Impedance is a measure of the opposition of a circuit to current, but it generalizes resistance by taking into account the frequency dependent behavior of capacitors and inductors. In particular, impedance varies with frequency.

You can split the impedance into the sum of two parts, the pure resistance (usually written as [latex]R[/latex]) and the reactance (usually written as [latex]X[/latex], as we did above when we were computing the reactance of the capacitor). The total reactance of a circuit is the inductive reactance minus the capacitive reactance. If the overall reactance is negative, the circuit looks like a capacitor. If the sum is positive, it looks like an inductor. If they precisely cancel, then the reactance disappears, and the circuit presents no opposition to current at all.

But how do we handle resistance? Here’s where the complex numbers come in.

[latex]Z = \sqrt{R^2 + X^2}[/latex]

[latex]X = X_L – X_C[/latex]

The nifty bit is that you can treat impedances exactly as if they were resistances (e.g. we can use Ohm’s law) just so long as we remember that we are dealing with complex quantities. I decided to write a small Python program which could be used to compute the filter responses of RC filters:

[sourcecode lang=”python”]
#!/usr/bin/env python
#
# Here is a program that works out how RC filters
# work. Here is a diagram of the prototypical
# RC low pass filter, sampled across a resistive
# load Rload.
#
# R
# Vin -> —/\/\/\/\—-+——–+ Vout
# | |
# | /
# | \
# C —– / Rload
# —– \
# | /
# | \
# | |
# —– —–
# — —
# – –

import math
import cmath

RLoad = 1e9
R = 600 #
C = 0.0000001 # .1uF

for f in range(10, 100000, 10):
XC = complex(0., -1/(2.0*math.pi*f*C))
Z = cmath.sqrt(XC*XC)
t = RLoad * Z / (RLoad + Z)
Vout = t / (R + t)
print f, 20.0 * math.log10(cmath.sqrt(Vout*Vout.conjugate()).real)
[/sourcecode]

If you take the data that gets printed out here and graph it, you get the following:
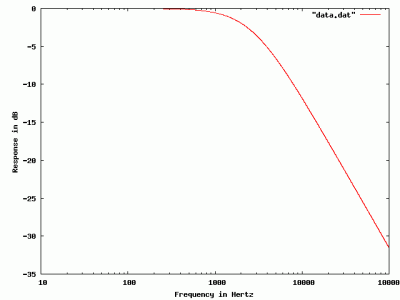
I built the same circuit in LTSpice just to check my understanding, and the graph appears identical. If you search through the data to find the place where the response drops to -3db, you find it occurs around 2650 Hz. The traditional formula for filter bandwidth is

[latex]F = \frac{1}{2 \pi R C}[/latex]

which when you plug in the values I chose, you end up with 2653.9 (which is pretty good agreement).

Addendum: This filter works best when the input impedance is very low (compared to the 600 ohms that we chose for the input resistor [latex]R[/latex]) and where the load impedance [latex]Rload[/latex] (here purely resistive, but it could also be complex) is high. If the load were low (Rload was comparable or less than than R) then the losses would be higher. (Ignore the capacitor. If Rload is small compared to R, then the voltage, even at DC, is already divided down to a lower value, this shifts the entire curve downward).

Addendum2: I wrote this hastily. If it doesn’t make sense, or people have suggestions, don’t hesitate to add them in the comments below.

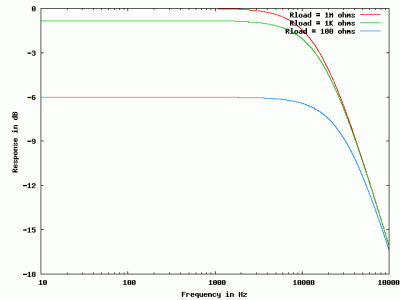
Addendum3: Atdiy asked me to run some simulations showing how the load [latex]Rload[/latex] changes the output to demonstrate loss. Here, I kept [latex]R = 100[/latex], but varied [latex]Rload[/latex] from 1M ohms, to 1Kohms, and then down to just 100ohms. You can see the entire curve moves down, with only 100 ohms of load resistance, the voltage is -6db (multiplied by 0.25) even at DC).
Addendum4: Atidy has started her series on filter design, which includes a qualitative description of how these filters work that you might find easier to understand. Check it out here.
.

The Kansas City Standard

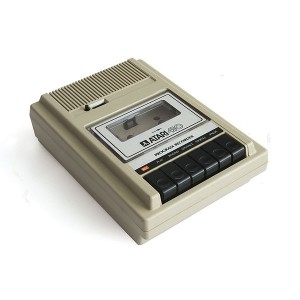
I was pondering my laser transmitter the other day, and began to think of how I might transmit digital information from the Arduino to the remote receiver. Since I am old, I remember the old days where programs used to be stored on an obsolete audio storage medium called cassette tape. Indeed, the first storage device I ever used was the Atari 410 tape drive pictured on the right.

The Atari stored data at 600 baud, using FSK (data is stored as short bursts of two different tones, in the case of the Atari 3995 and 5327 hz), using a variant of the so-called Kansas City Standard. KCS was a standard for storing data on cassettes that was developed at a Byte magazine sponsored symposium in 1975.

Data is converted to short bursts of 1200Hz and 2400hz tones to represent zeroes and ones, respectively. Each burst is 1/300 of a second long, meaning that it sends 300 bits per second. Each 8 bit character is framed by a 0 start bit, and a pair of 1 stop bits so that character frames can be identified. It was designed to be a reliable if slow format, and succeeded on both counts. It transmits about 27 characters per second. An 8K download would take about five minutes.

It’s amazing we ever lived through the stone age.

Anyway, I thought it would be fun to make an Arduino library to send this information over my laser link, but first I decided that it would be good to test to make sure I understood how the format worked. So, I coded up a small program to generate some test .WAV files from an input data file. I made the problem simpler by generating the output at the somewhat non-standard sample rate of 9600 samples per second. This considerably simplifies the generation of samples, since they only would have amplitudes of zero, plus or minus one, and plus or minus sqrt(2)/2. I coded up the following C code, and generated this WAV file.

A WAV file that contains an ASCII test message, encoded in Kansas City Standard

The encoder is simple, the decoder, somewhat less so. So, to test that I was generating the proper bits, I used Martin Ward’s decoder written in Perl which did a good job of decoding the sample WAV files. I haven’t tested the robustness of this format with respect to noise yet, but it does appear to work reasonably well.

It wouldn’t be that hard to modify the simple sound generation code I used before to send data in this format. I think I will try to get to that next week.

[sourcecode lang=”c”]
#include <stdio.h>
#include <stdlib.h>
#include <math.h>
#include <sndfile.h>

/*
* kc.c
* A program which takes a file as input, and encodes it via the old
* Kansas City Standard – a 300 baud format that was used by old
* microcomputers to store data onto cassette tape.
*
* http://en.wikipedia.org/wiki/Kansas_City_standard
*
* We are going to produce a 9600 sample per second output file…
*
* Each "baud" is 32 samples long.
*
* A ‘0’ is 4 cycles @ 1200 Hz.
* A ‘1’ is 8 cycles @ 2400 Hz.
*
* 0 – 0 R2 1 R2 0 -R2 -1 -R2
* 1 – 0 1 0 -1
*
*/

#define R2 (.70710678118654752440f)

SNDFILE *sf ;
SF_INFO sfinfo ;

void
output(float f)
{
sf_write_float(sf, &f, 1) ;
}

void
send(int bit)
{
int c ;

switch (bit) {
case 0:
for (c=0; c<4; c++) {
output(0.f) ;
output(R2) ;
output(1.f) ;
output(R2) ;
output(0.f) ;
output(-R2) ;
output(-1.f) ;
output(-R2) ;
}
break ;
case 1:
for (c=0; c<8; c++) {
output(0.f) ;
output(1.f) ;
output(0.f) ;
output(-1.f) ;
}
break ;
default:
abort() ;
}
}

void
encode(int ch)
{
int i ;
send(0) ; /* start bit… */
for (i=0; i<8; i++) {
send(ch & 1) ;
ch = ch >> 1 ;
}
send(1) ; /* two stop bits */
send(1) ;
}

main()
{
int i, ch ;

sfinfo.channels = 1 ;
sfinfo.samplerate = 9600 ;
sfinfo.format = SF_FORMAT_WAV | SF_FORMAT_PCM_16 ;

sf = sf_open("test.wav", SFM_WRITE, &sfinfo) ;

for (i=0; i<9600/4; i++)
output(0.) ;
while ((ch = getchar()) != EOF)
encode(ch) ;
for (i=0; i<9600/4; i++)
output(0.) ;

sf_close(sf) ;
}
[/sourcecode]

Hallway Test of the Arduino PWM Laser Transmitter

The other day, I showed how the Arduino could be used to generate PWM audio and send it over a very short distance using an LED. In my ever increasing pile of parts, I had some small 5mw red laser diode modules. These modules are supposed to be driven by direct connection to three 1.5 volt batteries, and draw a maximum of 50ma or so. In a fit of “what the heck”, I just soldered some better clip leads to one of them, and hooked it (without any other current limiting) to the PWM output of the Arduino. I measured the current draw as being about 13.7ma, which seemed fine, and the laser didn’t explode. So, the next day, I brought it into work and tested it out in a long hallway:


(Forgive the somewhat lower quality video, I sent them from my iPhone, and the quality leaves much to be desired). But it obviously works extremely well: the signal is easily discernable at even low settings of the amp.

Using the Arduino to send audio via pulse width modulation

I’m still interested in doing light based communication, but I haven’t made a lot of progress. I did build an LTSpice model of the circuit I used yesterday, but other than verifying that it probably would work as built (which it did) I didn’t feel like I had enough brain cells working to optimize the circuit. So, instead, I decided to try to see if I could use an Arduino to send reasonably high quality audio over light using pulse width modulation.

It doesn’t really seem all that hard in principle: the Arduino libraries include an analogWrite() command which can be used to generate a PWM signal on an output pin. But the problem is the frequency of operation is quite low: around 500Hz or so. Since I was interested in sending voice bandwidth signals (say sampled at 8000Hz or so) the PWM “carrier” frequency simply wasn’t high enough.

So, I did a bit of digging. It turns out that you can configure the timers on the ATMEGA328 on board the Arduino pretty easily, and if you dig through the datasheet, scratch your head a bit, and then type carefully, you can come up with the right incantation. Which I did: in fact, it worked the very first time I downloaded it to the board.

I recorded a second or so of audio using Audacity, dumped it as an 8 bit raw audio file, and then converted it to bytes. I then created a very simple program which simply copies each byte to the PWM overflow register, and then delays for 125 microseconds (1/8000 of a second). Other than that, just some simple bit twiddling to change the PWM prescaler to operate at the full 16Mhz clockrate, and… voila.

Witness the video:


Here’s the core of the code (the actual audio data has been stripped for brevity):

[sourcecode lang=”c”]
#include <avr/pgmspace.h>

prog_uchar bwdat[] PROGMEM = {
0x80, 0x80, 0x80, 0x7f, 0x80, 0x80, 0x80, 0x81, 0x80, 0x80, 0x80, 0x80,
// … lots of lines deleted for brevity…
0x80, 0x80, 0x80, 0x80, 0x80, 0x81, 0x80, 0x7f, 0x7f, 0x80, 0x80, 0x80,
0x80, 0x81, 0x81, 0x80, 0x80, 0x81
} ;

void
setup()
{
pinMode(11, OUTPUT);
TCCR2A = _BV(COM2A1) | _BV(WGM21) | _BV(WGM20);
TCCR2B = _BV(CS20) ;
OCR2A = 180;
}

void
loop()
{
int i ;
char ch ;

for (i=0; i<sizeof(bwdat); i++) {
ch = pgm_read_byte_near(bwdat+i) ;
OCR2A = ch ;
delayMicroseconds(125) ;
}
}
[/sourcecode]

Laser audio transmitter…

Okay, so last night, after just testing one of the laser modules I had, I decided to try to make a transmitter to send audio over laser light to my “solar cell + Radio Shack amplified speaker” receiver that I was experimenting with earlier. I suppose I could have used my linear current LED modulator, but there were reasons to believe that it wouldn’t work all that well. Lasers are inherently nonlinear: they are meant to operate under reasonably narrow ranges of drive current, whereas LEDs are fairly linear over a wide range of drive currents. Thus, linear current drive isn’t appropriate for lasers. It would be much better to use pulse-width modulation to simulate AM modulation on a higher frequency carrier.

So, that’s what I did.

I took the quickest way out: I built one using a 555 timer. I had previously built a simple AM radio transmitter using a 555 timer, and somewhat unsurprisingly, the exact same circuit can be used to drive a laser. You simply hook a current limiting resistor (150 ohms in my case) and the laser diode to the output at pin 3 of the 555 astable multivibrator, aim it at your solar cell receiver, and.. voila! It works!

Well, it sort of works. The sound quality, like the sound quality of the AM transmitter that I liked to above, leaves something to be desired. It’s not unintelligible or anything, it’s just not particularly high fidelity. So, rather than shoot a video that demonstrates it, I thought I’d spend some time trying to figure out how to design a system that would work better. Here are some of my basic thoughts:

My input biasing and scaling for the prototype was completely adhoc. I merely injected the voltage directly onto pin 5, without any impedance matching, scaling or biasing. That’s mostly because I was pretty sure that even without those things, I’d get some modulation that would be detectable. I was right, but I really should go back and figure out what the right answer is to ensure that I have deep modulation with a typical -1v to 1v, low impedance audio signal (which is what I’m feeding into it).

The AM carrier frequency I picked was selected by just using two resistors (I think 1K) from my junkbox, and then selecting caps to get the frequency of oscillation above the audio frequencies people can hear. I think I ended up with a 0.01 uF cap, which results in a frequency of oscillation of around 46Khz). That seems okay, but on the receive side, we could benefit by some bandpass filters centered around that frequency (this would hopefully decrease the 60 hz buzz I get from flourescent lighting).

I got a few more ideas, but they will have to wait until after breakfast. Oh, and baseball. A double header, A’s versus Angels.

Addendum: Okay, before I left, I recorded a quick demonstration to show how it works. It’s not bad actually:

Just playing with laser diodes…

A while ago, I got some laser diodes from from dealextreme.com. They were dirt cheap, but I haven’t had any chance to hook them up. I didn’t have a datasheet for them either, so wasn’t sure exactly what I should do to current limit them. So, I hooked it in series with a 150 ohm resistor and a 9v battery, and measured both the current and the voltage drop across the laser module. The resulting beam seemed bright and steady.

The current through the circuit was approximately 37ma, and showed a voltage drop of almost exactly 2.5 volts. That means the total power consumed is about 92 mw. These laser modules seem to be good quality: the beam is bright and quite round. While I don’t have a specific model number on these diodes, staring at datasheets for similar diodes make me believe I’m probably not too far off in terms of picking a good current.

Yes, yes, I should use a better constant current circuit. This was just a first test.

Magnetic Loop Antenna Theory

I was digging around trying to find some software to help me design a magnetic loop antenna for use on VLF frequencies. I stumbled across this page, which provided a lot of interesting insights, as well as a Spice model to help you understand how they work.

Magnetic Loop Antenna Theory

The article clarified something to me which I only vaguely understood before. If you desire narrow band performance, the best way to do it is to make the antenna resonant by paralleling it with a capacitor, and using it in combination with a high impedance load to measure the voltage from the antenna. But if you desire wide band performance, then you want to use it combination with a very low impedance, which basically means that you feed it into a transimpedance amplifier which effectively shorts the antenna to ground and converts the current to a voltage.

Interesting.

I might have missed it, but while the page presents an Spice model for the antenna, it doesn’t seem to have it available for download. I’m working on putting it into LTSpice, and should have it available for download sometime in the next couple of days.

Andrew Holme’s projects

Most of the websites that I link to are related to specific topics or projects. But every once in a while, you find one that has a bunch of good stuff that matches some of your esoteric interests, and you wonder how one person could do it all. Inspired by Jeri Ellsworth’s latest video showing her Spartan 6 FPGA board which reconfigures itself to generate the VFO, I thought I’d try to figure out what magic that entailed, with the idea of maybe doing something similar with my (as yet sorely underutilized) BASYS-2 board. That sent me to Andrew Holme’s project page:

Andrew Holme’s projects

He’s got some projects on Fractional-N frequency synthesizers, which I don’t think are exactly what we want, but what a treasure trove of cool projects. An experiment using core memory, a microcoded FORTH machine built from discrete logic, a homebrew spectrum analyzer, and an experimental GPS receiver! Too cool. Lots of good stuff.

The Gyrator VLF receiver…

Back on June 7, there was a spectacular coronal mass ejection on the sun:


Yes, I did mention this event and gave some links to VLF receivers at the time, but I’ve been thinking about this some more.

As an astronomy/telescope buff, I have built simple telescopes for looking at the sun, but I haven’t done much of that lately, and I have only recently become interested in observing the sun’s effect on the Earth’s radio environment. I’ve also had a fairly longstanding interest in VLF communications, and so the prospect of building a radio system for monitoring radio for SIDs (Sudden Ionospheric Disturbances) seems like a good project. I recall that Mark Spencer, WA8SME whom I’ve had the pleasure of meeting at Pacificon and even chatted with via the AO-51 satellite had published some articles on designing such radios for amateur and educational construction.

The most common way to monitor for SIDs is to try to detect the signal strength of the VLF station in Cutler, ME on 24Khz. Changes in signal strength can indicate the presence of solar flare activity as the ionosphere is bombarded by high energy particles. One common circuit that lots of people use is called The Gyrator VLF circuit, which you can find here:

The Original Gyrator Circuit (PDF)

I had never really looked at this circuit very carefully before, and looking at it tonight, I realized that it was actually fairly interesting and employs a technique which I hadn’t seen before. Instead of making a tuned front end using a (fairly large, because of the low frequency) inductor, they create an equivalent circuit using two op amps and a collection of resistors. This creates an inductor with very high Q, with the side effect that is easier to make, using operational amplifiers that you can still get at Radio Shack. I’ll probably try to simulate some of the basics with LTSpice to gain some intuition as to what’s going on, but it’s a simple enough circuit that just building it would be pretty easy.

The basic circuit has undergone a couple of iterations, and now the Gyrator III schematic is recommended by the AAVSO. You can check out the details here (and surf around, the AAVSO has lots of information on this stuff).

A Cree LED in my linear current LED Transmitter

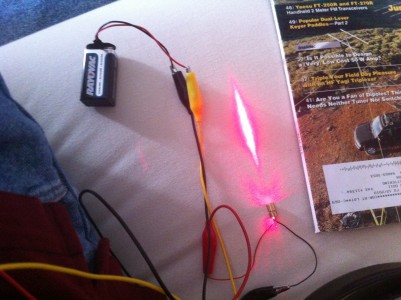
I was away all weekend, so I didn’t get a chance to check out my LEDs that I got from Deal Extreme last week. Tonight, I just soldered a couple of clip leads and tried it out when hooked to the linear current modulator that I built (and blogged about) before. The transmitter in this video is set to pull an average of about 10ma average through the diode, with a peak of 20ma. That’s hardly enough to really get the cree going at all (I believe this one can go all the way to 350ma or so, and about 1W of output power) but it was enough to play with.


After I filmed this, I changed the current limiting resistor from 100 ohms to 16 ohms (by ganging two 32 ohm resistors together) and wired my multimeter in series with the supply to measure the power, and as expected it was 60ma, for an output of around 150mw or so (I didn’t measure the voltage drop, but I think it’s around 2.6 volts). It was quite a bit brighter, and was detectable even without any optical assistance at the other side of my room. To go much higher, I think I should probably swap the 2N3904 that I’m using to modulate it with something a bit beefier (like the IRF510s that I have lying around) and I’ll need some 1/2 watt current limiting resistors (probably around 3 ohms).

I’ll play with this some more in the next few weeks.

What should Radio Shack do to satisfy the DIY/Maker community?

Radio Shack recently posted this (as yet, not incredibly popular) video asking for feedback on what they could do to support the DIY/Maker community:

I’ve thought about it off and on for the last couple of days, and read some other blog posts, and I thought I’d give my take on it.

I mostly don’t think they can help the DIY/Maker.

First of all, there is a cultural element. While Radio Shacks of the distant past used to be populated by people who might know something about electronics, for the most part when I go into them now I see kids working for minimum wage without any real knowledge or even excitement about electronics. They might be able to help you find the right 1/8″ jack Y-connector you need, or a battery, but for the most part, they don’t build things and therefore, they aren’t really very helpful to those who do. It’s nice to have a local store where I might be able to go in and get a voltage regulator or a MPF102, but I haven’t interacted with anyone at a Radio Shack in years who could tell me what one was, or even if they had them in stock faster than I could find them in their component cabinets.

Related to the first is that they simply have lost their niche. Thirty years ago, you might expect that you could see something in a Radio Shack store that was innovative and cool. Perhaps it was the TRS-80 or the Model 102. Maybe it was a ham radio or a scanner. Or even just a plain old stereo or radio (yes, they used to be more of a status symbol than they are now). Now, you simply see the same things that you can see at any of the big electronics stores like Best Buy, but you’ll probably pay more. They simply aren’t as relevent anymore: other than maybe an RC car or some batteries, most people I know don’t even consider making an electronic purchase at Radio Shack.

They also have pretty much abandoned the educational niche that they used to be good at. Let’s face it, there really wasn’t much practical reason to buy a 7400 series TTL gate, but I did, along with some books (probably by Forrest Mims) to help me understand how they work. I built crystal radios and had a 150 in one electronics kit. I learned alot. There are a lot of people today who would like to learn about how to assemble simple electronic and computer gadgets, but they can’t get those supplies at Radio Shack.

Lastly, they just aren’t innovative. Perhaps it is just because they are carrying the weight of their 4500 or so stores: there isn’t a way they can be sufficiently nimble. Small Internet basesd companies like Sparkfun, Adafruit Industries, Evil Mad Scientist Laboratories, and Seeed Studio are all actively, hungrily trying to develop and market new products, and to make components available to the Maker community. It’s these small companies and their innovation that I think are most exciting, and these are the people I feel more comfortable supporting, since it is obvious that these people “get it” to a degree that Radio Shack simply doesn’t.

What can Radio Shack do? Realistically, not much. If I was unrealistic? Okay, here are some ideas.

  • Revamp your staff. Stop treating them like minimum wage register-jockies, and pursue those with an interest in electronics and in helping your customers.
  • Bring back kits and educational toys. Consider it fertilizing the ground for the future. If kids aren’t exposed to this kind of tinkering, they aren’t going to grow into adults with lots of disposable income who tinker.
  • Bring back ham radio equipment. Hams are tinkerers, you probably want them in your store. Radio Shack used to sell pretty decent and reasonably priced ham radio equipment and scanners. Sunspots are on the rise, and 10m will begin to heat up. Take advantage of the recent increase in hams caused by the dropping of the Morse code requirement, and figure out a way to get them into your stores.
  • Pay attention to trends in open hardware, find popular items, and stock them. I’d go to the Shack to get an Arduino if they had them in stock. Or a Bus Pirate. Or some high power Cree LEDs. Or good solar cells and battery chargers.
  • FInd local hacker/maker communities, and help them. Be nimble. Support your local groups by stocking the equipment and components they need.
  • In short, ask yourself what the value is that you are delivering to your customers, and stop viewing them as mindless consumers. If you seriously want their business, seriously pursue it.

What do you all think? What could Radio Shack do for you that would make you cross their doorstep more often?

Speleogroup’s cool LED headlamp design

Fellow hacker Mike Cowlishaw tweeted me a reminder that he had worked on a design for a spelunker’s headlamp that used Luxeon LEDs, and had excellent high performance. I remember that I listened to a talk about this design, but at the time, I wasn’t saavy enough in electronics to grasp the details, and it had slipped from my mind. He was designing a headlamp for caving, where battery life was a serious matter of safety, so efficiency was primary concern. The final design they came up with would drive a 350ma Luxeon LED at full power for over 5.5 hours using 4 high capacity 1800maH batteries, and then would automatically step down the current as the battery voltage faded. Their first designs used an LT1512A constant current/constant current battery charge controller, but the version I think most interesting was just a small Atmel AVR chip driving a IF7422 FETKY (combination power MOSFET and Schottky diode. Very neat! Mike references an interesting AVR application note which gives a complete design for a battery charger, which is indeed somewhat similar. I’m printing it out so I can read it later.

Speleogroup – LED Lamp based upon ATtiny

Thanks Mike!

A simple constant current LED circuit

I’ve been pretty happy with the performance of my linear current based LED transmitter, but that was just sitting on the bench, driving a 20ma device. As I played with the circuit, I began to realize that if I scaled the circuit up to a 1W LED, its deficiencies in terms of efficiency would become more evident. In particular, I began to think about the efficiency: what percentage of the total power delivered by the battery is actually consumed by the LED?

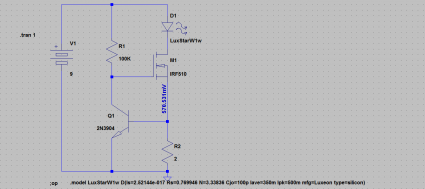
Rather than using my previous op amp circuit, I thought I’d analyze the basic circuit from this Instructable, which I’ve created and reproduced with LTSpice:

I substituted components: I used the every popular 2N3904 and IRF510, and entered a simple model for a 1W Luxeon LED, which has a current drop of around 3.4v. I set it for a 9v supply, just for an example. A quick simulation shows that current through the LED is about 285mA, which combined with the voltage drop means the LED is putting out about 973mw.

But there is also a voltage drop through the MOSFET and through the reference resistor R2. The resistor is easy to calculate: the current through it is the same as the current through the LED (285mA) and the resistance is 2 ohms. The voltage drop is the then .57 volts, and the total power is .57V * 285mA or about 165mw.

So, what’s left? Well, we began with 9v, and we drop 3.4 for the LED, and another .57V for the resistor, let’s say the total drop is 4V. That leaves 5V, and at 285mA or about 1.425 watts. Ouch. The total of non-LED components is about 2.6W, only about 1W of which gets to the LED which nets us about 37% efficiency.

We can do a bit better by lowering the supply voltage: dropping it to six volts lowers the current to around 267mA, but the voltage drop across the MOSFET decreases to just a little over 2V, which drops the power to about 550mw. The net result is the efficiency climbs to about 57%.

Of course now more integrated solutions exist: many of which combine voltage regulation and current limiting in very small packages at high efficiencies. For instance, the LM3407 is a 350mA constant current floating buck switching converter. It can achieve efficiencies of 90% over a wide variety of supply voltages in a very small, inexpensive package. It also appears that you can use it with a PWM input to implement dimmer technology. It seems like a chip like this can be the center of an efficient LED transmitter.

More to think about and play with.