New experiment… Life beyond Comcast…

February 6, 2016 | Amateur Radio | By: Mark VandeWettering

Today, I finally lost my freaking mind with respect to Comcast.

First of all, some background. I’ve have been a Comcast customer since 1999 when I moved into my house. For the most part, the service itself has been reasonably reliable and effective. I don’t have a lot of technical quibbles with them.

But their customer service makes me absolutely insane.

I am currently paying $269 a month (yeah, I know, right?) for a combination of Internet, TV, and phone (which I didn’t even want, but which was part of some “package” deal that was supposed to save me lots of money, that somehow never really materialized). I have mostly been ignoring it, but I finally decided that if I am paying nearly $3000 a year on television and Internet, I should review my priorities to reduce my bill since I pay for a lot of premium services that I probably don’t really need.

And here is where my irritation begins.

Because if you want to do that, you can’t do it online. In fact, other than determining that someone, somewhere signed me up for some package which has the label “HD XF Premier Bundle” and a somewhat mysterious “Additional Outlet Fee” for $39.00, it has no indication about what Internet speed limits can be be achieved, what channels are included or not included, and most importantly there is no way to actually determine what my options are. In fact, to make any changes to your service, that means talking to a service representative.

And here is where my absolute rage begins.

I hate losing my temper with people. I really do. I like to be easy going and polite. If someone is trying to help me, I try to help them help me. But Comcast service representatives are not there to help you. They are there to sell their package deals, which seem carefully constructed to be as opaque as humanly possible and to extract the maximum amount of money from you that they possibly can.

It’s infuriating, and today my fuse was admittedly short.

To be fair, I probably wasn’t fair. I wanted to a) review each of the charges on my bill and b) decide in each case whether the charge was appropriate, and what my options might be to change it. But the Comcast service representative literally could not do that. She insisted on trying to tell me that there was some other package, with some other price that she could sign me up for that would achieve some other price that was much cheaper. When I said that sounded better, she asked me whether I wanted to sign up for a “commitment” or not, and started explaining that if I signed up for a commitment, then I could not change my service for two years. And I am supposed to decide all of this without an actual itemization of the terms and conditions or even the services that were provided.

And I lost my freaking mind. Expletives were emitted. I was not a gentlemen. And then something that has never happened before, happened.

I had a customer service representative hang up on me.

So, I’m going to do something truly crazy: I’m ditching Comcast. Sonic.net has become available in my neighborhood, and they have more sensible packages available with Direct TV. I imagine that the service that I am going to get is a bit less speedy than Comcast, but I literally don’t care. I literally don’t care if Direct TV is better or worse than Comcast or even cheaper. I just no longer want to be a Comcast customer, and since it appears I don’t have to, I am not going to.

Voting with my feet. I’ll let you all know how it goes.

Quadcopter Survey with my DJI Phantom 2/GoPro

January 25, 2016 | My Projects, Quadcopter | By: Mark VandeWettering

I hadn’t been flying my DJI Phantom 2 since last year (before I herniated two disks in my neck) but I’ve been meaning to take it out and get it in the the air. This week, two different things happened which provided some incentives to get it in the air, for reasons which weren’t entirely frivolous:

  • My new next door neighbor mentioned that there was debris in the drainage ditches up on the hill that drain from his yard to my yard. I thought that it had been cleaned out, so I wanted to be sure, but frankly, hiking up there when the ground is wet is asking for a new herniated disk.
  • I had a small roof leak which caused a call to my roofers to come out and have a peek. They mentioned that I had a fair number of busted tiles on my roof (annoying, perhaps broken by our contractors during last years remodel?).

I hadn’t flown in a while, so I decided that rather than flying over my house, I’d begin by just getting the view of the drainage ditches. I got the copter charged up again, reviewed my checklists, and took it out into the backyard.

Oddly, I heard a familiar droning: one of my neighbors had a quadcopter up doing a high pass over the neighborhood. By the time I was ready though, it had sailed back off to the south. I got it up in the air and tried to get my coordination back. It was a beautiful day for flying.

Here’s a nice high view to the north east from my house, fairly high up.

vlcsnap-2016-01-24-16h43m07s108

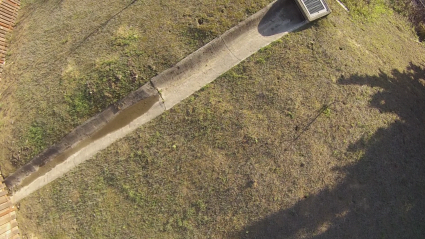
But that wasn’t what I was after: I aimed the GoPro down and flew fairly low over my hill to get these pictures. This is the view of the lower of the two drainage ditches. It’s got a little silt in it, but is pretty clear. It might be worthwhile to do a concrete patch of the seam. You can also see a fair number of gopher holes up on the hill.

vlcsnap-2016-01-24-16h42m37s703

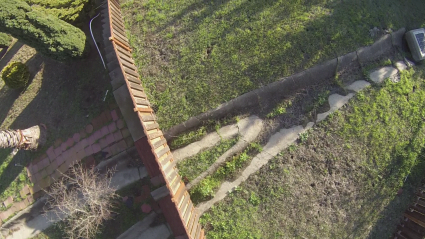
The other ditch is at the top of the hill. It actually gets a lot less water, so the silt settles out pretty well up there, and I’ve got some grass growing it. It could definitely use some work to clear it.

vlcsnap-2016-01-24-16h42m21s229

Very nice! Perhaps next weekend I’ll do a flight over the house and see if I can identify broken roof tiles. I’m pretty glad I didn’t have to hike up there to check it out. Kind of wish I had an FPV setup. Perhaps I’ll get that going in the not-too-distant future.

Christmas Dinner: Prime Rib == Yum.

December 25, 2015 | Food | By: Mark VandeWettering

Okay, need to archive this for future Christmas dinners, because it turned out pretty nicely. I’m stuff chock-a-block full of prime rib, which was done pretty well, but I am going to add a suggestion or two for next year that I can refer to in the future, and possibly make it even better.

I purchased a 7.5 pound prime rib from Costco, kind of at the last minute. What I should have done is buy it several days in advance, unwrap it, rub it with a dry rub of salt, pepper and rosemary and let it sit uncovered in the fridge for at least a day. I didn’t have time for that, so instead, I remembered to pull it out several hours in advance of cooking it. It is important that the meat come up to roughly room temperature before you cook it, otherwise the inside will remain raw even the outside is overdone. I rinsed it, dried it with paper towels, and then made a simple rub of salt and pepper, and rubbed it in.

Previously, I had cooked prime rib by searing it in a hot pan or oven, and then putting it in a low oven until it came up to 120 degrees or so. But I am always willing to try new methods.
The Food Lab’s definitive guide to prime rib is well worth reading, and formed the basis of what I tried tonight.

Skipping a lot of what they prescribed, the basic idea is to start the cooking in a very low oven: I set mine for a mere two hundred degrees Fahrenheit. This low temperature allows the meat to cook evenly, until the center comes up to 120 degrees. If you are going to spend money on a prime rib, get a digital thermometer and use it. It took about three hours for this roast to reach 118, which I deemed okay. Next time, I’ll probably let it go another five degrees. While the meat was not “blue” (raw), it was a little more rare than Carmen likes it, and I could have tolerated a little warmer inside without affecting the taste or texture. You then pull the roast out, and tent it with foil, while you let the oven heat up to as hot as it can go (500 degrees plus), which should take 20-30 minutes. Then, a simple eight or nine minutes in the oven will crisp up the outside, making a nice salty crust that is one of the great parts of a prime rib.

The good news about this is that no part of the prime rib turns out overcooked and gray. Check out this picture (not mine):

20141208-prime-rib-guide-12

This roast was cooked in a hot oven, so by the time the meat next to the bone got cooked, the top was overdone and dry.

My roast tonight? Delicious. Beautifully even in color from center to edge, and full of juiciness. Next time, I might let it go a few more minutes to get the center just a tiny bit warmer (I was impatient), and I might also let the “crustifying” phase run a bit more, but the texture and doneness were very good. Letting the roast dry age with a dry rub in the fridge for a couple of days would likely intensify the meat flavor and make it better too.

Sides? A simple lettuce and cherry tomato salad with lemon vinaigrette, and some mashed russet potatoes with butter. Yum.

And the best part, this meal will keep on giving. Tomorrow, it will get sliced and made into French Dip sandwiches on toasted rolls, and the bones will get roasted again and turned into beef stock for some future stroganoff.

Merry Christmas to all. You are in my thoughts.

Two bits of hardware on order…

December 19, 2015 | Embedded, Hacking, Internet of Things, Raspberry Pi, Small Linux Computers | By: Mark VandeWettering

Yes, my fascination with cheap computing devices continues. I’ve got two bits on order at the moment.

First is the Pine A64 from Kickstarter. This one won’t be showing up for a while, but seems to be a pretty nice piece of kit. You can think of it as a competitor for the Raspberry Pi, but it’s got a few additions that seem pretty interesting. You can order them with up to 2G of RAM, it can drive a 4K display, it has a real time clock, and it’s actually cheaper than the Pi.


Second is the LinkIt Smart 7688 Duo from Seeedstudio. It should ship to me fairly quickly, and I’m pretty excited by it. It runs Linux OpenWRT, which I have had some experience with on other router hardware. It’s tiny and limited, but still powerful. I view it as basically competition for the WRTnode, which has similar specs and also runs OpenWRT, but this one nicely includes a microSD card slot. I will try to get it up and running and maybe do a comparison between the two when I get it.

Stay tuned.

I’m not dead…

December 18, 2015 | Blogging | By: Mark VandeWettering

Hey gang…

It’s been quite some time since I posted anything here. Apologies. I have had a lot going on for the last sixty days or so, most dramatically a herniated disk in my neck. I am improving though, and have some backed up ideas for blog posts, so stay tuned, and I promise over the next day or two you’ll see some posts about some small computing projects I’ve managed to tinker with between bouts of pain medication.

A tease of future topics:

  • My early experience with the Kickstarter project Modulo, created by former Pixar colleague Erin Tomson, including an unboxing video and my first impressions
  • Experience setting a home theater setup using Kodi
  • Some new hardware from China

Stay tuned!

Another quick iPhone astrophotograph

September 30, 2015 | Astronomy | By: Mark VandeWettering

Got home around 11:00PM, and while there was a lot of high clouds, there was a break that revealed the stars of Cassiopeia and Andromeda which I snapped using NightCap Pro on my iPhone 6. The clouds did scatter a lot of light around, I mangled the image a bit using Gimp to make the stars stand out a bit more.

cass

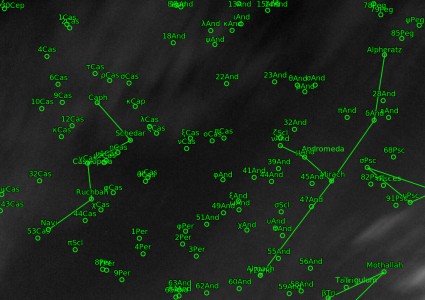
Addendum: Astrometry.net did a pretty good job of identifying the field.

cass-map

Astrophotography with just my iPhone 6…

September 28, 2015 | Astronomy, Photography | By: Mark VandeWettering

While I was dinking around with my binoculars during the eclipse last night, I decided to try to hunt for an application which would allow me to have better control over the exposures etc. on my iPhone. I found the program Manual, which gives SLR like controls (more on that some other time) but I also found out about NightCap Pro, a program that can be used to take star trail photos and long exposures. For a mere $1.99, I could not resist. I downloaded it, read over the manual, and wandered out into my backyard. I couldn’t immediately find my iPhone tripod, so I just rested it on a flower pot aimed roughly up the hill, and snapped this photo with a roughly 30 second exposure.

NightCap Pro-Photo

I was actually pretty impressed. You can see clearly a few stars, as well as the high clouds. The scattered light from my porch and the full moon was enough to clearly show the color of the foiliage as well as my humming bird feeder. I mulled for a moment about what constellation I was looking at, but then realized the bright star was Vega, and the stars above and to the left of it were Lyra. I cropped it down to eliminate the terrestrial landmarks. You can see that the star images are pretty soft and out of focus, I didn’t figure out how to lock the focus at infinity, I’ll try in the future.

fullsize-orig

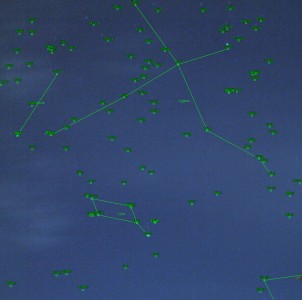
If you haven’t heard of astrometry.net, it is a cool website which allows you to upload star field pictures, and it will figure out where the stars were aiming, and then label the stars and constellations. When I handed it the cropped version, it confirmed my suspicion that it was Lyra, but also showed the stars in Cygnus that are above it.

fullsize

Great fun! The program can also take pictures of star trails and satellites. I’ll have to give that a try sometime soon. Stay tuned.

The lunar eclipse was just an excuse to haul out my binoculars…

September 27, 2015 | Astronomy, Optics, Telescopes | By: Mark VandeWettering

Tonight was a total lunar eclipse…

eclipse

Lunar eclipses are pretty, but not super rare. Tonight’s started before moonrise, and by the time I got out to snap a picture or two, totality was already over. More interesting perhaps than the eclipse was the optical gadget that I pulled out to have a look.

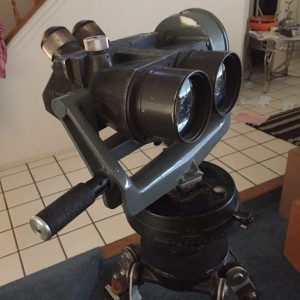
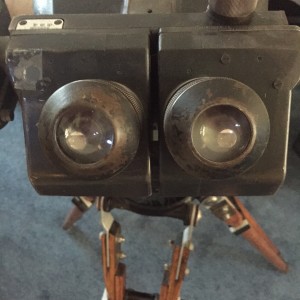
Over the years, I’ve acquired a bunch of optical gadgets at auctions and garage sales, and through my hobby of building telescopes. One of my best acquisitions were a pair of tripod mounted binoculars. I haven’t had them out in a few years, but the eclipse gave me an excuse.

IMG_0536

IMG_0538

IMG_0539

These are German WWII aircraft spotting binoculars, probably manufactured after 1942. I got them at an auction of optical gadgets from the estate of a Chabot Telescope Makers Club (whose name is shamefully escaping me at the moment). I do remember that Kevin Medlock was the auctioneer, and made sure that I didn’t get them too cheaply. I believe that he had a pair that he restored, and if memory serves, he replaced the eyepieces with better Erfle eyepieces (which he machined to fit in the original barrels) and had the objectives sputter coated.

Mine aren’t so cool, but they are in pretty good shape.

I know I looked up some details on them when I acquired them, but I am not certain I wrote anything down, so tonight I dug around trying to find more information about them.

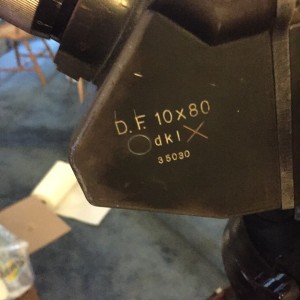
Looking at the markings is helpful. 10×80 is the specification of the binoculars, just like modern binoculars. 10×80 indicates that the objectives are 80mm, and they magnify 10x. D.F. stands for Doppelfernrohr (double telescope). The initials above the serial number are “dkl”, which indicates that they were made by Josef Schneider, Kreuznach. Binoculars of this type were manufactured by a number of different companies, all comparable in terms of their performance and quality.

A nicer pair (without the tripod and mount) were auctioned off at Bonhams for a lot more than I paid for them.

Here’s an article on restoring them.. He includes some great information about the type:

In 1936, Emil Busch AG of Rathenow won a contract to produce a 10x binocular for air observation for the German military. Leitz and Möller each produced competing prototypes, but the Busch model was chosen for its lighter weight (6.5 kg vs. 9.25kg for the Möller and 8.5kg for the Leitz) and greater field of view (131m at 1000m vs. 105m/113m for the Möller/Leitz models). Production began soon afterwards and continued through the war, when the Busch design was also produced by other firms in Germany and occupied Poland. The markings of the different factories are listed in the following section. All models have identical optical systems: 80mm cemented achromatic objectives with 280mm focal length, 70-deg eyepieces, 45-deg Schmidt roof prisms. Due to allied bombing, the 10x80s were primarily used for identifying attacking aircraft and directing the large 4m rangefinders, searchlights and cannons of the anti-aircraft batteries around German cities. They also proved useful on the battlefield, and a version with 20-deg inclined eyepieces was produced for use at sea. A single half of the 10×80 binocular served as Z.F. (Zielfernrohr) 10×80, a sight for the 8.8cm artillery.

Mine are missing a few parts: there is some sort of mounting block which is over the top, and mine is missing the filter wheel that is toggled from a (missing in my pair) knob to the left of the viewer. I’ve put a piece of Scotch tape over the empty hole to keep dust from getting inside. Mine are also missing

Thousands of these were made, and a lot of them are still kicking around. They are pretty awesome for doing astronomy. The tripod I have is made from a solid hardwood (oak, I suspect) and is super strong and stable. A lot of the ones I see on eBay and the like have been stripped of their original finish, and often are buffed to a comically shiny bare metal look. Yuck. I suppose since many are recovered from damaged condition, not much is loss, but mine are in pretty good shape, so I think I’ll try to keep them as original as I can.

Tonight’s picture was captured by just holding my iPhone to one of the eyepieces. The view through the eyepieces is quite a bit nicer, the low light makes the autofocus not function well, and you can see there is a lot of noise in the sensor.

Over the next few days, I might do a similar post about my microscope. Stay tuned.

Addendum: After totality had completely ended, I went out and took this shot. It was difficult to get the iPhone to set the exposure correctly, and I used the digital zoom feature to get it large. The result has a pretty good view of the larger features, but is kind of mushy and looks like it was painted, rather than photographed. Still, you can see the system of rays emanating from the crater Tycho. I wonder if there are camera applications for the iPhone that allow better adjustment of parameters. I may try again sometime soon.

On calculators, Space Invaders and Binary Coded Decimal Arithmetic…

September 21, 2015 | Computer Science, Development Boards, Emulation, Math, Microcontrollers, My Projects | By: Mark VandeWettering

A couple days ago, one of my Twitter or Facebook friends (sadly, I forgot who, comment if it was you, and I’ll give you credit) pointed out this awesome page:

Reversing Sinclair’s amazing 1974 calculator hack – half the ROM of the HP-35

It documented an interesting calculator made by Sinclair in the 1970s. It is an awesome hack that was used to create a full scientific calculator with logarithms and trigonometric functions out of an inexpensive chip from TI which could (only barely) do add, subtract, multiply and divide. The page’s author, Ken Shirriff, wrote a nifty little simulator for the calculator that runs in the browser. Very cute. It got me thinking about the bizarre little chip that was at the center of this device.

I’m kind of back in an emulator kick. I recently had dusted off my code that I had started for emulating the 8080 processor. I had originally wanted to implement a version of CP/M, but I remembered that the 1978 game Space Invaders was also based upon the 8080. It wasn’t hard to find a ROM file for it, and with a little bit of hacking, research and debugging, I had my own version of Space Invaders written in C and using SDL2, running on my Mac laptop.

Screen Shot 2015-09-16 at 12.46.01 PM

Fun stuff.  The sound is a little crude: most of the sound in the original game was generated by a series of discrete circuits which you can find on this page archived via the Wayback Machine. I briefly played around with simulating some of the sounds using LTSpice based upon these circuits (it appears to work fairly well), but I haven’t got that fully integrated into my simulator yet. For now, it just queues up some recorded sounds and plays them at the appropriate time. Everything is currently working except for the classic “thump… thump…” of their marching. I’ll get that working sometime soon.

Anyway, back to calculators. One thing on Ken’s page kind of made me think: he mentioned that the HP-35 had taken two years, twenty engineers, and a million dollars to develop. Mind you, the HP-35 was pretty revolutionary for its time. But I thought to myself “isn’t a calculator an easy hobby project now?”

After all, I had assembled a KIM-Uno, Oscar’s awesome little $10 board that emulates the KIM-1 microcomputer:

In fact, the KIM-Uno implements a floating point calculator as well. It’s brains are just an ordinary Arduino Pro Mini wired on the back. Arduino Pro Minis can be had for less than $3 from China. Could I make a fun little calculator using that as the basis?

My mind is obviously skipping around a lot at this point.

Of course, a bit more googling revealed that someone had done something very similar using the MSP430 chips from (appropriately enough, also manufactured by Texas Instruments). Check out the build thread here.. It’s pretty nifty, and uses a coin cell to drive it, as well as some very classic looking “bubble LED displays”, which you can get from Sparkfun. Pretty cool.

Anyway…

For fun, I thought it might be fun to write some routines to do binary coded decimal arithmetic. My last real experience with it was on the 6502 decades ago, and I had never done anything very sophisticated with it. I understood the basic ideas, but I needed some refresher, and was wondering what kind of bit twiddling hacks could be used to implement the basic operations. Luckily, I stumbled onto Douglas Jones’ page on implementing BCD arithmetic, which is just what the doctor ordered. He pointed out some cool tricks and wrinkles associated with various bits of padding and the like. I thought I’d code up a simple set of routines that stored 8 BCD digits in a standard 32 bit integer. His page didn’t include multiplication or division. Multiplication was simple enough to do (at least in this slightly crazy “repeated addition” way) but I’ll have to work a bit harder to make division work. I’m not sure I really know the proper way to handle overflow and the sign bits (my multiplication currently multiplies two 8 digit numbers, and only returns the low 8 digits of the result). But.. it seems to work.

And since I haven’t been posting stuff to my blog lately, this is an attempt to get back to it.

Without further ado, here is some code:

[sourcecode lang=”C”]
/*
* A simple implementation of the ideas/algorithms in
* http://homepage.cs.uiowa.edu/~jones/bcd/bcd.html
*
* Written with the idea of potentially doing a simple calculator that
* uses BCD arithmetic.
*/

#include <stdio.h>
#include <stdint.h>
#include <inttypes.h>

typedef uint32_t bcd8 ; /* 8 digits packed bcd */

int
valid(bcd8 a)
{
bcd8 t1, t2, t3, t4 ;
t1 = a + 0x06666666 ;
t2 = a ^ 0x06666666 ;
t3 = t1 ^ t2 ;
t4 = t3 & 0x111111110 ;
return t4 ? 0 : 1 ;
}

bcd8
add(bcd8 a, bcd8 b)
{
bcd8 t1, t2, t3, t4, t5, t6 ;

t1 = a + 0x06666666 ;
t2 = t1 + b ;
t3 = t1 ^ b ;
t4 = t2 ^ t3 ;
t5 = ~t4 & 0x11111110 ;
t6 = (t5 >> 2) | (t5 >> 3) ;
return t2 – t6 ;
}

bcd8
tencomp(bcd8 a)
{
bcd8 t1 ;

t1 = 0xF9999999 – a ;
return add(t1, 0x00000001) ;
}

bcd8
sub(bcd8 a, bcd8 b)
{
return add(a, tencomp(b)) ;
}

bcd8
mult(bcd8 a, bcd8 b)
{
bcd8 result = 0 ;
bcd8 tmp = a ;
bcd8 digit ;
int i, j ;

for (i=0; i<8; i++) {

digit = b & 0xF ;
b >>= 4 ;

for (j=0; j<digit; j++)
result = add(result, tmp) ;

tmp <<= 4 ;
}
return result ;
}

int
main(int argc, char *argv[])
{
bcd8 t = 0x00009134 ;
bcd8 u = 0x00005147 ;
bcd8 r ;

r = mult(t, u) ;
printf("%X * %X = %X\n", t, u, r) ;
}
[/sourcecode]

I’ll have to play around with this some more. It shouldn’t be hard to move code like this to run on the Arduino Pro Mini, and drive 3 bubble displays (yielding 11 digits plus a sign bit) of precision. And I may not use this 8 digits packed into 32 bit format: since I want 12 digits, maybe packing only 4 digits into a 32 bit word would work out better.

Anyway, it’s all kind of fun to think about the clanking clockwork that lived inside these primitive machines.

I’ll try to post more often soon.

The ESP8266…

July 28, 2015 | Embedded, ESP8266, LED | By: Mark VandeWettering

I’ve been quiet lately, but mostly because what tinkering I’ve been doing has been relatively limited in scope. But one thing I have begun to play with a lot are various tiny development boards based upon the Espressif ESP8266 WiFi chip. I’ve mentioned them a bit before, but I’ve made some progress since then (and the platform has as well) so I thought I would give you an update.

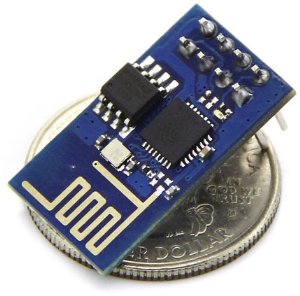
51oc+lvXC3L._SX300_First of all, the hardware. There are lots of different development boards which use this chipset. The smallest and least expensive is the ESP-01, which probably costs around $3.50 if you look around, maybe even cheaper via eBay. You’ll pay about $7 or so from Amazon or the other major dealers, but companies like ElectroDragon have them for half that. The ESP-01 is really small, but not very breadboard friendly, since it has its 8 pins in a 2×4 array. They also have a fairly limited number of GPIO pins: notably, two (and GPIO 0 needs to be able to be pulled low to start the flash bootloader).

You can get a plethora of other modules (popular ones are the ESP-12 surface mount modules) that bring more pins to the output, but I wanted something with the ability to be put in a breadboard for experimentation, so I stared at three different modules:

  • The NodeMCU which I purchased from Electrodragon. This was the first version of this board, which has a couple of quirks: it’s wide, almost takes up the entire width of the breadboards that I have, which is kind of annoying. It also has a yellow soldermask with white lettering, which is pretty difficult to read, even with bright light and magnification. And, it uses an offbrand serial/USB chip which is supported under Linux, but might require driver downloads if you have Windows or Mac OS X. I’m told that their new version fixes that: it’s narrower because it is based upon an ESP-12E module, it uses the slightly more common CP2102 chip for serial/USB and as a bonus, it doesn’t require you to hold down the rest key to reprogram. I don’t have one of those yet, but it seems like a pretty nice little module.
  • The Adafruit Huzzah board is similar to the ElectroDragon, but has a couple of nice changes. First of all, it’s a product of Adafruit, and I like to support companies that actively support user communities. It’s similarly small, but has much nicer labels that are reasonably easy to read. Unlike the ElectroDragon board, it has just a raw TTL serial connection (six pins on the end) so you’ll need a USB/Serial cable to talk to it and program it. Luckily, this design has included circuitry to change the levels of the TX/RX lines to be compatible with 5V programming cables, which are a bit more common. Note: there is no level shifting on the other GPIO pins. The board comes shipped with a couple of rows of header pins you have to snap off and solder in place yourself. I would have liked it had they included a 6 pin right angle set too: when you solder in the programming pins, they are pretty close to the reset button which you need to hit fairly often, making them right angle would have helped. It comes programmed with the NodeMCU firmware, which is based upon the Lua programming language, which is a compact programming language that has gained some popularity in the game world. More on that later…
  • The Sparkfun “Thing” board is a similar board which is a bit more expensive ($16) but has some additions that make it attractive. Most notably, it has an on-board LiPo battery charger and power supply, which means that if you wanted to do something battery powered, this might be a good way to go. Like the Huzzah board, it needs an FTDI cable, but it does NOT have levelshifting, you should use the 3.3V programming cables. I don’t have one of these yet, but I probably will soon. It should also be noted that Sparkfun also has a $15 WiFi Shield that you can attach to the Arduino, which is basically has the same brains, but put in a formfactor that can easily attach to an Arduino. Very nice.

Out of the box, each of these boards except the Adafruit Huzzah supports the “AT command” firmware. If you are as old as me and remember the days of the Hayes Modem, you might remember issuing AT commands to the modem to get it to dial a remote BBS. This firmware works kind of the same way: there are a bunch of commands which begin with AT that allow you to connect to local WiFi networks, establish network connections, and send and receive data. If you have a project which uses the Arduino (or almost any other small micro like the Teensy) that you want to connect to the Internet via WiFi, using one of these modules with the AT command firmware might be a reasonable way to go. You merely attach the serial port on the ESP8266 board to your Arduino, and then you can send commands to it and receive data back. Very cute.

But the system itself is more powerful. The processor on the board is surprisingly capable: it’s a 32 bit processor, running at 80Mhz, with 64 K of instruction RAM, 96K of data RAM, and 64K of boot ROM. It has 9 GPIO pins, and can do I2C, SPI, PWM, and even has a slightly odd ADC channel (max voltage 1.8v). And, what’s pretty neat is that the manufacturer has done quite a bit to encourage people to program them. They release a set of SDK libraries which are reasonably complete, and lots of people have starting writing their own programs in C/C++. When used this way, the boards may not even need a separate microcontroller like the Arduino: it can do all the work itself.

I’m not going to explain all the details here, but you’ll need a compiler and a tool for downloading code to the ESP8266. There are several ways that you can do that:

  • I like to use PlatformIO, which supports ESP8266. If you are interested in doing code for embedded development boards, check out platformio. I’ve mentioned it before, and I’m super glad that the ESP8266 is supported. Basically, it’s a simple command line shell that enables you to ignore a lot of the download/compile/configuration of the tools you’ll need. You simply tell it to build a project for the ESP-01 with the command “platformio init –board=esp-01” and it makes sure that you have all the right libraries/compilers/utilities. It also installs the Arduino framework for Espressif, which means that if you are used to writing Arduino code with the setup/loop structure, you can write code the same way for the ESP8266. Earlier last week, I used this to code up a simple sketch which took temperature readings from a DS18B20 1-Wire temperature module, and upload it to the phant.io data server on data.sparkfun.com. It’s been running for a few days, and if I pull down the information, you can see how the temperature in my living room has been varying…temp
  • You can use ESP8266 support in the Arduino environment. Modern versions of the Arduino software support installation of third party packages that allow you to use the Arduino IDE with third party platform packages. I haven’t tried this, but this is probably the easiest way to get into programming the bare metal.
  • You can use pfalcon’s Open SDK. I think this is a tiny bit misleading: it’s really just an easy way to build the necessary cross compilers: the SDK is still the no-source binary blobs that Espressif sends you. I also had some difficulty getting this to work properly on Mac OS X. But if you want to recompile the “nodemcu” firmware from source, you’ll need this.

There are a couple of issues which seem to be different between the various boards as well. Most of them require that you pull the GPIO 0 pin low (tie it to ground) to reflash the chip. On the ESP-01 boards, you usually do this by moving a jumper to tie it low, then powering up the chip. On the NodeMCU boards, they have a nifty little button, if you hold it down before starting programming, it will do the right thing. The Adafruit Huzzah board is a little bit odd, you hold down the GPIO 0 button, and while holding it down, click the RESET button and release it. I understand that the Sparkfun boards might actually use the DTR (or some such) pin on the programming cable to do the switching for you, which means that it can do so without button pressing. Whatever board you get, check documentation online and see what you need to do to make it work.

Another issue is labelling of pins. If there is one thing that Arduino got right, it was that if you use the pin number which are printed on the board to identify each pin, you’ll be fine: the table which converts between those numbers and the proper port/offset is well handled, and things mostly just work. On the ESP-01, there are simply no labels. On the NodeMCU, many of the pins are labelled D0-D7. On the Adafruit, pins are labelled with the underlying GPIO port numbers. But if you use those numbers in a sketch, imagining that something labeled pin 16 should enable you to call it pin 16, you’d be mistaken. And, it’s far from clear to me that boards do this at all consistently: you might need to think really hard to find out what the mapping is, and it might vary (I’m pretty sure that the NodeMCU hardware and the Adafruit Huzzah have different mappings, so the code will have to be different to address the same pin.)

All that being said, the ESP8266 in its many forms is a very cool little processor, all priced at a pittance. Worth exploring. I’ll have more information on projects as I move forward on them.

One dimensional cellular automata code in Python..

July 9, 2015 | Computer Science, Math, Python | By: Mark VandeWettering

Inspired by the KnitYak Kickstarter, I thought I would code up a simple Python program that could generate the same sort of patterns that are used in the scarves in the video. If you want to learn more about the mathematical theory of these cellular automata, google for keywords like “1D” “cellular automata” and “steve wolfram”. Without much further explanation, here is the code:

[sourcecode lang=”python”]
#!/usr/bin/env python

# __
# ___ __ __ _ _ _ / _|
# (_-</ _/ _` | ‘_| _|
# /__/\__\__,_|_| |_|
#
# Inspired by the KnitYak Kickstarter, which offers
# mathematical scarves whose patterns are algorithmically
# generated, I thought it would be good to dust off my old
# knowledge and generate the same sort of patterns using
# Python. The patterns are simply printed using ASCII,
# but the code could be adapted to output in other forms
# easily.
#
# Written by Mark VandeWettering
#

import sys
import random

WIDTH=79 # How wide is the pattern?

w = WIDTH * [0] # create the current generation
nw = WIDTH * [0] # and the next generation
w[WIDTH/2] = 1 # populate with a single one

# or alternatively, you can populate it with a random
# initial configuration. If you want to start with
# just a single one, comment the next two lines out.

#for i in range(WIDTH):
# w[i] = random.randint(0, 1)

# How wide is the neighborhood of cells that are
# examined? The traditional Wolfram 1D cellular
# automata uses a neighborhood of 3…

NEIGHBORHOOD=3

# rtab is space for the rule table. It maps all
# numbers from [0, 2**NEIGHBORHOOD) to either a 0 or 1.
rtab = (2**NEIGHBORHOOD) * [0]

# The "rule" is a number which is used to populate
# rtab. The number is in the range [0, 2**(2**NEIGHBORHOOD))
# Many rules generate uninteresting patterns, but some
# like 30 generate interesting, aperiodic patterns.
rule = 30

# This fills in the table…
for i in range(2**NEIGHBORHOOD):
if ((2**i) & rule) != 0:
rtab[i] = 1

def dump(r):
for x in r:
if x == 1:
sys.stdout.write(‘X’)
else:
sys.stdout.write(‘ ‘)
sys.stdout.write(‘\n’)

# and generates 100 lines…

for y in range(100):
dump(w)
for x in range(WIDTH):
sum = 0
for d in range(NEIGHBORHOOD):
sum = sum + (2**d) * w[(x+d+WIDTH – NEIGHBORHOOD/2) % WIDTH]
nw[x] = rtab[sum]
w, nw = nw, w
[/sourcecode]

The pattern this generates with these settings follows. Try adjusting rule to other numbers up to 255 to generate other patterns. Lots will be boring, but some will be pretty interesting.

                                                                               
                                       X                                       
                                      XXX                                      
                                     X  XX                                     
                                    XXXX XX                                    
                                   X   X  XX                                   
                                  XXX XXXX XX                                  
                                 X  X    X  XX                                 
                                XXXXXX  XXXX XX                                
                               X     XXX   X  XX                               
                              XXX   X  XX XXXX XX                              
                             X  XX XXXX X    X  XX                             
                            XXXX X    X XX  XXXX XX                            
                           X   X XX  XX  XXX   X  XX                           
                          XXX XX  XXX XXX  XX XXXX XX                          
                         X  X  XXX  X   XXX X    X  XX                         
                        XXXXXXX  XXXXX X  X XX  XXXX XX                        
                       X      XXX    X XXXX  XXX   X  XX                       
                      XXX    X  XX  XX    XXX  XX XXXX XX                      
                     X  XX  XXXX XXX XX  X  XXX X    X  XX                     
                    XXXX XXX   X   X  XXXXXX  X XX  XXXX XX                    
                   X   X   XX XXX XXXX     XXXX  XXX   X  XX                   
                  XXX XXX X X   X    XX   X   XXX  XX XXXX XX                  
                 X  X   X X XX XXX  X XX XXX X  XXX X    X  XX                 
                XXXXXX XX X  X   XXXX  X   X XXX  X XX  XXXX XX                
               X     X  X XXXXX X   XXXXX XX   XXXX  XXX   X  XX               
              XXX   XXXXX     X XX X    X  XX X   XXX  XX XXXX XX              
             X  XX X    XX   XX  X XX  XXXX X XX X  XXX X    X  XX             
            XXXX X XX  X XX X XXXX  XXX   X X  X XXX  X XX  XXXX XX            
           X   X X  XXXX  X X    XXX  XX XX XXXX   XXXX  XXX   X  XX           
          XXX XX XXX   XXXX XX  X  XXX X  X    XX X   XXX  XX XXXX XX          
         X  X  X   XX X   X  XXXXXX  X XXXXX  X X XX X  XXX X    X  XX         
        XXXXXXXXX X X XX XXXX     XXXX     XXXX X  X XXX  X XX  XXXX XX        
       X        X X X  X    XX   X   XX   X   X XXXX   XXXX  XXX   X  XX       
      XXX      XX X XXXXX  X XX XXX X XX XXX XX    XX X   XXX  XX XXXX XX      
     X  XX    X X X     XXXX  X   X X  X   X  XX  X X XX X  XXX X    X  XX     
    XXXX XX  XX X XX   X   XXXXX XX XXXXX XXXX XXXX X  X XXX  X XX  XXXX XX    
   X   X  XXX X X  XX XXX X    X  X     X    X    X XXXX   XXXX  XXX   X  XX   
  XXX XXXX  X X XXX X   X XX  XXXXXX   XXX  XXX  XX    XX X   XXX  XX XXXX XX  
 X  X    XXXX X   X XX XX  XXX     XX X  XXX  XXX XX  X X XX X  XXX X    X  XX 
XXXXXX  X   X XX XX  X  XXX  XX   X X XXX  XXX  X  XXXX X  X XXX  X XX  XXXX XX
     XXXXX XX  X  XXXXXX  XXX XX XX X   XXX  XXXXXX   X XXXX   XXXX  XXX   X   
    X    X  XXXXXX     XXX  X  X  X XX X  XXX     XX XX    XX X   XXX  XX XXX  
   XXX  XXXX     XX   X  XXXXXXXXXX  X XXX  XX   X X  XX  X X XX X  XXX X   XX 
  X  XXX   XX   X XX XXXX         XXXX   XXX XX XX XXX XXXX X  X XXX  X XX X XX
XXXXX  XX X XX XX  X    XX       X   XX X  X  X  X   X    X XXXX   XXXX  X X  X
    XXX X X  X  XXXXX  X XX     XXX X X XXXXXXXXXXX XXX  XX    XX X   XXXX XXX 
   X  X X XXXXXX    XXXX  XX   X  X X X           X   XXX XX  X X XX X   X   XX
X XXXXX X      XX  X   XXX XX XXXXX X XX         XXX X  X  XXXX X  X XX XXX X X
X     X XX    X XXXXX X  X  X     X X  XX       X  X XXXXXX   X XXXX  X   X X  
XX   XX  XX  XX     X XXXXXXXX   XX XXX XX     XXXXX      XX XX    XXXXX XX XXX
 XX X XXX XXX XX   XX        XX X X   X  XX   X    XX    X X  XX  X    X  X    
X X X   X   X  XX X XX      X X X XX XXXX XX XXX  X XX  XX XXX XXXXX  XXXXXX   
X X XX XXX XXXX X X  XX    XX X X  X    X  X   XXXX  XXX X   X     XXX     XX X
X X  X   X    X X XXX XX  X X X XXXXX  XXXXXX X   XXX  X XX XXX   X  XX   X X  
X XXXXX XXX  XX X   X  XXXX X X     XXX     X XX X  XXXX  X   XX XXXX XX XX XXX
X     X   XXX X XX XXXX   X X XX   X  XX   XX  X XXX   XXXXX X X    X  X  X    
XX   XXX X  X X  X    XX XX X  XX XXXX XX X XXXX   XX X    X X XX  XXXXXXXXX  X
 XX X  X XXXX XXXXX  X X  X XXX X    X  X X    XX X X XX  XX X  XXX        XXX 
X X XXXX    X     XXXX XXXX   X XX  XXXXX XX  X X X X  XXX X XXX  XX      X  XX
X X    XX  XXX   X   X    XX XX  XXX    X  XXXX X X XXX  X X   XXX XX    XXXX  
X XX  X XXX  XX XXX XXX  X X  XXX  XX  XXXX   X X X   XXXX XX X  X  XX  X   XXX
X  XXXX   XXX X   X   XXXX XXX  XXX XXX   XX XX X XX X   X  X XXXXXX XXXXX X   
XXX   XX X  X XX XXX X   X   XXX  X   XX X X  X X  X XX XXXXX      X     X XX X
  XX X X XXXX  X   X XX XXX X  XXXXX X X X XXXX XXXX  X     XX    XXX   XX  X  
 X X X X    XXXXX XX  X   X XXX    X X X X    X    XXXXX   X XX  X  XX X XXXXX 
XX X X XX  X    X  XXXXX XX   XX  XX X X XX  XXX  X    XX XX  XXXXXX X X     XX
 X X X  XXXXX  XXXX    X  XX X XXX X X X  XXX  XXXXX  X X  XXX     X X XX   X  
XX X XXX    XXX   XX  XXXX X X   X X X XXX  XXX    XXXX XXX  XX   XX X  XX XXX 
 X X   XX  X  XX X XXX   X X XX XX X X   XXX  XX  X   X   XXX XX X X XXX X   X 
XX XX X XXXXXX X X   XX XX X  X  X X XX X  XXX XXXXX XXX X  X  X X X   X XX XXX
 X  X X      X X XX X X  X XXXXXXX X  X XXX  X     X   X XXXXXXX X XX XX  X    
XXXXX XX    XX X  X X XXXX       X XXXX   XXXXX   XXX XX       X X  X  XXXXX   
    X  XX  X X XXXX X    XX     XX    XX X    XX X  X  XX     XX XXXXXX    XX X
X  XXXX XXXX X    X XX  X XX   X XX  X X XX  X X XXXXXX XX   X X      XX  X X X
XXX   X    X XX  XX  XXXX  XX XX  XXXX X  XXXX X      X  XX XX XX    X XXXX X  
  XX XXX  XX  XXX XXX   XXX X  XXX   X XXX   X XX    XXXX X  X  XX  XX    X XXX
XX X   XXX XXX  X   XX X  X XXX  XX XX   XX XX  XX  X   X XXXXXX XXX XX  XX   X
 X XX X  X   XXXXX X X XXXX   XXX X  XX X X  XXX XXXXX XX      X   X  XXX XX X 
XX  X XXXXX X    X X X    XX X  X XXX X X XXX  X     X  XX    XXX XXXX  X  X XX
 XXXX     X XX  XX X XX  X X XXXX   X X X   XXXXX   XXXX XX  X  X    XXXXXXX   
X   XX   XX  XXX X X  XXXX X    XX XX X XX X    XX X   X  XXXXXXXX  X      XX  
XX X XX X XXX  X X XXX   X XX  X X  X X  X XX  X X XX XXXX       XXXXX    X XXX
 X X  X X   XXXX X   XX XX  XXXX XXXX XXXX  XXXX X  X    XX     X    XX  XX    
XX XXXX XX X   X XX X X  XXX   X    X    XXX   X XXXXX  X XX   XXX  X XXX XX   
 X    X  X XX XX  X X XXX  XX XXX  XXX  X  XX XX     XXXX  XX X  XXXX   X  XX X
 XX  XXXXX  X  XXXX X   XXX X   XXX  XXXXXX X  XX   X   XXX X XXX   XX XXXX X X
  XXX    XXXXXX   X XX X  X XX X  XXX     X XXX XX XXX X  X X   XX X X    X X X
XX  XX  X     XX XX  X XXXX  X XXX  XX   XX   X  X   X XXXX XX X X X XX  XX X X
 XXX XXXXX   X X  XXXX    XXXX   XXX XX X XX XXXXXX XX    X  X X X X  XXX X X  
X  X     XX XX XXX   XX  X   XX X  X  X X  X      X  XX  XXXXX X X XXX  X X XX 
XXXXX   X X  X   XX X XXXXX X X XXXXXXX XXXXX    XXXX XXX    X X X   XXXX X  X 
    XX XX XXXXX X X X     X X X       X     XX  X   X   XX  XX X XX X   X XXXX 
   X X  X     X X X XX   XX X XX     XXX   X XXXXX XXX X XXX X X  X XX XX    XX
X XX XXXXX   XX X X  XX X X X  XX   X  XX XX     X   X X   X X XXXX  X  XX  X X
X  X     XX X X X XXX X X X XXX XX XXXX X  XX   XXX XX XX XX X    XXXXXX XXXX  
XXXXX   X X X X X   X X X X   X  X    X XXX XX X  X  X  X  X XX  X     X    XXX
    XX XX X X X XX XX X X XX XXXXXX  XX   X  X XXXXXXXXXXXXX  XXXXX   XXX  X   
   X X  X X X X  X  X X X  X      XXX XX XXXXX             XXX    XX X  XXXXX  
  XX XXXX X X XXXXXXX X XXXXX    X  X  X     XX           X  XX  X X XXX    XX

I will experiment with larger rules: the space of possible behaviors with a neighborhood of 5 is quite a bit larger (there are 2**32 possible rules instead of just 256).

The Kim-Uno — a Kim-1 simulator

July 4, 2015 | Arduino, Emulation, My Projects, Retrocomputing | By: Mark VandeWettering

Ken Boak had mentioned on twitter that someone was creating a blinken-lights front end for the simh simulator of the PDP-8, called the PiDP-8, since you can power the entire thing from a Raspberry Pi. Very cool, but not quite available yet. What was available from Oscar is the Kim-Uno, a simulator for the old KIM-1 computer, a single board computer based upon the MOS6502 with a simple LED display and a whopping 1K of memory, first shipped in 1977 or so for about $245. The simulator is incredibly simple: a board, buttons, leds, and an Arduino Micro to drive it all. I went ahead and ordered one, just for kicks.

But you don’t actually need the hardware to play with this: you can get the code running on an ordinary Arduino Uno. So I did. It’s setup to run Microchess out of the box. Microchess is cool because it can play chess in less than 1K of code, and probably was the first commercial game software produced for hobbyist computers.

The Kim-Uno sketch is a little bit odd though. I’ve begun tinkering with it, and cleaning it up a bit. First of all, I thought it was confusing the way it tried to include the 6502 core emulation (written by Mike Chambers). It is written in C, and to merge it into the sketch required a bit of chicanery using ‘extern “C”‘ directives. Bleh, I renamed cpu.c to cpu.cpp, and cleaned that up. I fixed some forward declarations. I uncovered a couple of bugs by paying attention to compiler warnings. It won’t even come close to compiling on non-Arduino platforms, so I deleted lots of conditional definitions. And I generally just tidied things up. Along the way, I checked out the code that Oscar put in to scan the six digit display, which took a lot of pins. As is happens, I had an 8 digit display which used the 74HC595, which I had gotten working before using an interrupt driven display driver. I merged that code in, and now I had a hardware display like the Kim wired to my Uno. Probably refreshes more often than the original, but looks great!

When I get my code tidied up more, you’ll be able to download it on github. Stay tuned.

The NOAA Magnetic Field Calculator

July 1, 2015 | Amateur Science | By: Mark VandeWettering

Just bookmarking this for now:

The NOAA Magnetic Field Calculator

This website can accept a latitude longitude (or, conveniently, a Zip code) and will give the you predictions of what the inclination and declination of the magnetic field is. John used this apparently to make predictions about the field near my location.

A brief overview of my recent magnetometer experiments…

June 30, 2015 | Amateur Science, Arduino | By: Mark VandeWettering

If you follow me on twitter (@brainwagon) you’ve undoubtedly seen a few mysteriously short tweets about experiments I’ve been performing on magnetometers. It’s hard to give any meaningful context in just 140 characters, so I thought I would dump a short overview of what I’m doing here, in the hope that I’ll turn it into a longer post later.

First of all, the inspiration to experiment with magnetometers comes from John R. Leeman’s blog/website. John posted the following video describing how he used inexpensive magnetometers to microcontrollers like the Arduino to teach about the basics of data acquisition and geophysics.


It was inspiring. As it happens, I had a simple 3 axis magnetometer (manufactured by OSEPP) using the HMC5883L chip. So, walking in his footsteps, I wrote some code for my Wicked Device Wildfire V2 board. It’s basically a member of the Arduino family which has built in wifi. My code basically reads the magnetometer and uploads it to the “phant” data logging server hosted at the Sparkfun website. Using the Python programming language, I can fetch the data from this server, and reformat it so that I can visualize it with gnuplot. For instance, here’s the smoothed data (mx/my/mz) and the computed amplitude and heading.

data

I’m really only just now trying to understand what the data actually means, and how the sensor is affected by things like temperature. This sensor is currently in my upstairs bathroom, which probably has a fairly wide temperature swing, is not level, and is probably closer to nearby metallic options than optimal. I’ll be letting this go in its current state to see if I can spot the diurnal (daily) variation in the heading. I suspect that most of the change in amplitude is actually due to changes in temperature. When I get a chance later this weekend, I’ll reset the device, and add a temperature sensor (probably a DS18B20) and record that along with the magnetic data, and maybe do some work to calibrate the sensor better.

I really like John’s site, and he also co-hosts a nifty geology podcast called the Don’t Panic Geocast. Definitely worth listening to, and inspiring me to learn more about geology, a subject that I admit I know relatively little about. Good stuff!

On quadcopters…

June 18, 2015 | DIY Drones, Quadcopter, Rants and Raves | By: Mark VandeWettering

I’ve been having a bit of fun with my DJI quadcopter lately, but there is something that is annoying me and stressing me in the back of my head, and that’s surrounding the legality of flying quadcopters.

Basically, it’s impossible to determine with any certainty whether flying your quadcopter in any particular place is legal.

Consider my very first time flying with the DJI Phantom 2:


Within minutes of putting birds in the air, the police roll up and inform us that it’s illegal to fly in East Bay Regional Parks. You might imagine that you’d be able to find this rule somewhere: go ahead and read their rules and regulations. This webpage makes the claim that drones are illegal under Ordinance 38, but I was unable to locate any mention of that in the actual ordinance. The term “drone” doesn’t appear in the ordinance. The word video only appears once in section 702, which covers commercial filming, which I was uninterested in. There doesn’t seem to be any regulations covering remote controlled aircraft in Eastbay Parks at all.

Is it illegal? I don’t know. I’m really not interested in engaging in a confrontation with a police officer about it though, so I’m not flying there. Even if it isn’t illegal, you could probably be stupidly cited under some noise ordinance or failing to cooperate with police. Who needs that headache?

So, the question is, where can you actually fly? And where can you be sure that flying is legal?

For those who would argue against spying or presenting a hazard to pedestrians or other park goers, look at the video again. We chose this park and venue precisely because it was far from residential properties, and from other park users. The parking lot was convenient to launch from, but we launched far from other cars, and our flight path was out over unoccupied park land. We want to operate safely and responsibly, and just have some fun snapping some nice pics of the beautiful landscape that surrounds the Bay Area.

Oh, and by the way, what I have isn’t a drone. It’s a model aircraft, in particular, a quadcopter. It is an unmanned aircraft only in the sense that your RC car is a remotely operated motor vehicle. It weighs 2.2 pounds. Call it a toy. Do not call it a drone.